Wreaking Havok with Physics, Part 2
August 24, 2001
by Darrel Plant
In last week's installment, we created a Shockwave3D movie that used Lingo to create a box and three balls that interacted with each other through the rigid body dynamic system provided by the Havok Xtra. In this installment, we'll talk a little about what's going on in the movie, then expand on what we've done by adding some color, interaction with the mouse, and linkages between the balls. Click here to see the final piece.
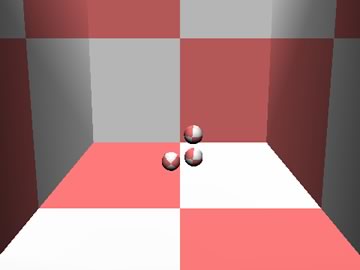
Last week's article ended with three balls in a vertical stack that collapsed as gravity affected them. The balls then roll across the floor of the box until they stop or reach a wall.
Havok
The Havok Xtra was developed in parallel with Shockwave3D, and is integrated into the current version of Shockwave, although it is not a part of the default install for the Player. Shockwave movies that use Havok should have the Download if Needed button checked in the Movie Xtras dialog.
The uncompressed Havok Xtra is about 600K; compressed, it's about 270K. The download is Macromedia-approved, which means that it doesn't trigger a Verisign dialog box.
What Havok provides is a very impressive set of tools to apply what are called rigid body dynamics to objects in the Shockwave3D world. Rigid bodies are objects that don't change their shape when reacting to physical forces like gravity or collisions. In other words, a billiard ball remains a sphere when it hits another ball; a box doesn't squash when it hits a wall; and if a thin surface is balanced on a thin object, it won't bend around it like a sheet on a clothesline.
In addition to collisions and gravity, the Havok Xtra has springs and dashpots. Two objects can be linked together with a spring and when one is moved, the spring between the two will stretch until it reaches a maximum value. Then, as the spring contracts, the object on the other end will have a force applied to it and a series of movements of the two objects will continue until the spring reaches a steady, rest state.
A dashpot is sort of like a very stiff spring. A linear dashpot controls the distance between two objects. Just like with a spring, the distance between the objects is maintained, but the final result is much more quickly achieved, so the appearance is more like that of a solid rod than a springy spring. An angular dashpot restricts the difference in rotation between two objects, transferring the rotational value of one object to the other. In our molecule simulation, we're going to use linear dashpots.
Havok physics properties can be applied to models in the Shockwave3D world in two ways. The first is to use the Reactor plugin for 3DS Max to assign physics properties to the objects there. Those values are exported from Max and imported into Director as an HKE (Havok Export) file.
Physics properties can also be assigned and modified with Lingo. In our movie, we're using a blank Havok physics cast member (inserted in last week's installment) and assigning all of the physical properties through Lingo commands.
The Physics (No HKE) behavior added from the Havok behavior libraries to the Shockwave3D sprite associates the Havok cast member with the 3D world. The behavior initializes the Havok physics engine when the movie starts up, so it should be one of the first behaviors attached to the sprite, since the initialization needs to happen before any properties are defined. This behavior or the version that supports the HKE file should be used, unless you plan to initialize the Havok physics engine yourself through Lingo.
The behavior used to create the world has been used to make the parts of the box into fixed, or immovable, rigid bodies. The three balls have been defined as movable rigid bodies. So far, no constraints (springs and dashpots) have been created, so that's what we'll do next.
Linking the Balls
The code for adding the connections between Ball1, Ball2, and Ball3 (the names of the three sphere models) goes at the end of the script that creates the 3D world:
linearDashpot = hk.makeLinearDashpot ("MyDash", "Ball1", "Ball2")
linearDashpot.strength = 40
linearDashpot.pointA = vector (0.0, -35.0, 0.0)
linearDashpot.damping = 0.5
linearDashpot = hk.makeLinearDashpot ("MyDash2", "Ball2", "Ball3")
linearDashpot.strength = 40
linearDashpot.pointA = vector (0.0, -35.0, 0.0)
linearDashpot.damping = 0.5
end
Two dashpots are defined here: MyDash (which is a link between Ball1 and Ball2) and MyDash2 (a link between Ball2 and Ball3). By default, the end of each link is at the center of mass of one of the two objects. Both have a strength of 40, which is fairly stiff, and a damping value of 0.5, which fairly well cancels out any springiness. The vector value of pointA is the initial distance between the spheres. In the case of MyDash, the default position for the origin of the dashpot would be the center of the sphere of Ball1. This offset value places the origin right smack in the middle of Ball2, coincident with the termination of the dashpot. This setting essentially gives the dashpot a length of 0 units, meaning the ball on the termination of the dashpot will always be trying to maintain a position 35 units in a negative direction from the center of the ball at the origin, along the origin ball's Y axis (not the world's Y axis). Conversely, as the termination ball moves, the origin ball will follow.
If you run the movie at this stage, you'll see the column of balls collapse as before, but each pair connected by a dashpot will maintain their original distance.
Mouse Interaction
To really see the beauty of the Havok system, we're going to employ another of the Havok library behaviors, this time from the Controls library. Drag the Move Model behavior onto the Shockwave3D sprite on the stage and just accept the default values.

As with most of the 3D behaviors, this needs some sort of action to initialize it. Drag the Mouse Left behavior from the 3D > Triggers library and accept its defaults.
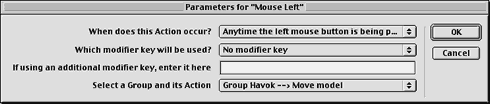
The combination of these two behaviors will make any of the moveable Havok objects (the balls) respond to the click and drag of the mouse. The sides of the box are not affected. Give it a try, and the balls will move like they're connected. Now we can make them look like they're connected.
Color my world
You'll probably notice as you're flinging the balls into the walls that they spin very independently. The default texture makes that fairly obvious. We could use angular dashpots to restrict the rotational movement. But for simplicity's sake, we'll just hide the fact that they're spinning by assigning them a solid color. Just after the resetWorld command in our world setup script, add this chunk of code:
s.resetWorld()
-- create shaders
sh = s.newShader ("nitrogen", #standard)
sh.diffuse = rgb (0, 51, 153)
sh.textureList[1] = VOID
sh = s.newShader ("phosphorus", #standard)
sh.diffuse = rgb (204, 153, 255)
sh.textureList[1] = VOID
sh = s.newShader ("hydrogen", #standard)
sh.diffuse = rgb (255, 255, 255)
sh.textureList[1] = VOID
sh = s.newShader ("carbon", #standard)
sh.diffuse = rgb (0, 0, 0)
sh.textureList[1] = VOID
sh = s.newShader ("oxygen", #standard)
sh.diffuse = rgb (255, 0, 0)
sh.textureList[1] = VOID
sh = s.newShader ("link", #standard)
sh.diffuse = rgb (51, 51, 51)
sh.textureList[1] = VOID
This adds six solid colors (blue, lavender, white, black red, and gray) to the shaders palette. Setting the first element in the textureList to VOID removes the default texture from the new shader.
A shader can now be applied to each of the balls. This code segment how the shader is applied to Ball3 within the existing code (new code in bold):
m = s.newModel("Ball3", mr)
m.transform.position = vector(0, 150, -130)
m.transform.rotation = vector(90,0,0)
m.addModifier(#meshdeform)
m.shader = s.shader ("oxygen")
rb = hk.makeMovableRigidBody(m.name, 10.0)
The balls still spin wildly, but it's not so apparent.
You can download a Mac or Windows version of the Director 8.5 source file so far.
In our final installment, we'll actually draw the rods between the balls and talk about how to orient them.
Copyright 1997-2026, Director Online. Article content copyright by respective authors.