Blur with Imaging Lingo, Part 1
August 29, 2001
by Sébastien Portebois
Read this article in French at: director hors piste.
This article presents the principle of image blurring, and an efficient way to implement the standard schemes to Imaging Lingo, shedding light on the Lingo traps and exploring a workaround.
What is a Blurred Image?
Everyone agrees that blurring an image is 'averaging' it. Or to be more accurate, a blurred image is a copy of the original image where each the pixels has been modified to display the average color value of its neighbourhood.
Let's think of an image like a two-dimensional signal. In fact it's what an image is: the 'first' signal is horizontal, and the 'second' is vertical. (Note : you should remember this to understand why the JPEG-like compression algorithms are the most destructive with the edges of the image, that's where the signal has its highest frequencies, so the most quality loss when compressing and losing data) Blurring recalculates every pixel of the new image, by looking the color value of its surrounding pixels and putting the calculated average value into the destination pixel.
For this we use a convolution matrix, that is, a NxN matrix containing coefficients. The center of this NxN matrix is put on the pixel to update, then we read the value of each pixel surrounding the updated one, and for each pixel we multiply the value read by the coefficient of the appropriate cell of the matrix. The new pixel value is the sum of all the values multiplied by their factors, and divided the total by the coefficient total of the convolution matrix. Although this can be hard to understand, this little demo will show you it step by step and you'll see it's really easy!
definition of the new pixel from its close neighbourhood
The easiest blur uses a 3x3 convolution matrix, all coefficients being 1 (so that the matrix coefficients total is 9), thus the new pixel value is (total color values) / 9. The same techniques are used to do edge detection, simply by changing the coefficients.
And how to blur more? The first solution you'll think about is increasing the convolution matrix size to 5x5, then 9x9 and so on. But the most common solutions is keeping this matrix quite small (3x3 or 5x5), and doing multiple passes. To get a very blurred image you start by a simple blur, from which you do another one, and so on until you've reach the blur level you're looking for.
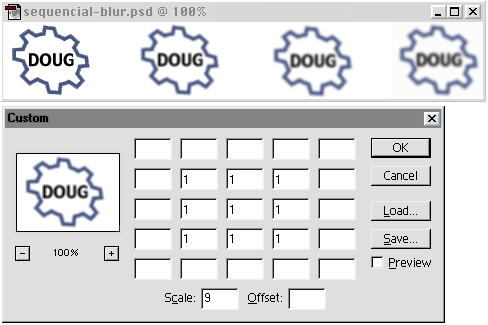
setting up the matrix yourself in Photoshop, and applying the filter three times to get a very blurred image
Converting to Imaging Lingo...
Knowing this, the first Lingo implementation that comes in mind will extensively use getPixel (up to 9 times) and setPixel (once) for each pixel. This will give you a nice blurred image, but you'll have time enough to go away, get a drink, and come back to see the end of the computation. The fact is that setPixel/getPixel commands are really too slow to be used on an entire image. You've entered the dark side of Imaging Lingo.
If you want to try this as an academic exercise, you should take a look to Charles Forman's demos at setpixel.com. Among lots of great examples he has done a Gaussian blur demo based on this technique, very good results, but very long computing.
Why do I call this 'the dark side' of Imaging Lingo? Simply because setPixel and getPixel are the easiest methods to use, but it's like looking at a treasure chest and saying 'What a beautiful treasure chest!", but never opening it and discovering the tremendous potential of copyPixels.
So how can we do this faster?
The setPixel and getPixel commands are slow because of incessant go-and-return between the Lingo Virtual Machine and the tokenized Lingo. So the first workaround that comes is trying to do the blur on the whole image at once..
Using Imaging Lingo Techniques to Speed Up the Blur
The blendLevel parameter of copyPixels enables us to do a 'blend'-copy onto a part of an image object. The idea is not to do the sum of the surroundings on a pixel-by-pixel basis, but on the whole image. Thus, the total division by the total matrix is now replaced by a (1.7 * 255 ) / 9. The 1.7 value is a lightness correction, set on an empirical basis, 255 is the maximum value for blendLevel. Useful results goes from 1 to 4, depending the blur amount you're expecting, which is linked to the loss of brightness loss this workaround must take into account.
So the steps for blurring the image are :
- Create a buffer.
Its size is larger than the original image.... but I'll come back to this point later, - Blend+Offset - copyPixels of the original image into the buffer.
The blend has just been explained. Since the convolution matrix is the same for the whole image, for a 3x3 matrix the offsets will be [-1,-1], [-1,0], [-1,1], [0,-1], [0,1], [1,-1], [1,0] and [1,1] for the blurring images, and [0,0] for the original one. - Cropping the result.
With the copyPixels technique, we should use a destination buffer larger than the original image. Although I find the result very useful, you may want to crop the image to have a blurred image of the same size as the original.
Let's talk about the image size. If we do a 3x3 convolution, we have to add 1 pixel line on the top, one at the bottom of the image, and one column on the left, and a last one on the right. This way we don't have to bother anymore about edge effects (with a pixel-based 3x3 convolution, working on a border pixel, what value will you take for the 3 missing pixels?), and we're free to crop the result.
Still, one point to correct. Although the way I've written the offsets makes it easier to understand, the image coordinates starts at (0,0), so the original image will be copied with an offset of (1,1) to be at the same relative place (the center remains at the center), and so the working offsets are :
  NW     N      NE     E     SE      S     SW      W    center

[0,0], [1,0], [2,0], [2,1], [2,2], [1,2], [0,2], [0,1], [1, 1]
That's it. All the basics are in the open, so now it's time to write code!
-- blurring the image
myImg = pOriginalMember.image.duplicate()
imgW = myImg.width
imgH = myImg.height
buffer1 = myImg.duplicate()
-- NW SE NE SW W E N S center
offsetL = [[0,0], [2, 2], [0, 2], [2, 0], [0, 1], [2, 1], [1, 0], [1, 2], [1,1]]
myBlend = 1.7*255/offsetL.count
-- optional : start a loop for multiple pass
-- repeat with i = 1 to nBlurLevel
-- blurring the image
buffer2 = image( imgW+2*i, imgH+2*i, 32 )
myRect = rect( 0, 0, buffer1.width, buffer1.height )
repeat with j = 1 to 9 -- = offsetL.count
destRect = myRect.offset(offsetL[j][1], offsetL[j][2])
buffer2.copyPixels(buffer1, destRect, myRect, [#blendLevel : myBlend])
end repeat
-- update working buffer
if bCrop then
-- do not crop
buffer1 = buffer2.duplicate()
else
-- crop the result
buffer1 = buffer2.duplicate().crop(myRect.offset(1, 1))
end if
-- end of the optional blurring loop
-- end repeat
-- apply the result
pMember.image = buffer1
The hardest part may be in the declaration and use of the offsetL list. It is just a linear list of the offsets to apply on the copyPixels destination rectangle. This saves use of repeat 9 times for each of the two lines that set destRect and do the copyPixels into the buffer. If theses lines are still hard to understand, I've used easier-to-understand but heavily redundant lines to do the same job without using an offset list. Just take a look on the Blur handler of the 3x3 blur movie script -- everything is there, just remove the double-dashes for the 3-bis section and you've won!
Two implementations of the 3x3 blur handler
A sample Director 8 movie is available for download in Macintosh or Windows format.
Next time we will go on and extend this principle. This case was quite simple -- once the idea was established -- because all the coefficients were equal to 1. We will modify slightly the Blur handler to create Gaussian blur and more.
Copyright 1997-2026, Director Online. Article content copyright by respective authors.