Image Blender
September 26, 2001
by Frank Di Luzio
One of the nicer things about being a subscriber to a forum like DIRECT-L is the sample films. Benjamin Ellison posted one for creating transition effects between images (search DIRECT-L for "cool transition effects" in August 2001). He ended his post by suggesting that someone else take it and make it all nice & "behaviory". I found the example so intriguing that I wanted to make something of it. So I contacted Ben and told him I was up to it. What turned out was a transition script that I could use as a stage transition. Although my script differs from his considerably, the technique he demonstrated remains the same.
These transitions are created by turning a greyscale image into a mask. The mask defines what portions of a overlay image are transparent so it can reveal what is behind it. Using Imaging Lingo, you can alter a mask and apply each change to the overlay image. Applying them in sequence creates a transition.
This article will explain how custom Lingo transition members work. It will only concentrate on the Lingo specifically used to create transitions but there is more to discover for yourself in the scripts of the sample movie.
Using a Lingo Transition Member
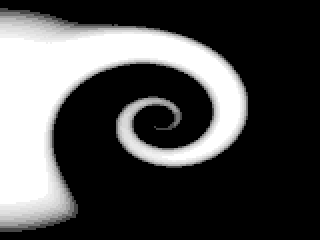
Lingo transition members are 8-bit greyscale images. Let me point out now that in Lingo, it's spelled "grayscale"but I'm a photographer so I'll spell it the way Kodak does. For best results, the image should incorporate the entire scale. That means 256 shades of grey. The swirl transition in the example film illustrates this perfectly.
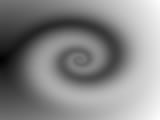
If you run the example film, you'll notice that the swirl transition is animated although the Lingo transition member seen above is only a single greyscale image. How does that happen?
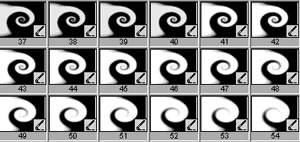
First take a look at this sequence of images made using the swirl image.
This is just part of the transition in action and is made possible by a simple piece of code.
imageObject.createMatte (alphaThreshold)
The entire transition code is built around taming this powerful beast. Now what does it do?
You will recall that the Lingo transition member is a greyscale image with 256 steps of grey. In the figure above, however, you see that parts of the greyscale are missing, so that some portions of the image are now areas of white or black. What you see is a copy of the Lingo transition member modified by the alphaThreshold parameter in the above lingo. The alphaThreshold value can range from 0 to 255 (256 steps from black to white, respectively). If you set the alphaThreshold to a value of 128 (50% grey) any grey value above that will turn black and any value below it will turn white. If you incrementally change the alphaThreshold you get a sequence of images where the black:white ratio changes as seen in the figure above; the white area appears to grow as the alphaThreshold value drops. Furthermore, the white shape is related to the greyscale image being used for the transition.
When an image uses a mask, the black area of the mask defines what you see of the original image (opaque) and the white area of the mask defines what you don't see (transparent). Shades of gray represent varying amounts of transparency. Therefore, based on the figure above, the image using these masks becomes more and more transparent as the white area enlarges.
Let's examine some code to find out how this works.
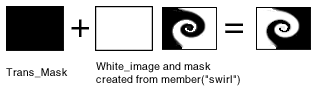
You start out with two 8-bit images using a greyscale palette. The first is a black image and the second is a white image to copy into the black image. You also need a 32-bit image to store the Lingo transition member image as an alpha channel. The three images are created as follows:
The base image is a black 8-bit image variable named Trans_Mask. This is the image that will be altered, then used as a mask for the transition. It starts out black because the image it will end up masking should be completely visible at onset. The variables mywidth and myheight are constant throughout.
Trans_mask = image (mywidth, myheight, 8, #grayscale)
Trans_mask.fill (Trans_mask.rect, paletteIndex (255))
White_image is a white 8 bit image variable to copy into Mask_image. It will be used to copy white (transparent) areas into the mask. The size and shape of the white area to be copied will be defined by the createMatte parameter of the copyPixels method.
White_image = image (mywidth,myheight, 8, #grayscale)
White_image.fill (White_image.rect, paletteIndex (0))
Alpha_trans is a 32-bit image (24 bits with an alpha channel) that is activated in the third line of code.
Alpha_trans = image (mywidth, myheight, 32)
Alpha_trans.fill (Alpha_trans.rect, rgb (0, 0, 0))
Alpha_trans.useAlpha = true
Alpha_trans is needed to store the Lingo transition member image (myTransition) as alpha channel information in order to modify it with createMatte. You can assign a mask to any 32-bit image by simply setting it's alpha channel to a greyscale image or to a value of grey. Set the alpha channel to the Lingo transition member image using the copyPixel method to ensure that the resulting alpha channel is the same size as the image it will mask.
tmp_Image = image (mywidth,myheight, 8, #grayscale)
tmp_Image.copypixels (member (myTransition).image, tmp_Image.rect, member(myTransition).image.rect)
Alpha_trans.setAlpha (tmp_Image)
Keep in mind, this is not the mask for the transition itself. This is the mask that will be modified in the copyPixels method by the alphaThreshold parameter. By setting alphaThreshold, the mask is modified so that it has no shades of grey.
To create a mask for the transition, you copy areas from White_image into Trans_mask. By using the alpha channel of Alpha_trans for the maskImage parameter you define exactly what portion of White_image will be copied over. This is when the alphaThreshold parameter comes in.
Trans_mask.copyPixels (White_image, Trans_mask.rect, White_image.rect, [#maskImage: Alpha_trans.createMatte (alphaThreshold)])
Changing the value of alphaThreshold changes the parameter maskImage used in the copyPixels method as illustrated above. The result of changing alphaThreshold in sequence using the Lingo transition member swirl in the alpha channel can be seen in the figure at the beginning of this section.
The alphaThreshold can be any value from 0 to 255. Therefore, you can create a maximum of 256 steps for any transition member that has 256 shades of grey. Since changing the mask of an image this often takes time, you may want skip a few steps. This code makes a list of alphaThreshold values at intervals defined by mySpeed. Fewer steps means faster transitions.
stepList = []
mythreshold = 255
repeat while mythreshold > 0
mythreshold = mythreshold - (mySpeed)
stepList.add (mythreshold)
end repeat
Use stepList to change the alphaThreshold value for createMatte.
Trans_Mask.copyPixels (White_image, Trans_Mask.rect, White_image.rect, [#maskImage: alpha_trans.createMatte (stepList[stepListCounter])])
Then after each change, set the mask of a member to Trans_Mask.
myImage.image.setalpha (Trans_Mask)
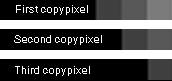
Each mask that has been created thus far contains sharply-defined black and white areas. In order to soften the edges you can use the blendLevel parameter to the copyPixels method. Setting the blendLevel to a value less than 255 affects the transparency of the image being copied from. With a blend level of 0 it's as if you didn't use the copyPixel method at all.
Trans_Mask.copyPixels (White_image,Trans_Mask.rect,white_image.rect, [#blendLevel: myblend, #maskimage: Alpha_trans.createMatte (stepList[stepListCounter])])
Each step in the mask will now be copied with a certain amount of transparency on top of the previous mask, causing a layered effect. The resulting mask has shades of grey. The figure below shows the edge of a mask. As the layers build up, each new and larger layer adds density to the mask and darkens the layer before.
Here's a closer look at a mask created from the Lingo transition member swirl. You can see the effects of using a blendLevel of 70 in the region between the white and black areas.
Making your own Lingo bitmap transition members in a picture editor requires patience, lots of skill and testing. Fortunately, I found a comfortable way to create these members in Flash.
Making a Transition Member in Flash
One of the most important considerations for creating my own transition members was the fact that they could work in Shockwave with no third party Xtras. Equally important to me was how to get file sizes down to a minimum. So what could better than Flash members? Jpeg compression you say?
There is only one reason why jpeg compression is not suitable. Jpegs cannot be 8 bit greyscale images. That may not disturb you, but Imaging Lingo does a terrible job converting a 24-bit greyscale into an 8-bit one. Gradations become bands of grey and dithering creates unwanted patterns. In fact, the image data from a Flash member or a vector member is indeed 32 bit. But, the image property of a Flash members has an alpha channel, and that's just perfect.
You can't just go ahead and use the alpha channel of any Flash member; the movie must have transparency. All this means is that some of the artwork in Flash has transparency. This can be done (in Flash) by setting the _alpha to less than 100% in the Color Mixer or Effects windows.
Use this Lingo to get the alpha information from a Flash member's image.
Alpha_trans.setAlpha (member (myTransition).image.extractAlpha ())
The stripes transition was made in less than a minute by creating a bar with a gradient fill from black to transparent. It's one bar that is copied and flipped 5 times and the resulting is 555 bytes. For comparison, the transition script in the sample film is 7.4 kilobytes.
Putting the Transition on Stage
Up to now, the technique used to create masks from a bitmap or Flash transition member has been explained. But how do you actually get the transition to work?
First, you need an image that can accept the masks you create from the Lingo transition member. This will indubitably be the stage image at the frame in the score where the transaction should take place . The following code creates a new bitmap of the stage image. Since the image needs to be masked, it must be 32 bit.
stageImage = new (#bitmap)
StageImage.image = image (myWidth, myHeight, 32)
stageImage.image.copyPixels ((the stage).image, stageImage.rect, rect (0, 0, myWidth, myHeight))
stageImage.useAlpha=TRUE
stageImage.image.setalpha(255)
Then, before proceeding to the next frame, a sprite will be created to place the newly-created image over the stage. This technique (dynamic sprite channel allocation) is not officially supported by Macromedia. A safer way is to reserve a sprite channel and sprite rather than creating one on-the-fly.
EmptySpriteChannel = the lastChannel
repeat while sprite (EmptySpriteChannel).type <> 0
if EmptySpriteChannel = 1 then
alert "This transition requires an empty Sprite channel"
exit
end if
EmptySpriteChannel = EmptySpriteChannel - 1
end repeat
puppetsprite EmptySpriteChannel,true
sprite (EmptySpriteChannel).member = stageImage
sprite (EmptySpriteChannel).rect = (the stage).rect
xx = myWidth / 2
yy = myHeight / 2
sprite (EmptySpriteChannel).loc = point (xx, yy)
sprite (EmptySpriteChannel).locZ = 2000
When the movie advances to the next frame, it is covered by an image of the frame it just left. This is the image that will accept the masks and reveal the stage behind it. Here is the code used for interpreting and applying a mask from the Lingo transition member. When it's done, it disposes of the bitmap and sprite created during the process
on executeWipe me
stepListCounter = stepListCounter + 1
if stepListCounter <= stepList.Count then
Trans_Mask.copyPixels (White_image, Trans_Mask.rect, White_image.rect, [#blendLevel: myblend, #maskimage: Alpha_trans.createMatte (stepList[stepListCounter])])
stageImage.image.setAlpha (Trans_Mask)
else
stageimage.erase ()
sprite (EmptySpriteChannel).member = VOID
puppetsprite EmptySpriteChannel, FALSE
end if
end
The Sample Movie
You can download the Director 8.5 source for the sample movie in Windows or Mac formats. It contains a ready-to-use parent script and behavior. The behavior is dragged into the script channel and includes features for choosing the Lingo transition member, setting speed and blendLevel, and flipping the transitions. One other feature is the ability to sync the transition to the score. That means you can actually animate things behind the transition. Enjoy!
Copyright 1997-2026, Director Online. Article content copyright by respective authors.