Save the Screen
December 17, 2001
by Darrel Plant
A common project for Director developers over the years has been the creation of screen savers. Because of Director's ability to create everything from slide shows to simple animations to full-fledged games, its ease of use (compared to, say, C++), and its wide support for media types ranging from bitmaps to digital video, it's not surprising that one of third-party tools that's been around the longest is one that makes screen savers from Director movies: CineMac for Director. It's been a part of the Director toolbox for so long, it was named before there was a stigma associated with having "Mac" in the name! Despite the name, versions are available for both Mac and Windows. (The company that created CineMac, named MacSorcery since 1992, changed its name to ScreenTime in April 2001).
CineMac has been used by everyone from small developers to multinational companies to create screen savers. But what exactly does it do?
The Rise and Fall of the Screen Saver
In the early days of computers, monitors that were left on all the time tended to (and still will, if you let them) burn out the phosphors of a CRT wherever the colors were bright, leaving a permanent ghost image of -- for instance -- the menu bar. Of course, nowadays we've got energy monitor controls that can dim or even turn off the screen to prevent that from happening, but long ago someone figured that one way to prevent burn-out (also known as burn-in, go figure) from happening would be to make the screen go black after a certain period of inactivity.
Of course, the problem was is that people would leave their computers, come back to a blank screen, and assume that their computer had crashed, which wasn't an unusual occurance lo those many years ago. Then they'd reboot their computers out of habit, until they remembered that it might just have been a screen saver.
So, instead of a blank screen, people came up with screen savers that did something. Preferably, something that didn't use up a lot of RAM (since there wasn't much to begin with) and didn't turn on a lot of pixels. Plus, to keep the screen saver from burning its own images into the screen, its content should be active, rather than static, which also served as a tip to the user that their computer hadn't crashed.
This lead to a whole lot of things like Berkeley Systems' After Dark, the screen saver package that introduced the flying toaster to the world. Soon, people were blanking their screens intentionally, because the screen saver was more interesting than what they were working on. The concept of a simple animation that left most of the pixels on the screen dark went by the wayside, and that wasn't necessarily bad, because the important thing about a screen saver is that a phosphor shouldn't be on all the time.
Screen saver choice became a personal choice issue. You weren't just saying: "I don't want phosphor burn-in on my screen" by choosing the screen saver of a man mowing grass on the screen. You were making a fashion statement to anyone who walked by your desk or stopped to talk to you for more than five minutes. So, like every other fashion statement, it got coöpted by the marketing people.
Once people realized that there was some untouched advertising space out there -- namely, the idle computer screens of the world -- the rush was on. The real breakthrough was when personal computer operating systems became powerful enough to run more than a single program simultaneously (yes, kids, at one time that wasn't possible). That opened up a whole new era of screen savers that didn't just show stuff on screens. Which brings us back to CineMac.
Anatomy of a Screen Saver
To appreciate what CineMac does, you need to know a how screen savers work. Basically, a very low-impact program is running on the computer to keeps track of user input from the mouse and keyboard. When a certain amount of time elapses, the program (usually) kicks off another program that blanks the screen and displayes whatever the screen saver does.
When you're using CineMac or similar type of product, the visual part of the screen saver -- the second program -- is what's provided by Director, Flash, or whatever. The system interaction -- the first program that watches for user input -- is where CineMac comes into play.
The reason you need something like CineMac is that you can't write those types of low-level system interactions with Director. You can watch for user interaction timeouts in a Director movie, sure, but to do that globally you'd need to launch the application. With a 2MB+ footprint for the Director 8 projector, that's been considered a little much for something that's always running in the background.
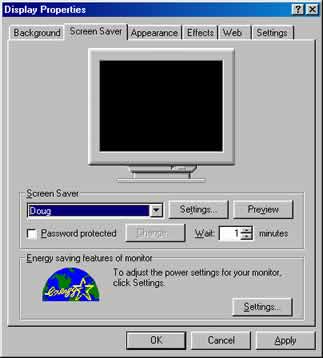
Because the initial step of screen saver operation is so integral to the system, the way screen savers are implemented is different on Windows and Macs. Since Windows 95, screen saver functions have been a part of the Display control panel. Screen savers are installed in the Windows or System folder (with the extension .scr), and are chosen from the Screen Saver tab of the control panel. Some screen savers just need the .SCR file; the Windows version of CineMac for Director also installs a DLL and an EXE -- which is a Director projector -- with the SCR.
On the Mac side of things, screen savers are usually control panels, as well. Macs load control panels at startup, which is when the code that tracks user input is initialized. A Mac install of a CineMac for Director screen saver is just one file containing the projector resources and control panel data rolled into one.
Paths Diverging
Despite the fact that the end results are so different, the folks at ScreenTime have attempted to make the creation of screen savers from Director on both platforms as simple as possible.
First off, you need a projector for each platform you want to make screen savers for. I'll talk more about projectors toward the end of this article, but suffice it to say that if you want to take advantage of CineMac to its fullest, the projector should be a single file containing any Xtras and casts. Nothing external. Each of the Quick Start sections explicitly states: "If you choose to use a shared cast or other external files you must ensure that they are installed in the correct locations." Note the italics on "you". Since the actual screen saver is just a Director projector, external movies, casts, and Xtras can be used, but it creates a whole new issue regarding installation that I won't go into here.
The first step to making a screen saver is setting the preferences. The fact that screen savers have different implementations on MacOS and Windows means that there is some variation between the preferences for the two versions.
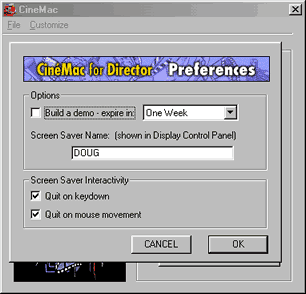
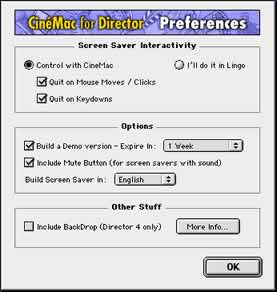
Both platforms let you control how to monitor user activity after the screen saver begins in the Screen Saver Interactivity portion of the Preferences window. In either one, you can control when to exit the screen-saver either automatically or in Lingo, although that choice is made a little more obvious in the Mac version.
In a standard screen saver, the option to quit when the mouse moves or a key is pressed works perfectly well, there's no need to write any Lingo. Deselecting both options (or selecting the I'll do it in Lingo option on the Mac) means that you control when to quit the Director application (by a simple quit command) and return to the regular screen.
The current versions of CineMac allow you to create timed-out demos that won't run after a preset number of days after the creation (not install) date of the screen saver.
CineMac works with every version of Director that runs on both platforms, so if you want to use a version in which the projectors aren't quite so weighty, you can do that. To blank out the screens on Macs when the projector is made with Director 4, CineMac ships with the BackDrop XObject, and a preference on the Mac makes sure that gets installed, if needed.
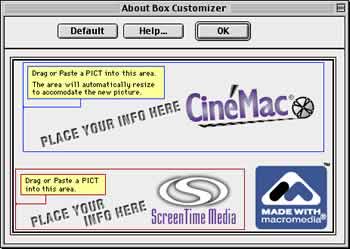
Both platforms display an About box when a button in the control panel is pressed. You customize the window in CineMac by pasting a couple of graphics into a screen in the CineMac application. On the Mac, this box appears when the control panel's About button is pressed; the Windows control panel's Settings button also displays it (there are no other options).
One note: the Windows Preview button displays the screen saver full-size, not in the preview window of the control panel.
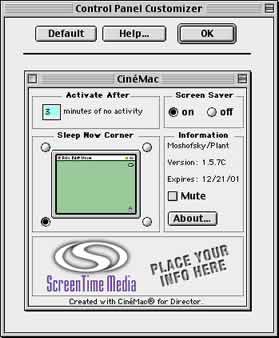
The Mac version also has a customization window for the appearance of the control panel, where you can add a graphic and set default values. Because Windows screen savers share a single control panel, this isn't an option there. One thing that is missing from the Windows version is the "instant-on" sleep corner feature shown above in the Mac control panel.
What You Get
After setting up your CineMac options (available through a little three-step walkthrough on Windows, as well as through the menus in both versions), you're ready to save screens. It takes just a few seconds to actually make the files, you'll probably spend more time installing the screen savers to test them.
What you end up win on Windows is an executable installer application (about 200K larger than the projector) that handles placing the SCR, DLL, and EXE files in the appropriate folder. The current version of CineMac for Director for Windows is 1.7.1, and is compatible with Windows 95 through Windows XP, according to ScreenTime.
The Mac version of CineMac for Director pops out just the control panel (about 100K larger than the projector). You need to provide installation instructions to the end user: basically, just drag it onto the System Folder and restart (no restart is required to install a Windows screen saver).
Either version makes screen saver creation easy and relatively painless. I only wish that the Windows version had the ability to set sleep corners as some other screen savers (and the Mac version) do, and that the Mac version produced an installer that the end user could just double-click on like the Windows version does. Both items are fairly minor quibbles. One anomaly I did notice was that if I used the Windows version of CineMac on a Mac with Virtual PC, when I tried to write a new installer over the top of an existing file, the new version was appended to the existing file rather than replacing it. Deleting the old file before I made a new installer worked just fine.
Screen savers made with CineMac are projectors at heart, so they can do pretty much anything a projector can do, including file and network operations, so long as the Xtras are available. If you want to create your own screen saver-based news tool, you can do it with Director and CineMac.
Blanking Out
One thing I noticed while I was looking at CineMac this time was that the code in the documentation is showing its age, so I'm providing a little pick-me-up as a part of this article.
CineMac runs Director movies as just another application once the screen saver kicks in. Unless you blank out the screen behind the projector, you're going to see the rest of your stuff, just like you would if you ran the movie in a window by double-clicking on it. To hide the screen, you need to create the projector with the Full Screen option.
That's fine if the screen's the same size as the movie window, of course, but what about big screens and multiple monitors? If your screen saver movie is 800x600 and the monitor's 1600x1200, it's going to look a little lost.
Well, if you're using a lot of bitmaps, you may just be lost, because resolution switching is still a pretty nasty little beast to beat. But if you take a little time to accommodate different-sized screens in your programming, there's a nifty little trick you can use.
Director 8 can change the size of the stage dynamically. You can blank out the screen and have your movie play across the entire area by finding out how big the monitor is, setting up the stage accordingly, and making your movement relative to the size of the stage.
Why stop there? Why not take multiple monitors into account? I've got to, since there's a 22" and a 15" attached to my computer.
It couldn't be simpler to do. I just walk through the deskTopRectList to find the minimum and maximum sizes of the monitors attached to the computer, then change the rect of the stage.
on startMovie
minX = (the deskTopRectList)[1].left
minY = (the deskTopRectList)[1].top
maxX = (the deskTopRectList)[1].right
maxY = (the deskTopRectList)[1].bottom
repeat with screen in the deskTopRectList
minx = min (minx, screen.left)
minY = min (minY, screen.top)
maxX = max (maxX, screen.right)
maxY = max (maxY, screen.bottom)
end repeat
(the stage).rect = rect(minx, minY, maxX, maxY)
sprite (1).rect = rect (0, 0, (the stage).rect.width, (the stage).rect.height)
end
The sample movie has a stopMovie handler that resets the stage size during authoring. The screen saver consists of a red box bouncing around the confines of the screen on a black background.
For a background, I used a rectangle shape in sprite channel 1, because my tests showed that the stage color wasn't always expanding to fill the entire area of the stage on some Macs (this doesn't have anything to do with CineMac).
I'll let you check out the demo movie (Director 8) if you want to see the box movement script; it just checks its updated position against the size of the stage rect. You can download the movie in Mac (12K) or Windows (9K) archives.
Demos of CineMac are available online from ScreenTime (screen savers made with the demos time out one week after creation) if you want to make your own projectors out of the example movie. If you'd rather download completed screen savers, those are available, as well: Mac (1.8MB) and Windows (1.4MB).
The Price of Success
CineMac for Director comes in two licensing levels: Commercial or Unlimited. The Commercial license gives you the right to distribute (per platform) up to 10,000 screen savers: 10,000 copies of one screen saver or one copy of 10,000 screen savers or anything in-between. The Unlimited license means you can make screen savers until you're sick of them.
Pricing for the Commercial version is US$299 per platform, US$500 for both. Unlimited licenses are US$999 per platform and US$1,500 for both. Some serious money, more than even ScreenTime's other screen saver creation tools, but if you desperately need to make screen savers that more than 20,000 people are going to be downloading....
Did You Say Other Screen Saver Creation Tools?
As a matter of fact, I did. Although ScreenTime started out with CineMac, they've been adding more utility programs of the same ilk for several years.
CineMac for QuickTime is a Mac-only tool for playing QuickTime movies as screen savers (duh). (US$199 Commercial/US$299 Unlimited).
ScreenTime Photo & Video gives you a storyboard interface where you can combine video, bitmaps, and sounds without Director to create screen savers for Windows. (US$199 Commercial/US$299 Unlimited)
The recently-released ScreenTime for PowerPoint (Windows-only) uses your favorite Microsoft presentation tool's files to make screen savers. (US$49 special Commercial pricing as of 15 December 2001/US$299 Unlimited).
And, of course, there's ScreenTime for Flash. (per platform: US$199 Commercial/US$299 Unlimited; both platforms: US$298 Commercial/US$500 Unlimited).
An intriguing item on the ScreenTime Web site is ScreenTime for Generator. According to Brian Hutchins, the product manager, STG is a server-side application that interfaces with Macromedia Generator to deliver individually-customized Flash-based screen savers. Users can choose options from a Web site; a Generator template file is built out to a Flash projector based on their choices (a standard Generator option); and the projector is wrapped up into an installer or control panel, depending on the platform. STG runs as an EXE on Windows servers and as a series of Perl scripts on UNIX/Linux (Generator needs to be installed on the machine, too). Call ScreenTime if you want pricing info on that baby.
Copyright 1997-2026, Director Online. Article content copyright by respective authors.