Customizing the Color of Your Hyperlinks
February 14, 2002
by Will Turnage
I have a movie with a text member that has a bunch of hyperlinks in it. However, my movie has a black background, and the blue hyperlinks are really hard to read against the background. I've tried changing the color of the text, but Director won't let me change the color of the hyperlink. Is there a way to do this? Cheers,
Victoria
Dear Victoria,
Contrary to what Director might have you think, there is a way to customize the colors of all of your hyperlinks -- and still have them appear as hyperlinks. However, it's not as easy as just unchecking a box somewhere or selecting a new color. You're going to have to do some custom coding to finish the job.
The first step is to open up the properties of your text member, and uncheck the box marked Use Hypertext Styles. This will turn off the automatic blue underlining that Director places on your hyperlinks and will display all of your text in a plain, ordinary manner. Now that you're starting with a clean plate, you're ready to start writing your behavior.
To begin, you need to select how your different links will look and appear. In this example, you'll create four different types of colors and styles. These four different states will be normal, rollover, clicked, and already visited. To start you need to create an easy way for you to select how these types of text will look. For the color of the text, you'll just use a color object, but in order to format the style of the text you will need a list of options for the style, such as plain, bold, bold-underline, etc. You can create those in your behavior by putting the following in a getPropertyDescriptionList handler.
on getPropertyDescriptionList
fontStyleRange = [[#plain], [#bold], [#underline], [#italic], [#bold, #italic], [#bold, #underline], [#italic, #underline], [#bold, #italic, #underline]]
props = [:]
props.addProp (#pNormalStyle, [#format: #list, #default: [#plain], #comment: "Select the normal font style:", #range: fontStyleRange])
props.addProp (#pNormalColor, [#format: #color, #default: rgb (0,0,0), #comment: "Select the normal font color:"])
props.addProp (#pRolloverStyle, [#format: #list, #default: [#plain], #comment: "Select the rollover font style:", #range: fontStyleRange])
props.addProp (#pRolloverColor, [#format: #color, #default: rgb(0,0,0), #comment: "Select the rollover font color:"])
props.addProp (#pClickStyle, [#format: #list, #default: [#plain], #comment: "Select the click font style:", #range: fontStyleRange])
props.addProp (#pClickColor, [#format: #color, #default: rgb (0,0,0), #comment: "Select the click font color:"])
props.addProp (#pVisitedStyle, [#format: #list, #default: [#plain], #comment: "Select the visited font style:", #range: fontStyleRange])
props.addProp (#pVisitedColor, [#format: #color, #default: rgb (0,0,0), #comment: "Select the visited font color:"])
return props
end
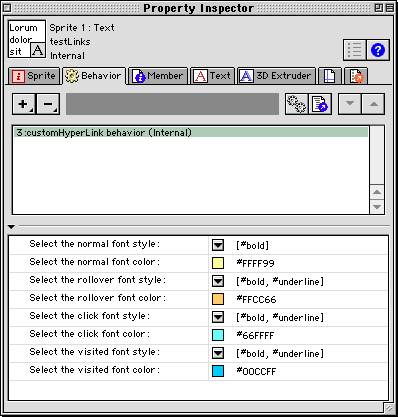
This getPropertyDescriptionList handler starts by creating a list of different possible font styles for you to choose from. This isn't every possible combination that exists, but it covers the basics. Next, you declare a different property for the color and style of each of the four types of hyperlinks you'll have in this behavior. When you're finished and you attach the behavior to your text member sprite, you'll be able to select the different options in the Property Inspector, like this:
Now that you've established the basics of how the links will look, you're ready to move onto the rest of the code in your behavior. You'll start by initializing a few variables at the time the sprite first appears.
On beginSprite me
pMemRef = sprite (me.spriteNum).member
pMemRef.useHypertextStyles = false
pHyperLinks = pMemRef.hyperlinks
pVisited = []
pVisited[pHyperlinks.count] = 0
repeat with i in pHyperLinks
pMemRef.char[i[1]..i[2]].color = pNormalColor
pMemRef.char[i[1]..i[2]].fontStyle = pNormalStyle
end repeat
end
This code starts by storing a reference to the text member in a variable called pMemRef. Next you make sure that the useHyperTextStyles option of your text member is set to FALSE (in case you forgot to uncheck the box earlier). Then, get a list of all the hyperlinks in your text member and put those in a variable called pHyperlinks. The list looks like this:
put member("hypertextTest").hyperlinks
-- [[67, 85], [232, 254], [469, 485], [645, 653], [912, 934], [1085, 1106], [1358, 1421], [1578, 1584], [1714, 1734], [1967, 1974], [2109, 2125], [2201, 2205]]
Each element in this list is itself a list containing two numbers. The first number is the number of the first character of a hyperlink, and the second number is the last character of that same hyperlink. Once you've created this list of links, then you create a companion list that will track whether the links have been visited or not. You want this list to be the exact same length as pHyperlink, so you set the nth element in the list equal to 0 (where n is the number of elements in your pHyperlink list) which will fill the entire list up to that point with zeroes. So if there are 20 hyperlinks, then by setting the 20th element in an empty list equal to zero, Director will automatically put a zero in the list for places 1 through 19. The final step for initializing your hyperlinks is to repeat through your list of links and format each of the links using the normal color and style.
Now, there are several ways you can monitor the mouse to check the text member and see if you've rolled over a text link. You could check on every frame or you could use a timeout object, but in this case, you should just use a simple mouseWithin handler. As long as the mouse is moving within a sprite on screen, it will automatically call the mouseWithin handler in your behavior.
On mouseWithin me
if not the mouseDown then
me.updateHyperlinks (pRolloverColor, pRolloverStyle, FALSE)
end if
end
This handler starts by making sure that the mouse isn't being held down. This way, this code will not interfere with the code used to handle the clicks. Next, you call the updateHyperlinks handler and pass it three arguments. The first argument is the color that you want the hyperlink to become if the cursor is currently over it. The second argument is the style that you want the hyperlink to become if the cursor is currently over it. The final argument is a flag indicating if the user has actually clicked on the link. In this case, since the mouse is just moving around within the sprite, you want your hyperlinks to appear with the rollover color and style if the mouse moves over them, and you also pass FALSE because the user is not clicking on the hyperlink.
The updateHyperlinks handler looks like this:
on updateHyperlinks me, whichColor, whichStyle, clickFlag
currentChar = pointToChar (pSprRef, the mouseLoc)
repeat with i = 1 to pHyperlinks.count
tempRef = pMemRef.char[pHyperlinks[i][1]..pHyperlinks[i][2]].ref
if ((currentChar >= pHyperlinks[i][1]) and (currentChar <= pHyperlinks[i][2])) then
tempRef.color = whichColor
tempRef.fontStyle = whichStyle
if clickFlag then
pVisited[i] = true
end if
else
me.resetColor(pVisited[i], tempRef)
end if
end repeat
end
It starts out by using Director's pointToChar function to find out which character the mouse is currently over. Then, you repeat through your list of hyperlink ranges, and see if the character you're currently over is within any one of those ranges. If the character is within a hyperlink, then you reset that hyperlink's color and style to the specific values passed to the updateHyperlinks handler. Next, you check the clickFlag variable to see if the hyperlink is being clicked or not. If it is being clicked, then you set the appropriate element in the pVisited list to be TRUE.
Finally, if the character you rolled over is not within the hyperlink, then you reset the hyperlink to its normal state by calling the resetColor handler and passing whether or not this hyperlink has been clicked.
On resetColor me, flag, stringRef
if flag then
stringRef.color = pVisitedColor
stringRef.fontStyle = pVisitedStyle
else
stringRef.color = pNormalColor
stringRef.fontStyle = pNormalStyle
end if
end
The restColor handler is passed a text reference along with a flag. Based on this flag, the handler sets the the text and style of the text reference to either normal or visited.
All that's left to do is to write the code that handles what happens when you click on an individual hyperlink. It's nearly identical to the code in your mouseWithin handler, but with a few small modifications.
On mouseDown me
me.updateHyperlinks (pClickColor, pClickStyle, FALSE)
end
The mouseDown handler code is also very similar to the mouseWithin handler, only this time, you are specifying that the font style and color should be that of the clicked style. Also, you have to pass FALSE because the click to the hyperlink hasn't officially been confirmed yet.
On mouseUp me
me.updateHyperlinks (pVisitedColor, pVisitedStyle, TRUE)
end
The biggest difference between the mouseUp handler and the other handlers is that this handler is where you pass TRUE to the updateHyperlinks handler, indicating that the link has successfully been clicked. Once you're done with this, the end result will look like this:
A sample Director 8 movie and images are available for download in ZIP or SIT archive format.
All colorized Lingo code samples have been processed by Dave Mennenoh's brilliant HTMLingo Xtra, available from his site at http://www.crackconspiracy.com/~davem/
Copyright 1997-2026, Director Online. Article content copyright by respective authors.