Maxon Cinema 4D XL7 and Shockwave 3D, Part 1
February 27, 2002
by Darrel Plant
All work and no play makes DOUG editors dull boys, so we've taken to poking our noses into this 3D stuff to see if it's ever going to amount to a hill of beans. Lately, we've been looking at a variety of 3D modelling tools that can export to Shockwave 3D. This week, I'll introduce you to one of the cross-platform solutions: Cinema 4D XL from Maxon Computer GmbH.
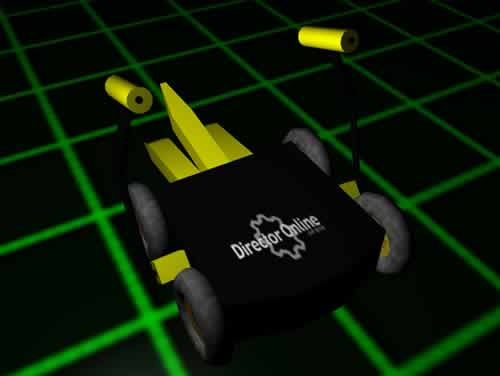
For a test case, I created an animated robot loosely-based on one of my favorite contenders from Comedy Central's Battlebots show, Donald Hutson's Diesector. I figured that a couple of hammers, jaws, and wheels would make some fun animating. A bit of wishful thinking led to me putting the DOUG logo on the model's back. You can check out the end result of my testing by clicking on the image below.
The Application
Specifications
At the time of this writing, Cinema 4D XL 7.3 is the current version (most of my testing was done in version 7.2). Maxon's US sales site lists a full version price for Director 8.5 users in the "Competitive Upgrade" package for US$1,295.
For the Power Mac you need to run MacOS 8.6 or later. The current version of Cinema 4D is OS X native. Cinema 4D runs on Windows 95 and later.
Mac users may find themselves needing lots of RAM; the preferred allocation on my MaxOS 9.1 system was 180MB. On the other hand, it ran quite well on a Windows Me Pentium III laptop with just 56MB of RAM.
The package consists of two CD-ROMs, and 2.4kg of manuals. The CD-ROMs are cross-platform; separate licenses are required for each platform. No dongle is needed.
Training Up
Like most 3D applications that have been around for a few years, Cinema 4D's feature set is extensive. Those features make getting acquainted with the interface and tools a time-consuming task to the neophyte, but if you're familiar with similar programs, it's more a matter of figuring out where to poke the cursor.
This is helped in large part by the excellent step-by-step Tutorial manual. Accompanied by extensive illustrations, the manual is written in such a way that you can basically jump into any of its sections and begin, you don't need to start from the beginning and work through (although I'm sure that's much advised). Even in the later chapters, the simplest steps are explicitly stated, which can be viewed as either tedious or extremely helpful (I chose the latter). The Tutorial covers several different projects through sections on Modeling, Materials, Animation, Lighting, and Rendering. The files accompanying the tutorial on the CD-ROM show completed versions of the projects at the end of each stage of development. There are no specific exercises related to Shockwave 3D.
Cinema 4D operates in its own window and menu system even on the Mac. The default setup shows 1 to 4 camera views of the current project in the central portion of the application window, with an object hierarchy browser to the right, properties window at the lower-right, materials window at the bottom, with tools and object icons along the top and left sides. Most of the windows have their own special-purpose menus, in addition to the main application window menus.

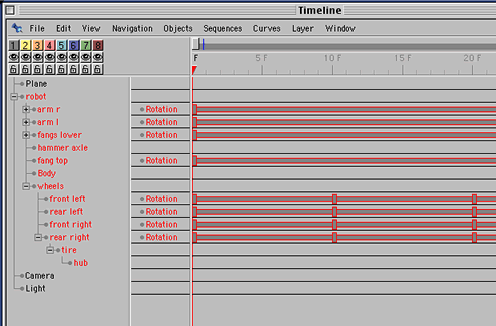
The Timeline window used to animate the model is treated as a separate window, and shows the object hierarchy along with separate tracks for animated properties. In the detail below, you see a portion of the animations from the model shown in the sample, which are all based on rotation tracks.
Modeling
Once you've got a feel for it from the Tutorial, making models in Cinema 4D is a breeze. In addition to standard shape primitives, there are tools to create a torus, a capsule (cylinder with hemisphere on each cap), an oil tank (cylinder with a curved cap), a tube (cylinder with a hole along the axis), Platonic solids, landscapes, and more. The spline tools include an image vectorizer that can convert a bitmap image to splines.
Cinema 4D's modeling tools go far beyond what what's reasonable for use in Shockwave 3D. The primitive shapes have features like fillets that can greatly increase the number of faces in an object. The program also sports NURBS objects, which use shapes and splines to generate smooth, organic shapes, but which don't offer much control over the complexity of the generated mesh (and the PolyReduction plugin doesn't appear to affect the data exported by the Shockwave 3D exporter). In other words, while you can easily make wonderful, smooth, organic shapes in Cinema 4D that look great inside Director, the price in polygons rapidly mounts to a total that may make the initial load time or animation take longer than you want. This isn't a fault with Cinema 4D any more than it is with any other modeler, it's just that it's so tempting to round the edges of your shapes, and C4D makes it pretty easy, with things like the HyperNURBS modeling objects.
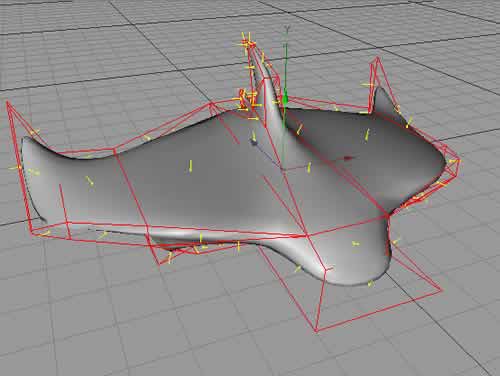
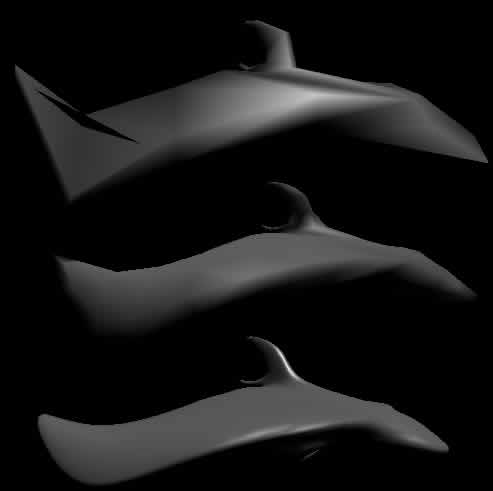
The images above show a Hyper NURBS model from the Tutorial projects. The image on the left shows the control cage (the red lines forming polygons) and the shape defined by the cage. On the right is a screen grab of the same model exported to Shockwave 3D, the top shows the cage itself (224 polygons), the middle is the exported Hyper NURBS object with the lowest possible settings applied (984 polygons), and the bottom shows the object exported at C4D's default settings, almost 9,000 polygons. C4D soesn't appear to export models to SW3D with the subdivision surfaces modifier when using HyperNURBS.
All in all, though, I was pleased with the quality and the speed of the modeling tools in Cinema 4D. The combination of visual and numeric controls works well for non-organic shapes and even for smooth stuff like the model above.
Cinema 4D has Instance and Symmetry tools that duplicate objects without making actual copies of the geometry or textures, but these are rendered out at the model level during export to Shockwave 3D. In the robot example, for instance, three of the four wheels are duplicated instances of the original wheel in Cinema 4D, but the Shockwave 3D cast member has 4 individual model resources for the hub and the tire. Textures are exported only once.
Shaders
Creating shaders for objects in Cinema 4D (materials in C4D-speak) is easy, but knowing what you're going to get for sure in Shockwave 3D can take some time to figure out. C4D has a plethora of shaders and options, but I had the best results relying on solid color shaders and single-layer textures maps. Shockwave 3D doesn't support the types of procedural materials you find in most 3D applications these days, so don't even bother with those.
Placing materials in C4D is straightforward, and the export of textures to SW3D works reasonably well when only one material is applied to a surface. I didn't have any luck exporting multi-layer texturing however, which means some extra work if you have surfaces that need, say, a tiled surface with other graphics overlaying it, as in the case of the top of the robot. You can get around this by making multiple textures with graphics composed into them (as I did with the DOUG logo).
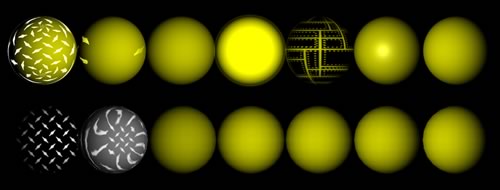
The image above shows a set of spheres using a yellow shader with various attributes rendered in Cinema 4D (top) and Shockwave 3D (bottom). From left to right, a metal grid pattern used as an environment map, the grid used as a reflection map, transparency (not obviously transparent in this view, but it works), glow, a texture applied as an alpha map, a material with increased specular highlight, and an unadulterated color material.
The two options (apart from the basic shader and simple texture mapping) that you can count on are the specular and transparency options, although it may take some adjustment to the specular options to get the effect you want.
Texture mapping works quite well, as you can see from the image below (rendered Cinema 4D on the left, Shockwave 3D on the right), which is modified from another of the tutorial projects. This is where you can see some of the things that work (and a few that don't), as well as how they translate.
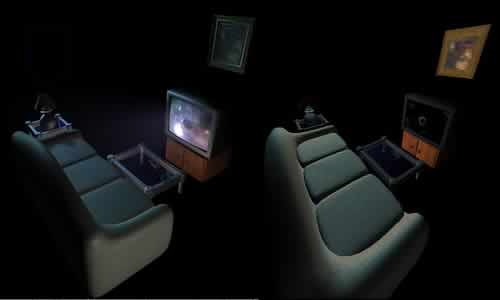
Obviously, there aren't any shadows in the SW3D image, but things like transparency (on the table tops and the lamp shade) work quite well. The light levels are similar, if not exact (SW3D has only a limited set of lighting options compared to most 3D modeling tools). The materials used for the screen of the TV, the glow it casts, and the deformation applied don't show up in SW3D, but the textures for the couch and other furniture items look good.
If you're adventurous, you can explore the SW3D version of this model by clicking on the image above. Be forewarned! It's about 2.5MB, and 46,000 polygons, so it's not for the faint-of-CPU.
In the second part of this review, I'll look at specifics of the Shockwave 3D animation and export capabilities of Maxon Cinema 4D.
Copyright 1997-2026, Director Online. Article content copyright by respective authors.