Scripting Color Transitions
March 18, 2002
by Darrel Plant
Dear Flashbrain,
How can I use the Flash 5 Color object to create a color transition?
Thanks & regards,
Pete
Dear Pete,
ActionScript-controlled color transitions are actually pretty easy to perform, once you've figured the process out. And once you have, you can do stuff like this:
click on the colored tabs to transition to a color,
click on the center circle to transition back to the original color
Exciting, eh? Here's how it works.
The Color of Movie Clips
Like everything else in Flash, if you want to control an object, it has to be a movie clip with an instance name. The central circle in the movie above is named ball, and that's how I'll refer to it from now on.
Each movie clip instance has a color transform applied to it. This is the value you set in the Timeline through the Effect panel. Changing the values in the Brightness, Tint, Alpha, or Advanced options all affect the transform in different ways.
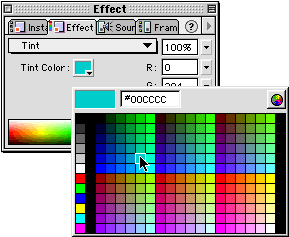
Picking an Effect for a movie clip from the Tint option.
A Tint effect changes the colors in the movie clip, and has an option other than just color which controls just how much tint is applied to the movie clip (the percentage showing in the image above).Of course, the Effect panel is only an option when you're in the Flash authoring environment. To affect the color of a movie clip at run-time, you need some sort of access.
Flash 5 introduced a Color object to the ActionScript model, Unlike Director, the Color object is not an independent data type. A variable containing an ActionScript Color object is actually a pointer to the color transform of a specific movie clip. The basic format to initialize it is:
variablename = new Color (movieclipreference)
So long as the variable is in existence, you can test or change the movie clip's color transform.
Color Methods
The Color object is fairly simple. Apart from the new constructor method used to create it, the object has four other methods: getRGB, setRGB, getTransform, and setTransform.
The setRGB method is roughly the equivalent of using the Tint option of the Effect panel, with no control over how much of the tint is applied. You can only change the color of the tint. It overrides any settings made in the Effect panel at authoring time except for the Alpha settings.
The getRGB method returns a value between 0 (black) and 16777215 (white), which is 224 - 1 (or 256 * 256 * 256 - 1). The number is derived from the sum of the red, green, and blue components (values ranging from 0 to 255), with red multiplied by 65536 and green multiplied by 256.
Setting a color using setRGB method can use an integer built in the same way, or it can be set with a hexadecimal value in the format 0xRRGGBB.
So, for the ball object in our movie, if I wanted to initialize a Color object and determine the current color, I could use this procedure:
myColor = new Color (_root.ball);
trace (myColor.getRGB ());
The result in the Output window would be an integer.
To tint the movie clip a neutral gray:
myColor.setRGB (153 * 65536 + 153 * 256 + 153);
or
myColor.setRGB (10066329);
or
myColor.setRGB (0x999999);
This doesn't give us any control or information about the transparency, though, and we can't affect the amount of tinting applied. To do that, we need the other methods of the Color object.
The color transform of a movie clip is itself an ActionScript object, similar in many ways to a property list in Director. If you try to do a trace operation on a getTransform, though, what you'll see is the ominous [type Object] in the Output window. Not much information there.
But if you know the structure of the color transform, it's quite enlightening. A color transform is an object with eight properties, each corresponding to the settings in the Advanced option of the Effect panel.
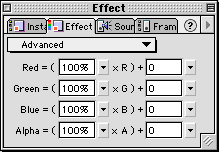
The rows are r, g, b, and a; (for red, green, blue, and alpha); the columns are a (percentage) and b (constant). The eight properties are the combinations of rows and columns: ra, rb, ga, gb, ba, bb, aa, ab.
The first column's values modify the existing values of the movie clip. The second column's values are added to (or subtracted from) the result. The percentages control how much of the existing color (or alpha) value is used, the added values add color even if there is no corresponding color in the movie clip already. For instance, multiplying the red component of a black object does nothing (there is no red to multiply), but it can be modified by adding red. The values for the second column range from -255 to 255.
While you can't just display the value of a color transform object returned from the getTransform method in the Output window, if you could, this is what it would look like for an effect like the image above:
{ra: 100, rb: 0, GA:100, GB: 0, BA: 100, bb: 0, AA: 100, AB: 0}
The braces (curly brackets) can be used to create an ActionScript object. Changing the color transform of a movie clip is similar to changing the tint, except that instead of passing an integer or hexadecimal color value, you use an object as the parameter:
myColor = new Color (_root.ball);
coltrans = {ra: 100, rb: 0, GA:100, GB: 0, BA: 100, bb: 0, AA: 100, AB: 0};
myColor.setTransform (coltrans);
I Love to Ride My Color Cycle
Now that we've got some numbers, we're in familiar territory. In the example movie, there are six movie clips used as buttons with a variation of this script attached to them:
on (press) {
col = {ra: 100, rb: 255, GA: 100, GB: 0, BA: 100, bb: 255, AA: 100, AB: 0};
ball.setColor (col);
}
A color transform object (col) is created, then the object is passed to a user-defined function (setColor), which is a part of the script attached to the ball movie clip.
There are two major portions to the ball movie clip's script. The first largely sets up a set of variables that are used in the animation of the color transform.
onClipEvent (load) {
myColor = new Color (this);
active = false;
start = getTimer ();
period = 2000;
baseTransform = myColor.getTransform();
function setColor (colTransform) {
originalTransform = myColor.getTransform();
targetTransform = colTransform;
active = true;
start = getTimer ();
}
}
onClipEvent (mouseUp) {
if (this.hitTest( _root._xmouse, _root._ymouse, true )) {
this.setColor (baseTransform)
}
}
When the clip first loads, a Color object (myColor) is created, pointing to the color transform of the clip itself. A flag (active) is set, which tracks whether any animation is currently in progress. A timer value is initialized, and so is the time allotted to the animation (2000 milliseconds). The baseTransform variable is loaded with the initial color transform of the clip.
The setColor function is defined in the load sequence, as well. When the function is called (as it is from each of the six buttons), it receives a color transform object as its parameter. The current transform of the movie clip is stored, the object passed as a parameter is stored in targetTransform, the animation flag is set to true, and the timer is reset.
I've also included in this portion of the code the mouseUp clip event that resets the ball movie clip to its original transform.
So far, all we've done is set the stage, there's nothing here that actually affects the movie clip. But we already know that's easy.
onClipEvent (enterFrame) {
if (active) {
elapsed = getTimer () - start;
if (elapsed > period) {
elapsed = period;
active = false;
}
percent = elapsed / period;
newTransform = {ra: 100, rb: 0, GA: 100, GB: 0, BA: 100, bb: 0, AA: 100, AB: 0};
drb = targetTransform.rb - originalTransform.rb;
dgb = targetTransform.gb - originalTransform.gb;
dbb = targetTransform.bb - originalTransform.bb;
newTransform.rb = originalTransform.rb + Math.floor (drb * percent);
newTransform.gb = originalTransform.gb + Math.floor (dgb * percent);
newTransform.bb = originalTransform.bb + Math.floor (dbb * percent);
myColor.setTransform (newTransform);
}
}
This is just standard time-based animation. A test is made to see whether the animation is active, the elapsed time is calculated, if the animation's still active and the timer's elapsed the activity flag is turned off and the elapsed variable is pegged to the animation period.
Then, a percentage is calculated from the elapsed time and the total animation period. The drb, dgb, and dbb values calculate the difference in three values from the transforms at either end of the animation cycle. Because this movie only changes those three values, I don't need to calculate the differences in the other five transform properties.
The newTransform color transform object creates a fresh transform into which we plug in the three changing values. Then, finally, the setTransform method updates the color of the movie clip.
Not too shabby for about 50 lines of code.
A sample file is available for download in ZIP archive format.
Copyright 1997-2026, Director Online. Article content copyright by respective authors.