Drawing Dynamic Pie Charts
May 21, 2002
by Will Turnage
Last week, you learned how to draw a dynamic line graph. This week, you'll see how you can draw your own pie charts with imaging Lingo.
The hardest part about drawing a pie chart is drawing the shapes that represent each wedge in the whole pie. Director doesn't have a command that lets you easily draw irregular shapes, and the math for calculating a vector shape can get pretty complicated too. Luckily, you can use a simple mask to do the hard work for you.
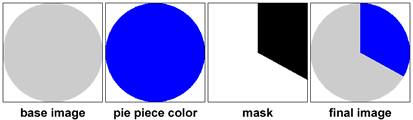
This picture shows you visually how you can create a pie piece using imaging lingo. First you start with the base color of your circle. Then you create a new circle that is the color of the piece you want to create. Next, using quads, you create a mask that has the same basic shape as your pie piece. Finally, you copy the circle onto your original circle using the dynamically created mask. Simple enough? Let's check out the code.
The first piece of data you will need to make a pie chart is a list describing the contents of the pie. For each piece of the pie, you will need to know what percentage of the pie it takes up along with the color that you want the piece to be. For instance:
pieDataList = []
pieDataList.append ([#percent: 25, #color: rgb (100, 0, 100)])
pieDataList.append ([#percent: 15, #color: rgb (0, 0, 100)])
pieDataList.append ([#percent: 40, #color: rgb (100, 0, 0)])
pieDataList.append ([#percent: 20, #color: rgb (100, 100, 0)])
This list contains information for four different pie pieces, each containing a different percentage of the pie, and each having a different color. Now you're ready to begin drawing the circle. You should start by sending the data list to the pie chart sprite.
sendAllSprites (#drawPieChart, pieDataList)
Then in your behavior, you will have this handler which will receive the list and process it.
on drawPieChart me, dataList
pPieData = dataList
flag = false
repeat with i = 1 to pPieData.count
if pPieData[i].percent > 60 then
newBackgroundColor = pPieData[i].color
pPieData.deleteAt (i)
flag = true
exit repeat
end if
end repeat
You start by assigning the data list to a local variable. Next, you loop through the list and check to see if any of the percentages are greater than 60%. If they are, then you want to reset the default color of your pie to this large percentage color (the reason for this is explained later). After you're done checking for a large percentage, next you create a circle image that will be the base for your pie chart animation.
pPieImage = image (pPieWidth, pPieHeight, 16)
pPieImage.fill (pPieImage.rect, pBackgroundColor)
if flag then
pPieImage.fill (pPieImage.rect, [#shapeType: #oval, #lineSize: 0, #color: newBackgroundColor])
else
pPieImage.fill (pPieImage.rect, [#shapeType: #oval, #lineSize:0, #color: pPieColor])
end if
This code creates a basic image object that is the exact height and width that you specify in your getPropertyDescriptionList dialog box. After creating the image, you fill the entire image with the background color that you also have selected for the behavior. Finally, if there is a percentage greater than 60%, then you draw a circle containing that percentage's color, otherwise, you draw a circle with the default color for the pie. All that's left is a few more variables to initialize, and you're ready to draw.
pCurrentPiece = 1
pCenterPoint = point (pPieWidth / 2.0, pPieHeight / 2.0)
pStartAngle = 0
pEndAngle = pStartAngle + ((pPieData[pCurrentPiece]Percent / 100.0) * 2 * pi())
pCurrentAngle = 1
timeout ("animatePieDrawing").new (-1, #animatePieDrawing, me)
end
You start by initializing pCurrentPiece, which will keep track of the pie piece that you are currently trying to draw. Next, you need to calculate a point representing the center of the circle. The next variable is the starting angle from which you will draw your pie piece. This behavior is set to start with a degree of zero and work its way around the circle until it has come completely around. After that, you need to initialize the ending angle for the first percentage in your list. To do this, you take the percentage, divide it by 100.0 to give you a floating point number between 0 and 1, and then multiply it by 2 * pi() which converts the angle from degrees to radians. The last variable you initialize is currentAngle which is used to animate the angle that you are drawing. When all of this is done, then you create a timeout object which will animate the drawing of each piece of the pie.
On animatePieDrawing me
if pCurrentAngle > pAngleIncrements then
pCurrentPiece = pCurrentPiece + 1
if pCurrentPiece > pPieData.count then
timeout ("animatePieDrawing").forget ()
return 0
end if
pStartAngle = pEndAngle
pEndAngle = pStartAngle + ((pPieData[pCurrentPiece]Percent / 100.0) * 2 * pi())
pCurrentAngle = 1
end if
This handler starts by checking to see if the currentAngle is greater than the total number of increments that you are animating for each piece. If it is greater, then that means that you've finished drawing this particular piece and are ready to move on to the next one, so you should increment pCurrentPiece. If pCurrentPiece is greater than the number of elements that are in your list, then this means you are done, so you forget the timeout object and exit out of the handler. Otherwise, you set the startAngle equal to the endAngle of the previous piece, and you calculate a new end angle based on the size of the new pie piece. Lastly, you reset pCurrentAngle, your increment counter, to 1.
tempEndAngle = pStartAngle + ((pCurrentAngle / pAngleIncrements) * (pEndAngle - pStartAngle))
tempMiddleAngle = (pStartAngle + tempEndAngle) / 2.0
Now that you have your starting and ending angles for this piece, you're ready to create the mask for this piece. You start by calculating the ending angle for this particular increment which is done by taking the difference of the ending and starting angle, multiplying it by the current increment you're on, and then adding it to the starting angle. Next, you calculate the angle halfway from the starting angle to your new temporary angle by just averaging the two. Now that you have these angles, you need to calculate some points.
startPoint = pCenterPoint + point (sin (pStartAngle) * 2 * pPieWidth, cos (pStartAngle) * -2 * pPieHeight)
endPoint = pCenterPoint + point (sin (tempEndAngle) * 2 * pPieWidth, COs(tempEndAngle) * -2 * pPieHeight)
midPoint = pCenterPoint + point (sin (tempMiddleAngle) * 2 * pPieWidth, COs(tempMiddleAngle) * -2 * pPieHeight)
quadList = [pCenterPoint, startPoint, midpoint, endpoint]
Using the sin and the COs of the current angle along with the center point of the image, you are able to calculate a point that is along the slope of startAngle from the center of your image. Next, you use the same formula with the endAngle to get a point that is along it's slope. Last, you average the two points together to get a middle point. When you are done, you put all of these points into a list representing a quad of the pie piece you are going to make.
Here's a sample picture of the points that you are calculating for in this example.

The only drawback to this method of drawing is that if your angles are really large -- that is greater than about 220 degrees -- then this method doesn't work because your middle point won't ensure that the whole image is filled. But since you can only have one piece per pie that is greater than 60%, you account for this discrepancy earlier by just setting the default color of your pie piece equal to this large percent.
Now that you have all of the math out of the way, all that's left is to just use some imaging lingo to copy the different pieces onto one another. You start by creating the masks.
pieBlackMask = image (pPieHeight, pPieWidth, 8)
pieBlackMask.fill (pieBlackMask.rect, rgb (0, 0, 0))
pieWhiteMask = image (pPieHeight, pPieWidth, 8)
pieWhiteMask.fill (pieBlackMask.rect, rgb (255, 255, 255))
pieWhiteMask.copyPixels (pieBlackMask, quadList, pieBlackMask.rect)
In this example, you create two separate 8-bit images. One is filled entirely with white, and the other is filled entirely with black. Then, using the quads that you calculated earlier, you copy the black image onto the white image using the quads. The result is a black and white image that you can use later as a mask.
piePieceImage = image (pPieWidth, pPieHeight, 16)
piePieceImage.fill (piePieceImage.rect, pBackgroundColor)
piePieceImage.fill (piePieceImage.rect, [#shapeType:#oval, #lineSize:0, #color:pPieData[pCurrentPiece]Color])
pPieImage.copyPixels (piePieceImage, pPieImage.rect, piePieceImage.rect, [#maskImage: pieWhiteMask.createMask ()])
In these final steps, you create a circle that's identical in shape to your master pie chart, and you fill it entirely with the color of this particular piece. Once you have done that, then you copy this image onto your image of the entire pie, however, this time, you use the mask that you have dynamically created earlier. The end result is that you have a perfectly drawn pie piece.
pCurrentAngle = pCurrentAngle + 1
pSprRef.member.image = pPieImage
end
The final steps here are to increment your pCurrentAngle variable by one, and then reset the member of your sprite to be the current image of the entire pie chart. When you're done, the final result will look like this:
And that's how you create dynamic pie charts in Director using Lingo. Next week, you'll learn how to make some simple bar graphs using some of these same concepts.
A sample Director 8 movie is available for download in SIT or ZIP format.
All colorized Lingo code samples have been processed by Dave Mennenoh's brilliant HTMLingo Xtra, available from his site at http://www.crackconspiracy.com/~davem/
Copyright 1997-2026, Director Online. Article content copyright by respective authors.