Bowling with Havok, Part 1
July 22, 2002
by Darrel Plant
My Bad
Sometimes you should just stick with your original plans. Last fall, after I'd written a couple of other Shockwave 3D articles here at DOUG, I thought I'd follow up with a practical application. A night out bowling with some old printing industry colleagues gave me an idea, and memories of the DOUG bowling party at UCON98 solidified my decision to make the next article in the series a bowling game.
I started off pretty quickly, finding specs for bowling alleys and equipment. I decided to use the Havok physics engine (which I'd played with in the series "Wreaking Havok with Physics"), developing the models in Tabuleiro's ShapeShifter 3D Xtra.
Then I got greedy. I thought: "What am I doing? Surely there's got to be some money in this!" So I decided to hold back on the article and focus on selling a bowling game. Like a number of greedy people these days, I would eventually be stymied by my own ambitions.
Although I'd been working with Shockwave (the delivery mechanism) since its release for Director 4 in 1996, I hadn't ever had a game on Shockwave.com (the web site), and at the time, they didn't have many Shockwave 3D games, so I sent a demo of the bowling game to them and asked if it was something they might be interested in seeing developed.
Well, if you've ever dealt with Shockwave.com, you can probably guess what happened. After months of waiting for answers to emails and phone calls, another, perfectly fine Shockwave 3D bowling game appeared on Shockwave.com early this year. By then, I'd moved on to other projects, and put the bowling demo aside.
I dug it up again the other day when I got some questions from a reader about doing a bowling game using the Havok Xtra. So here, some nine months after its original conception, is "Bowling with Havok", the way it should have been last year.
If you want to see the end result of this short series, get your bowling finger limbered up and take a look here.

Pieces
For the bowling demo, I needed just three shapes: a ball, a pin, and the bowling alley deck. I decided to create the pin and ball in ShapeShifter 3D. The ball could easily have been created using a Shockwave 3D sphere model resource, but I wanted to use ShapeShifter to apply the textures. I picked up a clip art photo of a bowling pin for its texture, which I also measured to get the height and diameter for the cross-sections.
The Ball
To make the ball, I just created a sphere in ShapeShifter. I didn't pay any attention to the size of the sphere, because I could always scale it in Director. I used ShapeShifter's default settings of 6 stacks and 12 slices.
Next, I created a new material from a TIFF I had made from my logo and named it ball.
To apply the material so that it "read" correctly on both sides of the ball, I needed to make two mesh groups, one for the front and one for the back. Otherwise, the standard spherical wrapping would distort the image on the front of the ball, or if I used the Texture Coordinate Editor in ShapeShifter to project the logo on the front, it would be reversed on the back. I used the Select faces mode in the Top view to select half the sphere.
I used the Regroup Selection button to create a new group, then named the original Sphere01 group ball. I named the regrouped half of the ball back
I used the Assign Material button to assign the ball material to back group. Then I went into the Texture Coordinate Editor (TCE). The back half of the ball should use the green field without the logo. In the TCE, I selected the Remap tab, used the cursor to draw a line around the half of the material texture for the back of the ball, then pressed the Continue button.
After you've selected a section of the texture to use, you're given the option to choose how the texture will be projected onto the selected group. I selected Back and pressed the Remap button. The mesh -- viewed from the chosen projection -- is placed to fill the rectangle of the area I drew in a previous step. The positioning, scaling, and rotation of the mesh projection can be affected with the TCE tools.
I used the same steps to apply the portion of the texture with the logo in it to the front of the ball. In both cases, I tried to make sure to get some of the orange border around the green field, since I thought this would make it more apparent that the ball was rolling down the lane.
I saved the file in ShapeShifter format for future editing, then exported it as a Shockwave 3D file with most of the options turned off.
The important thing here is to make sure that Export each group as a separate model is unchecked. All of the meshes are then combined into a single model, which is given the name of the first group in the group list.
The Pin
The pin is only slightly more difficult than the ball. I printed out the image I was planning to use for the texture, then took measurements of what I determined to be significant cross-sections. I ended up with ten segments at varying height differences.
To start the pin model, I created a new ShapeShifter document. The start of the pin was a closed-end cylinder primitive with 9 stacks and 12 slices. In Select vertex mode, with the Move tool, I adjusted the heights of each cross-section before using the Scale tool to get them to match my measurements. For the top of the pin, I used the Top view and Ignore Backfaces option to select the centerpoint of the top cap of the cylinder, then moved it up in the Front view.
Texturing the pin is even easier than the ball. Once the pin material has been created and its texture imported, there's no need to create a separate group for the front and back of the pin. The texture can be applied to the group, then remapped to the Front projection in the Texture Coordinate Editor. The pin's front profile should fit within the edges of the pin.
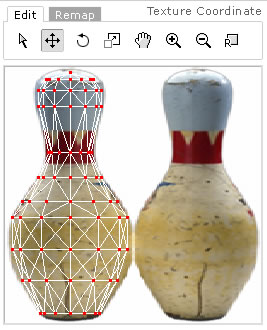
The material is projected through the model to the opposite side. The edges between the front and the back of the pin should be seamless, because the image on the back of the pin is a mirror or the image on the front.
This model is exported to a Shockwave 3D file with the same settings as the ball.
The Lane
Now it's time to begin assembly in Director (the lane itself will just be made from a box primitive). First off, I import the two Shockwave 3D files into the cast of a new Director movie. The imported Shockwave 3D cast members will just be carriers for the data, with the pieces assembled in an empty Shockwave 3D world. To make an empty Shockwave 3D cast member, you can use the option from the Insert menu, but I usually type
new (#shockwave3d)
into the Message window. The Insert method creates a cast member with the linked property set to true, which -- though it's never given me any trouble -- always gives me the creeps. I call this cast member alley.
The next move is to add the alley cast member to the Score, then add a simple loop script to one of the frames. My alley sprite uses the entire 500x330 Stage.
I tend to set up 3D scenes with a behavior I attach to the the Shockwave 3D sprite, which I usually name Create World. In the Create World behavior for this project, the first thing I need to do is set up the camera and lights, and create the deck for the lane.
property pScene
on beginSprite me
pScene = sprite (me.spriteNum).member
pScene.resetWorld ()
pScene.light ("UIAmbient").color = rgb (204, 204, 204)
l = pScene.newLight ("point1", #point)
l.transform.position = vector (63, 216, -288)
me.mMakeLane ()
me.mSetCamera ()
end
The beginSprite handler for this behavior does the usual setup thing, by setting a property to the Shockwave 3D cast member and resetting the scene each time it's run. It changes the color of the default ambient light, then creates and positions a point light source before calling the handlers that set up the lane and camera.
on mMakeLane me
mr = pScene.newModelResource ("lane", #box)
mr.length = 66 * 12
mr.width = 42
mr.height = 3
m = pScene.newModel ("lane", mr)
m.addModifier (#meshdeform)
end
The lane is a simple box model resource. A regulation lane is 66 feet long and 42 inches wide; I determined an arbitrary height for the lane. The model is added to the scene, then the meshDeform modifier is applied to the model to prepare it for use with the Havok physics engine.
on mSetCamera me
c = pScene.camera[1]
c.transform.position = vector (0, 46, 560)
c.transform.rotation = vector (-9, 0, 0)
c.fieldOfView = 18
end
The default camera is moved to a position and rotation that I determined by playing around with the model in Ulalla's 3DPI Xtra. I set the fieldOfView property of the camera to get the right angle on the scene.
This sets the stage for the addition of the ball and pin in my next installment, as well as the action of rolling the ball. You can download a Director 8.5 file of the progress so far (along with ShapeShifter and Shockwave 3D source files) as SIT or ZIP archives.
All colorized Lingo code samples have been processed by Dave Mennenoh's brilliant HTMLingo Xtra, available from his site at http://www.crackconspiracy.com/~davem/.
Copyright 1997-2026, Director Online. Article content copyright by respective authors.