updateLock: Make Director a Game Level Editor
December 6, 2002
by Lucas Meijer
This article will show you how to use the not-so-well-known updatelock system property to turn Director into your level editor. I'll show the technique using a simple example game, where we'd like to make waypoints for an AI car.
Click here to see the demonstration movie.
[Editor's Note: Some readers have complained of crashes when viewing this movie with the OS X and Windows XP versions of the Shockwave Player. We're currently investigating this issue. -DP]
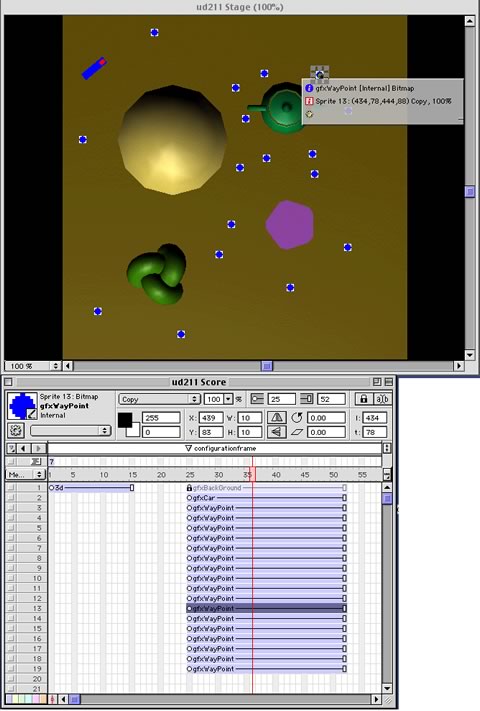
The trick is to use sprites in the score, in a 'configuration' frame. For each waypoint, we'll make a sprite in the score. When authoring, we can drag these sprites on the Stage, to place them exactly how we want them. At runtime, the movie will jump to this frame (without displaying it!) to inspect the properties of these sprites, from which the waypoints will be generated. We'll also have a sprite that specifies the starting point (and rotation) of the car.
This is how the configuration frame looks in the Stage and Score windows:
Now How Do We Code This?
The 'tricky' part of it all is how to inspect the properties in the configuration frame, when we're in the game frame. We could do:
tBackupFrame=the frame
go "configurationframe"
i=1
repeat while sprite(i).member<>member(0,0)
tList.append(sprite(i).loc)
i=i+1
end repeat
go tBackupFrame
but that would show the configuration frame on the stage, which would look real silly. We can add the updatelock = 0, which tells Director not to update the stage when we're going all over the place.
tBackupFrame=the frame
the updatelock=1
go "configurationframe"
i=1
tList=[]
repeat while sprite(i).member<>member(0,0)
tList.append(sprite(i).loc)
i=i+1
end repeat
go tBackupFrame
the updatelock=0
Since our game is 3D, we need to have some way of converting this 2D position, into a 3D coordinate. We'll make a scoreToWorld handler, to handle that task.
In order to be able to visually place the sprites comfortably, I've placed a top-down screen shot of the scene in the first sprite channel, so you can actually 'see' where the waypoints go.
Getting More Advanced
Now you've seen what the idea is, here are a few things to experiment with.
Use different configuration frames to configure different levels.
Next to position and rotation, you can use other sprite properties to specify things. Say you're placing enemy cars, and there are three types of cars. you could do that by:
- having a different member for each car
- using a different scorecolor for each car
- use a different forecolor/background color for each car
If at some point, you need to specify so much that you run out of reasonable sprite properties to use, or you're trying to encode something that no sprite property lends itself to, you can make a behavior and attach it to each configuration sprite:
script "enemyConfiguration"
property pName,pStrength,pHitPoints
on getPropertyDescriptionLlist
t=[:]
t.addProp(#pName,[#format:#string,#default:"",#comment:"Name of enemy"])
t.addProp(#pStrenth,[#format:#integer,#default:10,#comment:"Strength"])
t.addProp(#pHitPoints,[#format:#integer,#default:100,#comment:"Hitpoints"])
return t
end
at runtime you'd be able to read these properties like this:
tBackupFrame=the frame
the updatelock=1
go "configurationFrame"
tEnemies=[]
i=1
repeat while sprite(i).member<>member(0,0)
tEnemy=[:]
tEnemy[#name]=sprite(i).pName
tEnemy[#strength]=sprite(i).pStrength
tEnemy[#hitpoints]=sprite(i).pHitPoints
tEnemies.append(tEnemy)
i=i+1
end repeat
go tBackupFrame
the updatelock=0
Disclaimer About the Example:
This example merely serves as an illustration to the technique. I'm not saying that this is the best technique for this example. In this specific case, (and where you have access to 3D modeling software), it might be better to use the 3D modeler to be your level editor. If you were using Max, for instance, it would make sense to make a 'Dummy' for each waypoint, as these get exported to w3d 'groups', which you can get the position and rotation from. Depending on what your problem is, the technique presented here might, or might not be the best solution for you. Use your common sense.
The Director source file can be downloaded in either ZIP or SIT archive format.
All colorized Lingo code samples have been processed by Dave Mennenoh's brilliant HTMLingo Xtra, available from his site at http://www.crackconspiracy.com/~davem/
Copyright 1997-2024, Director Online. Article content copyright by respective authors.