Multiple Undo Functionality for Director Applications
April 22, 2004
by James Newton
Application users change their minds and make mistakes. The Undo item in the Edit menu has been a standard feature in all applications since the dawn of menu-driven applications. Undo buttons in toolbars are more recent. Most modern applications provide a multiple Undo facility. This requires a second Redo entry in the Edit menu, and a second button on the toolbar.
This article shows you how to provide a multiple undo button set for a simple Paint program in Director MX. This includes Undo and Redo buttons, each with a popup menu that allows you to undo or redo a whole sequence of changes with one action.
By the end of the article, beginner users of Director will be able to create a simple paint program with undo and redo buttons for the paint action. Users with a limited knowledge of Lingo will be able to extend the multiple undo feature to reset the choice of brush color. Intermediate users should be able to customize the Undo scripts for their own projects, and advanced users will have encountered a number of subtle tricks with standard Lingo features.
Test-driving the Multiple Undo Feature
Source files: undo.zip, undo.sit.
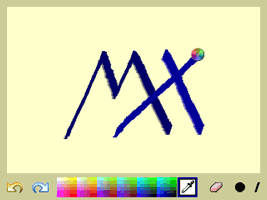
Above, you will see a simplified version of the final movie that requires no third-party xtras. Click on the yellow canvas area and drag the mouse to paint. Paint several lines, keeping in mind that the movie is set to provide up to 20 undo steps. Now click on the undo button on the left. Keep on clicking until the canvas is blank again, or until you run out of undo steps. You can now recreate your original painting by using the redo button.
Try selecting a different brush or the eraser tool, and using that on your painting. (Note that a double-click on the eraser will erase the entire painting). The exact same script members are used to undo any of these actions. All the script members you require are available in the tutorial download (see above).
Now try changing the brush color, by clicking on the color palette. Notice that the color swatch behind the eyedropper tool changes. Click on undo: the original color reappears. This action requires a different undo script, which you will have to create yourself by modifying a copy of an existing script.
Building the Paint Application
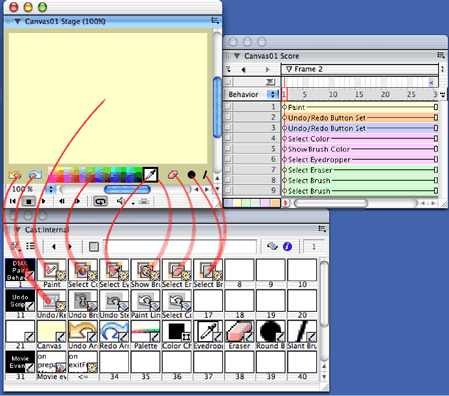
You don't need any knowledge of Director to build this little paint application. Simply download the tutorial package from the links above. You should find a file named Canvas01.dir. Open this up in Director 8.0 or later. You should find a set of nine sprites already positioned on the Stage, and a set of behaviors in the Internal Cast library.
Dragging and Dropping Behaviors
To build the Paint Application with its Multiple Undo feature, you simply need to drag the appropriate behaviors onto the appropriate sprites. Accept the default parameters except where noted below:
| Sprite 1 | "Canvas" bitmap member | Paint behavior | (Defaults) |
| Sprite 2 | "Undo arrow" bitmap member | Undo/Redo Button Set | (Default) |
| Sprite 3 | "Redo arrow" bitmap member | Undo/Redo Button Set | Redo |
| Sprite 4 | "Palette" bitmap member | Select Color | - |
| Sprite 5 | "Color Chip" rect member | Show Brush Color | (Default) |
| Sprite 6 | "Eyedropper bitmap member | Select Eyedropper | - |
| Sprite 7 | "Eraser" bitmap member | Select Eraser | - |
| Sprite 8 | "Round Brush" bitmap member | Select Brush | - |
| Sprite 9 | "Slant Brush" bitmap member | Select Brush | - |

That's it. You're ready to run your movie, and test the Multiple Undo and Redo buttons. Feel free to add more brush shapes or to modify the Stage layout.
Improved Paintbox Behaviors
If you have already used the behaviors in the Paintbox section of the Library Palette, you might recognize some of the icons. Don't let this fool you: these behaviors are a completely different set from the ones I wrote for Director 8.0.
Director MX runs on Mac OS X. On Mac OS X, the System automatically displays a busy cursor (fondly known as the spinning pizza of death) if an application runs a lengthy process. The original Canvas behavior, bundled with Director 8.0, uses a single process as long as the mouse is held down. In Director MX on Mac OS X, this brings up the busy cursor after about a second. This is not an issue on Windows.

I therefore rewrote the Paintbox behaviors for my own personal use. You will notice that I added two new ones: Select Eyedropper and Show Brush Color. This new set is much simpler than the original set of Director 8.0 behaviors except for the Undo Paint behavior.
The Undo Paint behavior has been replaced by a set of four scripts: an Undo/Redo Button Set behavior, an Undo Broker movie script and two parent scripts - Undo Step and Paint Line. The advantage of adopting this new technique for the undo feature is that it is no longer limited to undoing a paint action. As you will see, you can create a simple script, similar the Paint Line behavior, to undo and redo other actions. The undo feature thus becomes generic: you can use it for any undoable user action. I explain how the Undo Broker and the Undo Step scripts work further on.
How the Undo Feature Works
If you open up the Undo/Redo Button Set behavior in the Script window, you'll see that the mouseUp() handler says, in essence:
property action -- #undo | #redo
on mouseUp(me) --------------------------------------------
-- ACTION: Undoes or redoes the most recent action
---------------------------------------------------------------
if action = #redo then
Redo() -- in Undo Broker
else
Undo() -- in Undo Broker
end if
end mouseUp
The action property is set when you drop the behavior on the sprite, and choose Undo or Redo from the popup menu in the Behavior Parameters dialog.
The Undo Broker is a movie script. In fact, it's somewhat more than a movie script, but I'll leave the discussion of its complexities until later. All you need to know for now is that the Undo Broker contains a record of the last undoable action that the user made. This record is saved as an instance of the Paint Line parent script, which contains the instructions on how to undo the paint action and redo it again.
When you tell the Undo Broker to Undo(), the Undo Broker forwards the message to the instance of the Paint Line script, which actually does all the work. Let's first look at what an instance is, then look at what work it needs to carry out in order to undo the painting of a line.
Parent Scripts and Instances
A script instance is like a trained dog. When you give it the right commands, it does exactly what its handlers have taught it to do. A parent script is like a cross between a dog breeder and an obedience class. All the offspring of the script have the same general behavior but different characteristics.
You can breed as many offspring from a parent script as you like, and give them their different characteristics from the moment of their birth. They will all obey the same commands.
Or to use Lingo terms: you can create as many instances of the script as you like, and provide them with property values in the new() handler. An instance is in fact an address in the computer's memory that stores a number of property names and the values that are associated with them. When you give a command to an instance of a parent script, the command handler "knows" which property values are stored by that instance at that particular address in memory. Depending on the values it holds, each instance will thus do something different, by following the same rules.
Undoing a Paint Line Action
It's easier to understand this if you can see it in action. Let's first take a moment to consider what information is needed to undo a paint line action. We need to know:
- Which bitmap member is being altered by the paint line action
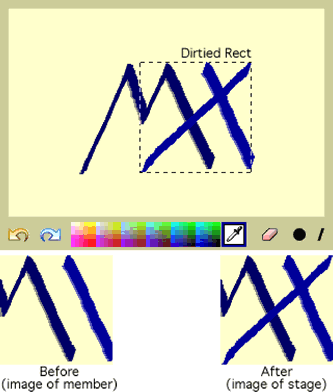
- What is the smallest rectangle that can fit around the new line
- What that rectangle looked like before the line was drawn
- What that rectangle looks like now.
Each new line that is drawn "dirties" a different rectangle, so each undo action will refer to a different rect and different before- and after-images for that rect.
Here's how the Paint Line parent script produces a new instance:
property pMember -- Bitmap member used for canvas
property pRect -- rect of altered area
property pBefore -- image of altered rect before alteration
property pAfter -- image of altered rect after alteration
on new(me, aDataList) -------------------------------------------
-- INPUT: <aDataList> must be a property list with the
-- structure:
-- [#member: <bitmap member>,
-- #rect: <rect>,
-- #before: <image>,
-- #after: <image>]
-- ACTION: Stores a pointer to the member whose image is
-- altered, along with the rect of the dirtied area and
-- the image of that rect before and after the change
-- OUTPUT: Returns a pointer to this instance
---------------------------------------------------------------
pMember = aDataList.member
pRect = aDataList.rect
pBefore = aDataList.before
pAfter = aDataList.after
return me
end new
Given these starting points, undoing the paint action is simply a matter of swapping the current image inside the dirtied rectangle for the image that was there before:
on undo(me) -----------------------------------------------------
-- ACTION: replaces the current image within pRect with the
-- original image
---------------------------------------------------------------
pMember.image.copyPixels(pBefore, pRect, pBefore.rect)
end undo
Redoing the change is just as simple:
on redo(me) -----------------------------------------------------
-- ACTION: replaces the original image within pRect with the
-- altered image
---------------------------------------------------------------
pMember.image.copyPixels(pAfter, pRect, pAfter.rect)
end redo
Setting Up the Undo Action
How does the movie know to create a new instance of the Paint Line script, and how does it know what values to use to create that instance? The answer is in the Paint behavior.
As the user drags the mouse to paint a line, the mPaint() handler of the Paint behavior continuously checks the position of the mouse, and determines the smallest rect that encloses all the positions of the mouse since the drag started.
While the user is dragging the mouse, the line is painted directly into the image of the stage. This acts as a separate layer, above the sprite that the user is painting on. When the user releases the mouse after painting the line, the bitmap still looks the way it did before the user started painting, and (the stage).image contains the "after" image. The mUpdateBitmap() handler copies the appropriate rect of the image of the stage into the appropriate rect of the image of the member.

At this point, all the ingredients are prepared for the undo action: the bitmap member, the dirtied rect, and the before- and after-images. All that remains is to assemble the ingredients into a list, and to tell the Undo Broker which script to use to treat the ingredients.
While you are welcome to study the Paint behavior to see this in detail, you'll probably find it more useful to practice with an easier example.
Creating a Customized Undo Script
As your movie stands, you can change the color of the brush but you can't undo that change. When you click on the color palette, the event #Paint_SetBrushColor is sent to all sprites. Here is how the Show Brush Color behavior, on the sprite behind the Eyedropper tool, currently handles it:
property pColor
on Paint_SetBrushColor(me, aColor)
if pColor = aColor then
-- The color has not changed
exit
end if
pColor = aColor
sprite(me.spriteNum).color = pColor
end Paint_SetBrushColor
To make the Paint_SetBrushColor() action undoable, you need to tell the Undo Broker what the color was before and after the change, and which script will handle undoing the change:
on Paint_SetBrushColor(me, aColor, isUndo)
if pColor = aColor then
exit
end if
-- Add your lines here
if not isUndo then
tUndoData = [:]
tUndoData[#before] = pColor
tUndoData[#after] = aColor
UndoAction("Select Color Undo", tUndoData)
end if
pColor = aColor
sprite(me.spriteNum).color = pColor
end Paint_ShowBrushColor
What purpose does the isUndo parameter serve? And how does the Select Color Undo script work? The answer to both these questions is in the following extracts from the Select Color Undo script. The undo action simply calls the same Paint_SetBrushColor() handler you saw above. Since it passes a value of TRUE to isUndo, no new instance of the Select Color Undo script is created.
property pBefore -- color before alteration
property pAfter -- color after alteration
on new(me, aDataList) -------------------------------------------
-- INPUT: <aDataList> must be a property list with the
-- structure:
-- [#before: <color object>,
-- #after: <color object>]
-- ACTION: stores the color before and after the color change
-- OUTPUT: a pointer to this instance
---------------------------------------------------------------
pBefore = aDataList.before
pAfter = aDataList.after
return me
end new
on undo(me) -----------------------------------------------------
-- SENT BY the mDo() handler of the Undo Step instance that
-- this instance is the ancestor of
-- ACTION: restores the brush to its original color
---------------------------------------------------------------
isUndo = TRUE
sendAllSprites(#Paint_SetBrushColor, pBefore, isUndo)
end undo
on redo(me) -----------------------------------------------------
-- SENT BY the mDo() handler of the Undo Step instance that
-- this instance is the ancestor of
-- ACTION: re-adopts the altered brush color
---------------------------------------------------------------
isUndo = TRUE
sendAllSprites(#Paint_SetBrushColor, pAfter, isUndo)
end redo
As you can see, the principles are simple. You define the before and after state in the new() handler, and you provide a means of switching from one to the other (and vice versa) in the undo() and redo() handlers.
I have removed the six crucial lines from the Show Brush Color behavior, and another six lines from the Select Color Undo behavior. All you need to do to make the feature work is to type in the lines indicated above
If you have followed the logic this far, you should be able to create your own Undo parent scripts for other undoable actions that you might need in your projects.
Chained Lists and Upside-Down Ancestors
The Paint Line and Select Color Undo scripts are simple because the real complexity is in the Undo Broker movie script and the Undo Step parent script.
An instance of the Undo Step script adopts an instance of the Paint Line or the Select Color Undo script as its ancestor. The Undo Step instances provide the links that chain the multiple undo actions together. Each instance contains a pointer to the previous undoable action. When an action is undone, its Undo Step instance becomes the first in a chain of actions to redo.
Normally, ancestors are used the other way around: normally the generic script is the ancestor of the specific script. Here, I make the specific script (Select Color Undo, for instance) the ancestor of the generic Undo Step. The idea is to make the specific scripts as simple as possible. There is no need, for instance, to declare an ancestor property.
By inverting standard practice, I make it easier for you to create your own undo action scripts.
Brokers, or Self-Instantiating Movie Scripts
The Undo Broker is a movie script. It thus responds to global calls to UndoAction(), Undo() and Redo(). The first time any of its public methods is called, the Undo Broker creates an instance of itself, and stores that instance as a property of itself. All public methods are diverted to private methods in this script instance. The properties of the script instance are thus kept private.
The Undo Broker thus provides a movie-wide feature without using any global variables. You can add it to any of your movies without needing to worry about clashes with the names of your global variables.
Not only that, but the action of the Undo Broker is limited to the movie itself. If you have several document windows open in your Paint application, each with its own Undo Broker, each paint document will perform its own undo actions independently.
A Professional Strength Version
The movie that you have been working on contains simplified scripts, to make it easy to see the wood for the trees. The buttons are just areas to click on: they give no feedback to indicate that the user's click has been registered.
The final version of this movie is CanvasPro.dir. This uses the OSControl xtra to provide platform-specific buttons, and to provide button menus that allow you to choose how many steps to undo or redo at a time. The behaviors have been adapted to work with OSControl sprites, but you can use them on your own buttons if you prefer. The behaviors in the CanvasPro.dir movie are more robust and end-user friendly than the ones you have been working with. To encourage you to use them in your own projects, they are organized into two separate external casts, which you can add to the Libs folder alongside your copy of Director. When you next open the Library Palette, the new behaviors will be there for you to use.
Conclusion
This article has dealt with Imaging Lingo, behaviors and parent scripts. It has shown you an unexpected use of movie scripts, and turned the notion of ancestors on its head. Some of these concepts may be new to you, and you may need to study the movies in more detail on your own to come to terms with them. But whatever your level of competence with Director, you should come away with something useful: an understanding of the power and flexibility of Lingo, two new sets of behaviors in your Library Palette, and the perception of how Director MX can help you make compelling, user-friendly applications.
Source files: undo.zip, undo.sit.
Copyright 1997-2025, Director Online. Article content copyright by respective authors.