Architecting a Console-Style RPG in Lingo: Part Two
June 25, 2004
by CC Chamberlin
Introduction
In last week's article, we discussed the high-level architecture of a console-style role playing game called Sacraments. We have established how the different game elements (called "interface objects") cooperate to interact with the players, and we've looked at how some simple interface objects are built.
This week, we're going to tackle the most complicated interface object in the game: the map renderer.
Drawing the Map
The basis of any RPG (and many other game types) is exploration. You need some way to display the world around the characters. There are very many ways to do this, especially now that Director has 3D capability. Because I was going for a retro console-style feel, I decided to go with a 2D tile-based representation, which meant building a 2D tile engine. I opted for 32 x 32 pixel tiles.
We'll be building the map drawing engine as an interface object. The actual control of the character walking around on the map is actually going to be another, separate interface object, because we might want to display the map without it being controlled by the user (such as during a cutscene). So all we're concerned with here is the display of the map and the storage of non-display data associated with it.
Building a Tile Taxonomy
The first step is to decide how your tiles are going to be stored and referred to. You'll need to have this in place before you can write the engine that displays all of this. Rather than trying to use sprites to move the tiles around, I was planning on drawing the screen using Imaging Lingo for speed. Therefore, I could keep all my tiles in tileset graphics, and draw out the pieces I want. A sample tileset from Sacraments is shown below:
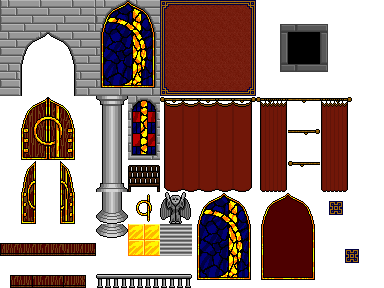
Note how all the tiles are connected with a single theme: the interior of the church. I wanted the flexibility to include various tilesets in the game without having to consolidate all of my graphics into a single file, so that I could organize my tilesets by purpose (forest, town, indoors, etc.). This was done mainly to allow for flexibility of the game engine - I could drop in and pull out tilesets at will, and I could keep the graphics organized into thematic groups.
Unfortunately, this presented a problem. If all the tiles were in a single reference image, you could simply store the x and y offsets for any given tile. The introduction of multiple tilesets, however, precludes this, so I just added another number to the mix to select a tileset, and then ensure that the tilesets are in the proper order. Each image could then be stored as a triplet of natural numbers: [t,x,y], where t is the tileset number, and x and y are the offsets to the tile.
Because there is no inherent cap to these numbers, the tilesets are almost limitlessly customizable. You can have one tileset that is 20x20 tiles in size, and then have a specialized 2x3 tileset for a particular purpose. You can even decide to add some rows or columns to a tileset without a problem, so long as you don't move any graphics that are already being referred to.
(Tip: I recommend always using a zero-reference system when indexing tiles in this manner, because it simplifies your calculations. In other words, count starting with zero instead of one. For example, the upper left corner of any given tile in a zero-reference system would be point(x*32,y*32). If you used a one-reference system, it would be point (x*32-32,y*32-32) or ((x-1)*32,(y-1)*32). However, if you've already got some legacy code that uses a one-reference system, stick with it - don't do what I did and try to use both systems - that gets confusing very quickly!)
Drawing Engine Architecture
I wanted to be able to have the characters walk over and under part of the scenery, to get them placed visually into the environment. I would simplify things considerably to not do that, but I felt it would be worth the tradeoff.
You'll notice from the tileset example above that the tiles are not complete, opaque tiles. I wanted to be able to composite tiles together to form more complicated tiles. In order to achieve this, I set up a system of 'layers' that would allow me to layer a series of tiles on top of each other to achieve the visual effect I wanted.
The map engine in Sacraments uses a total of nine visual layers. Eight of them are simply references to tiles. The first four determine the "Ground" tiles, which consists of scenery that is drawn behind the characters. The fifth layer is where the characters are drawn. The remaining four layers are the "Canopy" tiles, which is the scenery which is drawn above the characters.
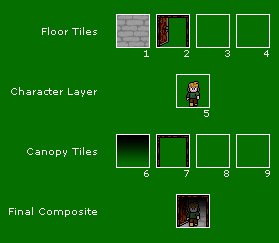
The Ground and Canopy layers get pre-rendered when the map is loaded, which collapses these nine layers into three: a Ground Composite, the characters, and a Canopy Composite. Each frame, I copy the visible portion of the Ground Composite Layer, then I draw the characters individually (see below), and finally, I copy the visible portion of the Canopy Composite Layer. I can do this because, with very few exceptions, the scenery elements of the map do not change from frame to frame, allowing me to pre-buffer the majority of the map scenery for speed.
Note that in order for this system to work, the Canopy Layer must have alpha channels turned on, or it must be copied with background transparent on, or a mask image used. Because I wanted gradient opacity shadows, I found the easiest thing to do was to simply use alpha channels. This simplifies the engine, too, since I can just copy from image to image without having to worry about building masks. In a memory-tight situation, however, you may want to stick with one of the other methods. You could make some great tilesets that are only 8-bit in depth, using one of the funky colors as your background color (I wouldn't use white, because you will eventually want to use it in a tile - better to choose some garish pink color to omit from your palette).
Animated Tiles
I wanted to include animated tiles in my game. This is somewhat at odds with the notion of pre-rendering the Ground and Canopy composite layers, because you could easily have large portions of the map changing frame by frame. My solution was a very memory-intensive one: I cached four versions of the composite layers, one for each frame of animation. (My animated tiles had four frames each.) When the time came to draw, I would use the composite frame that I was currently on.
(Luckily, my maps tended to be rather small (15x20 usually), so the memory size wasn't much of an issue, but it could quickly become an issue in a game that requires larger maps.)
With regard to how to keep track of tiles, I decided to simply do it on a tileset by tileset level. Basically, I'd just keep track of which tilesets contained animated tiles. This allowed me to retain the taxonomy described above. If the tileset being pointed at is an animated tileset, the (x,y) tile pointed at would be the first frame in the sequence, and the three tiles to the right of it would be the remaining frames.
Characters
Since characters in the map are liable to change pose often and move around in ways that don't fall neatly into tiles, they are handled differently than the composite map layers.
First of all, ecah character got its own sprite sheet of poses. Here's a sample sprite sheet for one of the characters in Sacraments:
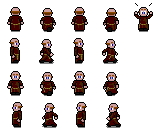
In this example, we have some very standard poses - walk cycle to the north, walk cycle to the east, etc. But also note the astonished deacon's expression at tile (4,0). I wanted the ability to display custom poses, so each sprite sheet could have any arbitrary poses I wanted, but doing so would require a way to describe these poses.
The mechanism I came up with was to abstract the poses into names, and then store a list of sprite sheet frame references for each pose. If it was a static pose, like someone just standing there, it would be a list with a single sprite sheet frame referencem, but if it was an animated pose, like someone walking, it would be a list with a sprite sheet frame reference for each frame in the animation cycle. Then, each character would only have to keep track of its current pose, and then loop through the list of references indefinitely.
For instance, here's what the pose information for the deacon might look like (formatted for readability):
#north [ [
#northWalk [ [0,0], [1,0], [2,0], [3,0] ]
#east [ [0,1] ]
#eastWalk [ [0,1], [1,1], [2,1], [3,1] ]
#south [ [0,2] ]
#southWalk [ [0,2], [1,2], [2,2], [3,2] ]
#west [ [0,3] ]
#westWalk [ [0,3], [1,3], [2,3], [3,3] ]
#shock [ [4,0] ]
But what's the best way to store this information? I wanted a way to associate animation data for this sprite sheet with the actual image cast member, rather than trying to keep the associated data elsewhere. In order to accomplish that, I added a member script to each character sprite sheet with a getPoseInfo() handler that returned more information about the character defined by that sprite sheet. Basically, it was just a list of poses. Each pose was defined by a two-item list: the pose name, and the list of pose animation frames.
Most of my sprite sheets were similar in layout - the first row was four frames of walking north, the second row was four frames of walking right, etc. Since most characters would be the same, I could take a shortcut and add a keyword, #standard, to indicate the set of standard poses. After that, any special poses would be defined on a case-by-case basis. Here's a sample of what the cast member script on the Deacon image might look like:
on getPoseInfo me
-- Each entry is either simply #standard, to load the standard poses,
-- Or a two-entry list. The first entry is the label for the pose.
-- The second entry is a list of sublists giving the frame locations
-- for the given animation, in the form [<x>,<y>].
base = [ #standard ]
base.add([ #shock, [[4,0]] ])
return base
end getPoseInfo
Thus, to add a new pose, I would just add another entry in the list that gets returned.
Here's how to call the getPoseInfo() handler in a particular image cast member to find its supported poses:
-- Get a reference to the member
theSheet = member( [spritesheet member name] )
-- Get the pose info
poseinfo = theSheet.script.getPoseInfo()
Once all that was worked out, it was a simple matter to make a generic 'character' parent script that could discern its own animation information if told which character sprite sheet to use. With that in place, building the character parent script was basically a matter of keeping track of where a character is on the map, stepping through the animation, and deciding whether to draw the character when prompted based on the current visible map region.
Each prop also had a pre-defined pose called #invisible that it started out as. Invisible props, as the name suggests, are not displayed.
Note that this mechanism can be used for more than characters. You could use it for boats, ambient life, and other purposes. For that reason, I actually just called them "props" rather than characters.
A Virtual Camera
I did not want to hard-code the visible area to be around a particular character at all times (even though it turned out that the camera never leaves the main character during the course of the game). The way to handle this is to have a camera that can be controlled, and just have the map draw wherever the camera is looking.
This is really little more than an (x,y) position to represent the point of interest that the camera is looking at. Then, to determine the visible area of the map, you just take the rect surrounding that point at the appropriate size. (There were some issues with keeping the camera looking at the map - blocking the camera from looking beyond the area where the map is currently defined, but that was entirely a matter of just checking the map extents.) With the visible area known, you can copy out of the ground composite layer. Then, you can discern which characters are currently visible by whether their rects intersect the visible rect. Sort those characters based on their y position (if you need to - if the characters are never overlapping tiles, this step is unnecessary) and draw them on the screen. Finally, copy the same rectangle out of the canopy composite layer, and you're done.
The way I handled the camera motion was to have the camera always pointing at a character/prop, taking its (x,y) reference information from the prop's current position. This prop could be the main character's prop, but if I wanted to, say, pan the camera away from the main character, I could move an invisible prop to the same location, point the camera at that prop, and move the prop wherever I wanted the camera to track.
You might also have noticed that I'm using a blocky, pixellated look for the graphics. Basically, I am drawing all graphics at double size. In memory, the graphics are half the size they appear in the game and are doubled on-the-fly. This is a simple matter to do in imaging Lingo - you simply double the size of the destination rectangle when performing your copyPixels() command. (Although I haven't done any formal benchmarking, copying a 320x240 rectangle to a 640x480 stage seemed to be considerably faster than simply copying a 640x480 rectangle, so this also apparently yielded a processing boost as well.)
Canopy Error
While the ground-character-canopy drawing mechanism has a lot of advantages, it does have a disadvantage in that this system does not do any depth-checking on any of the map scenery. If something is drawn in the canopy layer, it is always drawn above the character, even if the character has moved downward enough that it would normally be seen in front of it. This can be tricky, say, for a tree, which a character should be able to walk behind (meaning the tree should be in the canopy layer) or in front of (meaning it should be in the ground layer). The only way around this is dynamically changing the tile graphics, or preventing the character from walking in front of or behind the tree. (Or splitting the tree up into multiple tiles so that the character can walk behind the high branches, and in front of the low branches.) It is up to you to keep the characters from moving somewhere that will destroy the illusion of depth, as shown in the figure below:
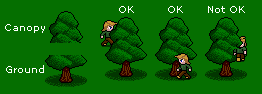
The way I solved this was to not give the characters a pixel-level freedom of movement, but instead a tile-based movement scheme. In other words, if you move up, you move up an entire tile. This way, the movement of the characters was predictable, and you could block characters from moving in a way that would destroy the illusion by blocking them from entering a tile that causes this "canopy error".
Movement Layer
As hinted above, there is more information associated with each location on the map than just the tiles to draw there. You need to know whether the character can walk into any particular map cell.
In some systems, you might be able to associate walkability directly with the tile from the tileset - for instance, the "wall" tile may block motion while the "ground" tile may allow motion. Unfortunately, because we're compositing our tiles, we cannot resort to this, and therefore, we store a movement layer.
The movement layer simply tracks what movement modes it would take to move a character into this tile. In Sacraments, there are only two states - walkable or not walkable - but it would be a simple matter to add multiple modes of motion by having this be a number representing the allowable modes of transportation.
Typically, you'd do this with a bitwise OR operation to describe ways to move into this tile. For instance, suppose "walking" is referred to as a 1, "swimming" is referred to as a 2, and "flying" is referred to as a 4. (For this to work, these numbers must be powers of two.)
You could then denote a tile that can be reached by swimming and flying but not walking by adding two (swim) and four (fly) to get six. Normal walkable tiles would be a five (walk and fly), and chasms would be a four (fly only). Impassable areas would be a zero.
Once you have this system in place, you could denote the modes of transportation available to the player using the same system. For instance, if the player can walk and swim currently, his movement mode would be a three (walk and swim). Then , to see if a character can move into a particular tile, you can do a bitwise OR operation with the tile's movement layer to see if any of the player's movement modes match any of the movement modes that can access the tile:
if bitOr( [player movement modes] , [tile movement mask] ) then
return 'Yup, you can walk there!'
end if
In this manner, the walkability of the entire map boils down to a single number per map cell.
Script Layer
So far, we have a largely static map. What fun is that? The player is going to want to do more than just walk around. Typically, this is the point where other game programmers start looking at writing or embedding scripting languages into their applications. But Director already has a scripting language built right in: Lingo. Rather than try to reinvent the wheel, why not simply use Lingo as the scripting language?
Each tile can have a script associated with it which contains Lingo code. Since there could be many tiles that have the same Lingo code associated with them, I decided to store these scripts in a simple List, and then have the tiles refer to the position in the list that the script is stored in.
I wanted the scripting system to be object oriented, so I decided to have the scripts act as actual parent scripts. But these scripts would be loaded at runtime, so I needed to create the parent scripts themselves at runtime.
This is a simple matter to do. I set aside a "skeleton" script member to spawn from. Whenever I needed to create a new object, I would set its scripttext to the text for the script in the map, and instantiate a new object from it. To reduce the amount of things I would have to type in the map editor, I held in memory a "least common denominator" object that would get prepended to the script string. Here, I would put references to oft-used globals, and populate the script with relevant information.
For instance, I wanted tile scripts to have access to some common globals, and to know where they were on the map, so that code would be reusable. So, I set up the following "base script":
global gRoomFlags, gGameFlags
property here, there
on new me
return me
end new
This base script (stored as pScriptBase) ensures that every script has access to some important game variables, and that each one will have a 'here' and 'there' property. The 'here' property refers to the script's location, and 'there' will be automatically populated with the player's position before calling the script.
Below is the routine I used to create the parent script, instantiate it, and populate it with its 'here' property.
on objectFromString me, theScriptText
a = member("SKELETON")
a.scripttext = pScriptBase & theScriptText
b = script("SKELETON").new()
b.here = [#x:0, #y:0]
b.there = [#x:0, #y:0]
return b
end objectFromString
Every tile that has an associated script, then, gets its own object when the map is loaded that has arbitrary script information in it.
Scripting Events
But what do you put in the script to have it affect the game world? To make things easy, I just defined some standard events that could be sent to any of these objects to allow them to respond to player behavior:
- #nudge - The player is facing this tile, and has pressed the action key.
- #bump - The player has tried to enter this tile, but cannot because he does not have any matching movement modes.
- #walk - The player has successfully entered this tile.
- #leave - The player has left this tile.
To facilitate being able to write scripts within a map editor, I came up with a lot of movie scripts that would cut down on the amount of raw text I would have to place in the individual maps. This breaks nice OOP somewhat, but in reality, the movie scripts simply route messages to the appropriate objects as necessary - really, it's just a shorthand way to do standard object-oriented messages. (In your own project, you could easily leave the true OOP syntax in place with little problem.) Here's an example script from a map that demonstrates the sort of thing that I would write for a map script:
-- Climb the ladder
on walk me
loadMap("apothecary",9,4)
end walk
Here, we see that when the player walks onto this tile, it calls the movie script "loadMap()", which will handle all the details of loading up a new map ("apothecary"), moving the character to the proper place on that map (x=9, y=4), and any other administrative tasks that need to happen to switch context over to it. In particular, note how readable this is. Nice and short, and I did not have to write a "new()" handler, or include any properties or globals. This cut down on the amount of time I spent writing and debugging map scripts considerably, and it made the map files smaller.
One of the shortcut routines was called setMapLayer(), which would essentially change a map layer's tile value, and rerender that tile in the composite Maps. It could also be used to change the walkability or the script associated with the given tile. In this manner, I could affect any change I wanted to the map - this was quite useful for writing scripts to open doors, make new areas walkable, and otherwise generally change graphics. I also made a version that would work over a rectangle of tiles on the map, to facilitate things like revealing unexplored areas of an indoor area.
Storing the map data
So, as you can see, there are a total of ten layers we need to store to build a map: four ground layers, four canopy layers, one movement layer, and one script layer. (The character layer is handled with code.)
By providing a raw ordering of these items, each tile location is simply a ten-entry list. The graphics layers contain references to tiles to draw in the [x,y,z] format mentioned above, or simply a zero to indicate that there is nothing to draw in that layer. The movement layer is simply a natural integer, as discussed above. The script layer is an index into a list of script text strings.
All that is left, after this large array of content, is to add the associated information, such as the width and height of the map, and the raw text of the scripts. I just used a simple line-by-line format for this, but it could very easily be compressed into a much more byte-friendly format. Here's how it works:
1  Header string (to check this is really a map file)
2  File format version
3  Identifier for this map
4  The large array of tile info, as a string (NxM ten-entry lists)
5  Number of scripts
6+  Script blocks for each script consisting of:
  1  Script number
  2+  Content of the script
  3  "&&EndScript&&" keyword to denote end of script
This format is very easy to write a parser and a exporter for, although it lacks the portability of something like XML or the economy of a compressed binary format. However, since the format was proprietary and closed anyway, and there was a time limit on the competition, I decided there was little reason to expend time and effort working with Director's XML parser or dealing with compressing and decompressing map data on the fly when a simple value() statement would suffice.
Summary of Map Code
Here is a summary of the map code architecture that we have discussed:
- Map Object
- Reads the map file for information layers.
- Stores and draws the ground and canopy composites.
- Has a virtual camera that points at a prop.
- Keeps list of props
- Draws itself to the stage when asked.
- Provides inspection services for discovering information about the map.
- Can be instructed to change any part of the map's information layers.
- Script Manager
- Reads the map file for scripts.
- Stores and spawns scripts for map areas.
- Prop
- Stores its own sprite sheet from the sprite sheet ID
- Reads its own animation information from the sprite sheet ID
- Draws itself to the stage when asked.
- Can be instructed to change pose, or change position.
The Map Editor
An entire article could be written on map editors alone, so I won't go into great detail in how I built mine. I will, however, talk a little bit about the relationship between the map editor and the game.
You can easily spend more time making your map editor than making your game. This is because map editors often have more complex interfaces than the games themselves. Nowhere in the game will the player have to manage tileset sheets or draw walls and define dialog boxes. So plan accordingly, especially if you plan to make your map editor available to players.
For RPG's, a map editor is a must. Don't even try to get by without one. Even if your map file format is the most human-readable format ever, you will still need to tap your creativity. You need to see how the map will look to the player. I highly recommend you build a map editor early on. Even if you have to rebuild it later as your engine changes, it's worth it, because it keeps your head in touch with the game world.
And your map editor really does need to be polished enough that you can be creative. It should be fairly effortless to modify your maps, or else your heart won't be in it. Spend the time to make a solution that you can work with without having to spend all your effort on following precise procedures or avoiding fatal errors.
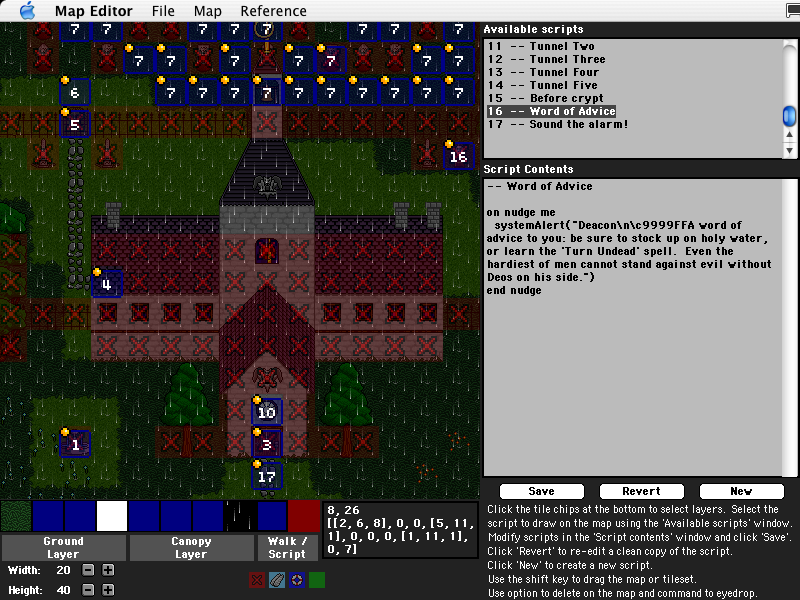
Click to enlarge
One thing that makes things a little less painful is to use shared casts to handle a lot of the common work between your game movie and your editor movie. For instance, store all your graphics in a shared cast, and then any updates to the graphics will be available to both applications. If both your editor and your game use the same map code object, there are less likely to be issues when moving data out of the editor and into the game.
Sacraments had a lot of casts all throughout development, until the very end, when I pulled the cast members from the shared casts into internal casts for distribution (I just didn't want any more associated files floating around than necessary). Until that point, the map editor was using the same tiles as the game, using the same parent scripts, etc.
The map editor also wrote out files via FileIO, so that I could archive them, move them around, and edit them by hand when it was convenient. When it came time to build the final game, I wrote a little script to import all the maps, again so that there would not be any associated files for players to lose.
Conclusion
We've looked at how the game renders the player's view of the game world. We now have the mechanism by which we can display the most important action of the game. Our game world has many colors, great depth, and the flexibility for a great range of terrain.
Unfortunately, our world is static. We don't yet have a mechanism to bring the game world to life. Next week, we'll look at how we can move characters around, either under the control of the player, or within cutscenes to advance the story. Once we have this code in place, we'll have everything we need to immerse the player in the game.
Copyright 1997-2026, Director Online. Article content copyright by respective authors.