Building Tooltips in Director
September 17, 2004
by Irv Kalb
In many programs, if you keep the mouse over an area of the screen (for example, a button) for a short amount of time, a small text message pops up to describe what the area of the interface does. This is knows as a "tooltip". Tooltips have become a widely accepted way of making user interfaces clearer. The new user can use them to learn basic functionality. A user who has not used a piece of software for a long time can use them to refresh their memory. The experienced user will not be impacted by tooltips since one will only appear if the user hovers over an area for a significant amount of time.
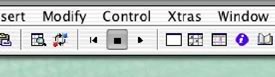
Even in Director, the meanings of some of the buttons might not be immediately clear. In the Director main toolbar, there is a button with two right angled arrows. The novice Director user might think that this is some sort of traffic diagram from England showing where cars may turn left:
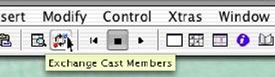
However, if you move the mouse over this button for a while, the following tooltip shows up to explain the meaning of this button:
In this article, I will show how to build a set of two related behaviors that will implement tooltips in Director. The first behavior will be the "Tooltip Rollover". You can attach this behavior to any interface element you wish to have a tooltip. The other behavior will be the "Tooltip Display" behavior. This behavior will be attached to a single sprite made up of a field member. This one sprite will be used to display the text of the tooltip.
In the article, we will discuss the following concepts:
- Instances of behaviors
- Events and event handlers
- State machines
- Timing in milliseconds
- Intersprite communication
- Calculating positions and rectangles on the Stage
ToolTip Rollover
First we'll discuss and write the tooltip rollover behavior. This behavior will detect when the mouse has been within the rectangle of a sprite for a given amount of time, and then send the text to be displayed to the ToolTip Display sprite that lives in a different channel.
Let's think about the essential pieces before writing some code. Among the things we must do are the following:
- Determine what text should be displayed
- Build a timing mechanism to see if the user has kept the mouse inside the rectangle of the sprite for an appropriate amount of time
- Find out where the Tooltip Display sprite is.
- Send text to the Tooltip Display sprite at the appropriate time.
Text to display
In Director each cast member can have a name. For simplicity, we will start by using the name of the rolled over member as the text of the tooltip. We can get this name by using the following code:
property spriteNum
property pName
on beginSprite me
pName = sprite(spriteNum).member.name
end
"spriteNum" is a special property variable that can be used in behaviors. When it is declared as a property and used in a behavior, Director automatically gives it the number of the channel to which the behavior is attached.
One of the big buzz-phrases in programming these days is Object Oriented Programming (also known as "OOP"). Behaviors are a great way of learning more about OOP. Programmers write behavior scripts. But when a behavior script is attached to a sprite, Director creates a new object from the script. Each such object is called an "instance" of that behavior.
Here's a simple example. Create a new Director movie. Go to the paint window and create a square. Name the member "Square". Then in the paint window, create a circle and name the member "Circle". Now open a script window and enter the code above. Before the last line (the "end" line) of the beginSprite handler, add the following line:
put "spriteNum" && spriteNum && "pName" && pName
Name this script "Tooltip Rollover". Using the Property Inspector, make sure that you set the type of this script to "Behavior".
Now drag the Square member into channel 1, and drag the Circle member into channel 2. Finally drag the ToolTip Rollover behavior script onto both sprites. Now run the movie.
If you open the message window, you should see the following:
--"spriteNum 1 pName Square"
--"spriteNum 2 pName Circle"
At run time, Director creates two instances (objects) from the single behavior script. Each instance uses the exact same code, but each instance gets its own copy of the data - the property variables. Each gets its own copy of spriteNum and its own copy of pName. As we will see in a moment, the value of any property variable declared in a behavior script is "remembered" and can be accessed by any other handler in that script.
Any change you make to the code in a behavior script will affect all sprites to which the behavior is attached. This is a very important part of object oriented programming.
Timing
Now we need to build a way for the behavior script to know when is the right time to show a tooltip. Again for simplicity, we'll just pick a set amount of time. Let's say that we will trigger a tooltip when the user has kept the mouse within the rectangle of the rolled over item for one second.
To build this timing mechanism, we must understand two important concepts: the "on exitFrame" handler and the concept of a state machine. At each frame, Director sends out special messages to all sprites. One of these messages is the exitFrame message. The rate at which this message is sent is dependent on the frame rate of the Director movie. In a behavior, you can write an on exitFrame handler to receive this message. The content of the exitFrame message is completely up to the programmer. You can tell Director to do anything you want it to do on each such call. A "trick" is to make the same handler do different things under different circumstances. In our case, in the exitFrame handler, we can constantly check how long the mouse has been within our rectangle. If it has been over a second, we can make a call to display the tooltip.
But how do we do this checking? The answer lies in a concept called a state machine. When implemented in software, a state machine is a piece of code that does something different based on the value of a variable. This maps nicely into a Lingo case statement:
case someVariable of:
State1:
-- execute this code here
State2:
-- execute this code here
...
StateN
-- execute this code here
end case
The key is that in any branch of the state machine - or in other handlers in the same script - we can change the state to some other state.
Here's how we'll apply this idea to our Tooltip Rollover behavior. We will declare a property called psymState that will be used to keep track of what state the current behavior is in. In thinking through the different states, the behavior will be in one of three states:
#notOver - the mouse is not over our rectangle
#overAndWaiting - the mouse is over our rectangle and we are waiting for 1 second
#showing - the tooltip is showing.
We'll start psymState in the #notOver state. Whenever the mouse enters our rectangle, we should go into the #overAndWaiting state. When we are in this state for one second, we trigger the tooltip to display, and change our state to #showing. Whenever the mouse leaves our rectangle we hide the tooltip and change the state to #notOver.
In computer science classes, students are asked to draw "state diagrams" to describe these type of interactions. Another approach is to create an table with a list of events as rows (exitFrame, mouse-Enter, mouse-Leave), and a list of states as columns (#notOver, #overAndWaiting, #showing). This is often a good idea to be sure to account for all cases. In each cell, you describe what action takes place and any change in the state variable. Then the array is turned into code.
However, this state machine is rather simple and will become clearer with some simple code. Here is what this state machine would look like in pseudo-Lingo. Notice the addition of the Lingo on mouseEnter, on mouseDown, and on mouseUp, handlers to handle these Lingo events:
property psymState
on beginSprite me
psymState = #notOver
end
on mouseEnter me
psymState = #overAndWaiting
* Start a timer *
end mouseEnter
on mouseLeave me
* Hide the tooltip *
psymState = #notOver
end mouseLeave
on mouseUp me
* Hide the tooltip *
psymState = #notOver
end
on exitFrame me
case psymState of
#notOver:
nothing
#overAndWaiting:
* if we've been in this state for more than 1 second then *
* show the tooltip *
psymState = #showing
end if
#showing:
nothing
end case
end
By declaring psymState as a property variable, it means that each instance of this behavior will have it's own version of psymState. Further, psymState can be used in any handler in the script, and its value will be remembered across these calls. For example, when the user moves the mouse into the rectangle of the sprite, the on mouseEnter handler is called by Director, and here we set the state to #overAndWaiting. The exitFrame handler is called many times each second. When the value of psymState changes, the exitFrame handler will do something different - it will take a different branch in the case statement.
To finish the timing aspect, we need to figure out how to count from 0 to 1 second. There are many ways to do this, but here is the simplest. When the user first brings the mouse over the sprite, we'll calculate what time it will be one second from that point. Lingo keeps time in milliseconds. You can find out the current value of milliseconds from when the computer was turned on by using the Lingo function "the milliseconds". To find one second from the current time, we can add 1000 to the milliseconds. We can save this value in a new property variable like this:
pmsShowTime = the milliseconds + 1000
Finally, in the exitFrame handler, in the #overAndWaiting part of the case statement, we can check for the 1 second elapsed by checking if the current value of the milliseconds is greater than the pmsEnd that we calculated earlier. If so, then we show the tooltip and change our state to #showing. The check looks like this:
If the milliseconds > pmsShowTime then
-- Show the tooltip
psymState = #showing
end if
It turns out that in this behavior script, the #waiting and #showing states don't really do anything, and they could be collapsed into a single state. However, for the sake of clarity, I like to show all possible states. It is also a good idea to keep these states in the code in case you decide to do something else when in one of these states.
There is one extra note here. If the rolled over area is not a rectangle, for example a circle, you may want to use Matte Ink in the score. When using Matte ink, Director will send the mouseEnter and mouseLeave messages only when the mouse enters and leaves a pixel that is in the cast member, not just within the rectangle of the sprite.
InterSprite Communication
The main thing that's left to do is to send a message to the ToolTip Display to show the tooltip. Obviously we have not written the ToolTip Display behavior yet. However, we can now define what messages we expect to send it. This is known as defining the "interface" of a behavior or an object. We know from our pseudo-code above that we will need to tell it to show and hide the tooltip. Clearly, we will need to define one handler for each of these actions. However, when we want to show a tooltip, thinking ahead, the code to show a tooltip will need to know two things: the text to display and the rectangle of the rolled over item (in order to position the tooltip accurately). When the behavior instance starts up, we can save away the rectangle of the sprite in a property variable. When we call the show routine, we will need to pass in the text and this rectangle.
The final issue is to find out what channel the ToolTip Display behavior instance is attached to. The way to do this is to broadcast a message to all sprites and ask them if they have the ToolTip Display behavior attached. This can be done using sendAllSprites. But sendAllSprites can be "expensive" in terms of time, so we don't want to do this a lot. Here's how we will handle this. The first time we show a tooltip, we will use a sendAllSprites to send out a special message asking for the sprite number of the tooltip display sprite. When we find out the channel number, we will save it in yet another property variable. All property variables (in fact all variables) start out with a value of VOID. We can use the voidP() function to check if we have figured out the channel number yet. From then on, whenever we want to send messages to the ToolTip Display behavior, we will use the saved channel number. When we want to send a message to the specific sprite with the ToolTip Display behavior attached, we use the sendSprite command.
Tooltip Rollover code
Putting all this together, we get the following code for the Tooltip Rollover:
-- Tooltip Rollover behavior
property spriteNum -- the channel in which thhe sprite is located
property pName -- the text to display
property pmsShowTime -- the milliseconds at which to show the tooltip
property psymState -- #notOver, #overAndWaiting, #showing
property pRect -- the rectangle of the rollover area
property pchToolTipDisplay -- channel number of the ToolTip Display sprite
on beginSprite me
pName = sprite(spriteNum).member.name
psymState = #notOver
pRect = sprite(spriteNum).rect
end beginSprite
on mouseEnter me
psymState = #overAndWaiting
pmsShowTime = the milliseconds + 1000
end mouseEnter
on mouseLeave me
sendSprite(pchToolTipDisplay, #mToolTipDisplay_Hide)
psymState = #notOver
end mouseLeave
on mouseUp me
sendSprite(pchToolTipDisplay, #mToolTipDisplay_Hide)
psymState = #notOver
end
on exitFrame me
case psymState of
#notOver:
nothing
#overAndWaiting:
-- See if it's time to show the tooltip
if the milliseconds > pmsShowTime then
me.mShowToolTip()
psymState = #showing
end if
#showing:
nothing
end case
end
on mShowToolTip me
-- The first time, the channel of the tooltip display is not known yet, let's find it
if voidp(pchToolTipDisplay) then
pchToolTipDisplay = sendAllSprites(#mToolTipDisplay_GetChannel)
end if
sendSprite(pchToolTipDisplay, #mTooltipDisplay_Show, pName, pRect)
end
on endSprite me
sendSprite(pchToolTipDisplay, #mToolTipDisplay_Hide)
end
Notice that I added an on endSprite handler to the end of the script. This just sends a message to the ToolTip Display sprite to turn off the tooltip when the rollover sprite ends.
Tooltip Display
Now we have to build the ToolTip Display behavior script. We know from our earlier discussion of the "interface" of this behavior, that this behavior script will at least need a Show, Hide, and GetChannel handler. Let's start by building a skeleton behavior script:
property spriteNum
on beginSprite me
me.mToolTipDisplay_Hide() -- start off hidden
end
on mToolTipDisplay_GetChannel me
return spriteNum
end
on mToolTipDisplay_Hide me
sprite(spriteNum).locV = -1000 -- move offstage
end
on mToolTipDisplay_Show me, theString, rectRolledItem
put theString && rectRolledItem
end
The above outline gives us most of the functionality we need. In fact, at this point, you can test if the intersprite communication is working correctly. To do this, create a field cast member and give it a name like "ToolTip Display Field". Drag it to the stage and place it in the highest numbered channel. This way, the tooltip will show over all other sprites. In practice, this sprite will need to be stretched across the entire movie so that tooltip rollover behaviors can communicate with it from anywhere in the movie.
Now create a new behavior script, call it "ToolTip Display", and enter the above code. Be sure to make it of type Behavior in the Behavior inspector. Finally, drag the behavior from the cast and drop it onto the field sprite in the score. Open the message window and run the program. When you hover over the square or the circle for one second, the word square or circle should appear in the message window, along with the appropriate rect.
Formatting the text
When dealing with a field member, there are many different properties that can be manipulated to alter the way the text is displayed. You can find a list of these properties by clicking on the member in the cast, then looking at the field tab in the Property Inspector.
Of these properties, for a tooltip display you will want to set:
- editable to false
- boxtype to #adjust
- wordWrap to true
You can experiment with and customize many of the other properties here (e.g., border, color, bgColor, font, fontStyle, fontSize, etc.) so that the tooltip will appear the way you want it to. Any changes you make here will be reflected for the display of all tooltips.
However, since the text to be displayed in the tooltip changes each time you rollover a different item, the rectangle (width and height) of the member needs to be set on the fly. Therefore, setting the rectangle must be done in code.
To begin the full ToolTip Display behavior, we will define a few properties for saving information, and set a few property variables as constants to be used in calculations later. At the end of beginSprite handler, we make a call to a move the tooltip off-screen so it is not visible at the start of the program:
property spriteNum
property pmTooltipText
property pMaxWidthToolTip
property pnPixelsAboveOrBelow
on beginSprite me
pmToolTipText = sprite(spriteNum).member
pnPixelsBelow = 4 -- spacing between rect and tooltip
pMaxWidthToolTip = 200 -- maximum width of the tooltip
me.mToolTipDisplay_Hide() -- start off hidden
end
An important thing to notice here is that in the first line, we "cache" away a reference to the tooltip member into pmTooltipText. This will make it easier to refer to the member in the rest of the code. Since Lingo only has to figure out this member reference once, it also helps make the code fast. You'll also notice that one of the properties we created was called pMaxWidthToolTip. This will be used to set a maximum width for the tooltip. If the text goes over the maximum width, the text will wrap onto two or more lines. We'll pick an arbitrary size of 200 pixels to start width.
As we discussed earlier, when an instance of the ToolTip Rollover behavior instance calls the ToolTip Display instance, it will pass in the text to display, and the rectangle of the rolled over item. Now we have all the information we need to code the mToolTipDisplay_Show handler.
To size the rectangle properly, we first set the rectangle of the member to some large height (and use our maximum width). Then we put the text into the display member:
on mToolTipDisplay_Show me, theString, rectRolledItem
member(pmToolTipText).rect = rect(0, 0, pMaxWidthToolTip, 1000)
member(pmToolTipText).text = theString
When we set the new text into the member, Director automatically adjusts the height of the rectangle for us, but it leaves the width at pMaxWidthToolTip. For multi-line tooltips this is fine. However, if the tooltip is only one line of text, then we must manually adjust the right side of the tooltip member's rectangle.
Lingo has a routine called charPosToLoc that tells us the position of any character in a string. We want to know the position of the right edge of the last character. To do this, we ask Director the position of the number of characters in the string, plus one. While this is a non-existent character, Director gives us the width of the full string. Knowing this width, we can adjust the rect of the member. Here's how:
if member(pmToolTipText).lineCount = 1 then
-- Only one line, must shrink the width to match the text
nChars = member(pmToolTipText).text.char.count
locLastChar = member(pmToolTipText).CharPosToLoc(nChars + 1)
textMemberRect = member(pmToolTipText).rect
textMemberRect.right = locLastChar.locH
member(pmToolTipText).rect = textMemberRect
end if
Placing the tooltip
Field members work differently from graphics members as far as the registration point is concerned. Since you can change text on the fly, field members have their registration point in the upper left hand corner. This makes the math slightly tricky. We will calculate the horizontal and vertical locations to display the tooltip separately.
We want to position the tooltip centered on, and a little below the rolled item.. Earlier we declared a property variable, pnPixelsBelow, and set it a small number of pixels (4) to give us some separation from the rolled item. To display the tooltip we make the calculations shown here:
-- Calculate locH and locV
centerH = (rectRolledItem.left + rectRolledItem.right) / 2
locHTip = centerH - (pmToolTipText.width / 2)
locHTip = ((rectRolledItem.left + rectRolledItem.right) / 2) \
- (member(pmToolTipText).width / 2)
locVTip = rectRolledItem.bottom + pnPixelsBelow
Finally, we use the locV and the locH we just calculated to properly position the tooltip:
sprite(spriteNum).loc = point(locHTip, locVTip)
Here is the resulting full script of the ToolTip Display behavior:
-- Tooltip Display
property spriteNum
property pmTooltipText
property pMaxWidthToolTip
property pnPixelsBelow
on beginSprite me
pmToolTipText = sprite(spriteNum).member
pnPixelsBelow = 4 -- spacing between rect and tooltip
pMaxWidthToolTip = 200 -- maximum width of the tooltip
me.mToolTipDisplay_Hide() -- start off hidden
end
on mToolTipDisplay_Hide me
sprite(spriteNum).locV = -1000 -- move offstage
end
on mToolTipDisplay_GetChannel me
return spriteNum
end
on endSprite me
pmToolTipText.text = " "
me.mToolTipDisplay_Hide()
updateStage
end
on mToolTipDisplay_Show me, theString, rectRoll
-- Set the max width of the tooltip
pmToolTipText.rect = rect(0, 0, pMaxWidthToolTip, 0)
pmToolTipText.text = theString
if pmToolTipText.lineCount = 1 then
-- Only one line, must shrink the width to match the text
nChars = pmToolTipText.text.char.count
locLastChar = pmToolTipText.CharPosToLoc(nChars + 1)
textMemberRect = pmToolTipText.rect
textMemberRect.right = locLastChar.locH
pmToolTipText.rect = textMemberRect
end if
-- Calculate locH and locV
centerH = (rectRoll.left + rectRoll.right) / 2
locHTip = centerH - (pmToolTipText.width / 2)
locVTip = rectRoll.bottom + pnPixelsBelow
-- Finally, assign the tooltip location
sprite(spriteNum).loc = point(locHTip, locVTip)
end
Extensions
While we have shown the basic functionality of tooltips. In practice, there are a few things we would want to do to extend these behaviors.
In the ToolTip Rollover behavior, we would want the ability to alter the text to be displayed. Ideally, by default we could use the name of the cast member, but we would like to have the ability to change that to any text. Further, we would like to have the ability to change the delay period. While one second may be fine, we might like to set some tooltips to show up in less or more time.
Both of these can be accomplished relatively easily. To allow for these types of modifications, there is a very powerful handler called getPropertyDescriptionList that can be built into the Tooltip rollover behavior. Using getPropertyDescriptionList, we can specify that when the developer drops a behavior onto a sprite, Director will bring up a dialog box that shows defaults, but allows the developer to change values.
We would probably want the ToolTip Display behavior to be a little smarter about placement of the tooltip. If an interface element is too close to the bottom of the screen, we would want the tooltip to display above the item. Likewise, if the interface element is too close to the left or right edge, we would want the display to be positioned so that the entire tooltip could be readable on the stage.
We might also want to make the tooltip fit neatly around multiple short lines of text. Further, we might want to be able to modify more of the field properties such as Margin and Framing, and have the Tooltip Display behavior adjust automatically. Doing so requires a little more math in the mToolTipDisplay_Show method.
Here is a fully functional and fully documented set of behaviors that includes these extensions in a sample movie: tooltips.zip.
Conclusion
Tooltips have become a valuable addition to improving the clarity of user interface designs. Using the two drag and drop behaviors described here, Director developers can now add this functionality quickly and easily.
Copyright 1997-2024, Director Online. Article content copyright by respective authors.