3D Lingo: Using Vector Math to Move a Model In a Plane
October 19, 2004
by James Newton
In the first part of this article, you saw how to create and modify a modelResource, how to create a model and how to create cameras and place them for different views, and how to create overlays for each camera.
In this second part, you'll add three more sprites and a second behavior to your movie, and see:
- How to solve the problem with
colorBuffer.clearValuethat you have just seen - How to determine which model is under the mouse
- How to describe the ray which enters the 3D world from the mouseLoc
- How to describe the direction in which the camera is pointing
- How vectors can be combined to form a dot product
- How a particularity of this dot product can be used to move a model with the mouse.
To open the xyzCone.dcr movie in a separate window while you work, click here.
Source files: xyzCone.zip (Windows) | xyzCone.sit (Macintosh)
One member, many sprites
In the movie you have been working on, select the Shockwave 3D sprite in the Score window and hold the Option key down while you drag the sprite into channel 2. Repeat the operation twice, so that you have four copies of the sprite in channels 1 to 4. Drag the sprites to new positions so that they don't overlap, using the Property Inspector to check their positions.
![]()
The directToStage property for 3D sprites (top)
Shockwave 3D sprites work much faster when they are drawn Direct To Stage. However, this means that they may be drawn over the sprite overlay that indicates the contour, channel number, member and position of the sprite. Hence the need to use the Property Inspector to check the sprite's position.
If you set the sprites so that they are not drawn Direct To Stage, the sprites will be rendered using the #software renderer. Any advantage gained from the machines 3D acceleration hardware will be lost.
Maintaining the colorBuffer.clearValue when you set a sprite's camera (top)
Now create a new Behavior script, and copy the following scriptText into it:
property spriteNum
property myTopLeft -- loc of top left corner of sprite(spriteNum)
property myCamera  -- sprite(spriteNum).camera
property myModel   -- the model the user clicked on
property myDelta   -- offset between the clickLoc and the apparent
--                    loc of the cone model
on beginSprite(me)
  tSprite   = sprite(spriteNum)
  tMember   = tSprite.member

  myTopLeft = point(tSprite.left, tSprite.top)
  myCamera  = tMember.camera(spriteNum)
  -- Ensure that the colorBuffer.clearValue is maintained
  tClearValue = myCamera.colorBuffer.clearValue
  tSprite.camera = myCamera
  myCamera.colorBuffer.clearValue = tClearValue
end beginSprite
The beginSprite() handler assumes that the Shockwave 3D member in the sprite to which it is attached contains as many cameras as there are sprites. The myModel and myDelta properties will be set later, when the user clicks on the sprite.
Run your movie. Each sprite should now display a different camera view with a different background colour. To workaround the fact that the member's bgColor takes priority over the colorBuffer.clearValue of the camera, the value is saved in a local variable then reapplied after the sprite's camera has been changed.
Now that each sprite has a different background colour, try typing the following in the Message window:
member(1).bgColor = rgb(0, 0, 0)
The background of all the sprites will be reset to black. The colorBuffer.clearValue of each camera is reset when you change the bgColor of the member itself. Restart the movie to repair the damage.
Finding out which model is under the mouse (top)
3D Lingo provides two methods for determining if there is a model under a given point in a 3D sprite. Try watching the following expression in the Watcher window:
sprite(the rollover).camera.modelUnderLoc(the mouseLoc)
If you have a sprite whose top left corner is at the point(0, 0), you should see that this expression evaluates to model("Cone") when the mouse is over the cone model. You can get more details by watching the following expression (note "models" is plural in modelsUnderLoc):
sprite(the rollover).camera.modelsUnderLoc(the mouseLoc, #detailed)
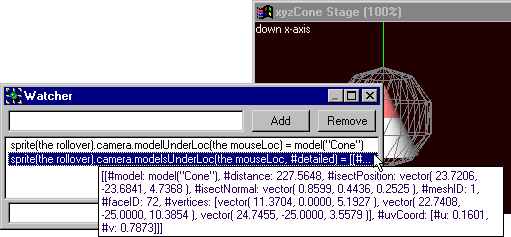
Note how, in Director 8.5, a tooltip appears with the full contents of a variable or expression if you rollover the content display in either the Watcher or the Debugger windows.
In our current movie, all we want to know is if the user clicked on the Cone model. We will thus just use the simpler modelUnderLoc() method in a mouseDown() handler:
on mouseDown(me)
  tSpriteLoc = the mouseLoc - myTopLeft -- loc relative to sprite
  tModel     = myCamera.modelUnderLoc(tSpriteLoc)

  if ilk(tModel, #model) then
    myModel = tModel
    put myModel
   end if
end mouseDown
Run the movie and click on any of the sprites. If you click on the Cone model, its name will be printed out in the Message window. If you click on empty space tModel will be <Void> and nothing will happen.
Note that you can use both of these methods for points which do not fall inside the sprite itself. To check this, click on the Cone in the cavalier view and drag it out of sight above and to the left of the top left corner of the sprite. Now type the following in the Message window:
put sprite(1).camera.modelUnderLoc(point(-10, -10))
-- model("Cone")
The point(-10, -10) does not fall inside the sprite, and yet the method returns a valid value.
Defining a ray under the mouse (top)
Even if there is no model at a given point in the sprite, the command aCamera.spriteSpaceToWorldSpace(a2DPoint) will return a vector point. This point is directly under the sprite position defined by a2DPoint, and on the plane inside the 3D world where one 3D world unit is the same size as 1 pixel. This is a fairly abstract definition, and you will rarely use the result directly. Combining the distant point with the position of the camera will, however, give you important information:
tCameraLoc  = myCamera.worldPosition
tDistantLoc = myCamera.spriteSpaceToWorldSpace(tSpriteLoc)
tRay        = tDistantLoc - tCameraLoc
The variable tray now defines a line which passes from the camera, through the chosen point on the sprite into the world. If tSpriteLoc is defined by the position of the mouse, you can think of tray as a line of fire. The length of this line is variable. Since we are really only concerned with its direction, it is useful to reduce the length of the line to 1 world unit:
tRay.normalize()
Once again, spriteSpaceToWorldSpace() returns a valid result, even when it is passed a point outside the borders of the sprite.
Mapping a point in the 3D world to the surface of the sprite (top)
You can determine where any visible point in 3D space appears on the surface of the sprite by using a complementary method: worldSpaceToSpriteSpace(). Unlike the previous methods, this one returns <Void> if the point in 3D space is not visible in the sprite. This is understandable: how could you map a point behind the camera onto the sprite?
We can use this to determine, for instance, where the centre of the Cone model appears in the sprite:
tLoc = myCamera.worldSpaceToSpriteSpace(tModel.worldPosition)
If the centre of the model is not visible in the sprite, tLoc will be <Void>, which is considered to be equivalent to zero in any mathematical calculations.
Let's change the mouseDown() handler so that we can calculate how the offset between the visible centre of the Cone model and the point where the Cone model is clicked:
on mouseDown(me)
  tSpriteLoc = the mouseLoc - myTopLeft -- loc relative to sprite
  tModel     = myCamera.modelUnderLoc(tSpriteLoc)

  if ilk(tModel, #model) then
    myModel = tModel
    tLoc    = myCamera.worldSpaceToSpriteSpace(tModel.worldPosition)
    myDelta = tSpriteLoc - tLoc --offset from mouseLoc to model centre
  end if
end mouseDown
If only part of the Cone is visible, but not its centre, myDelta will be the offset from the top left corner of the sprite to the mouseLoc, since tLoc will be <Void>.
Knowing which way the camera is pointing (top)
The last piece of information that we need to drag the model using the mouse is the direction that the camera is pointing in. Cameras look down their negative z-axis. The z-axis is a vector with a length of 1 unit:
tZAxis = sprite(1).camera.getWorldTransform().zAxis
put tZAxis
-- vector( 0.5774, 0.5774, 0.5774 )
The camera in sprite 1 gives you the cavalier view. The camera sits at the point vector( 144, 144, 144 ) and looks back at the point vector( 0, 0, 0 ).
The dotProduct of two vectors (top)
3D Lingo provides you with two ways to "multiply" vectors together: the dotProduct and the crossProduct. Neither of these is exactly like the multiplication of numbers. Here we shall only be concerned with the dotProduct() method. This method returns a floating point number, which is calculated as follows:
tVector1 = vector( x1, y1, z1 )
tVector2 = vector( x2, y2, z2 )
tVector1.dotProduct(tVector2) = x1*x2 + y1*y2 + z1*z2
One interesting property of the dotProduct of two vectors is that it is zero if two vectors are perpendicular. The x-, y- and z-axes of the camera are all mutually perpendicular. If you have two vectors, on of which is parallel to the camera's x-axis and the other of which is parallel to the camera's z-axis, it follows that the dotProduct of these two vectors must be zero.
Moving the model in the same plane as the camera (top)
The figure below illustrates the movement that we want to produce.
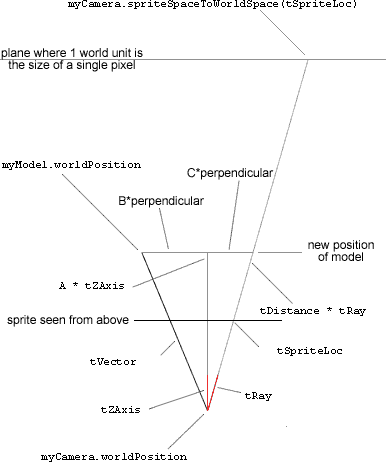
To get from the camera to the centre of myModel, you can follow one of two paths:
- A straight line from
myCamera.worldPositiontomyModel.worldPosition, identified astVectorin the diagram above - A path in two steps. The first step goes straight forward from the camera along a line parallel to the camera's z-axis:
tZAxis. We don't know how long this line is yet, so let's just say that it is A times the length oftZAxis. The second step follows a line perpendicular to the camera's z-axis. Again we don't know exactly how long this line is, nor do we know exactly what direction it points in, so we'll just say it isB * perpendicular.
This gives us the following equation:
A * tZAxis + B * perpendicular = tVector
We can subtract B * perpendicular from both sides of the equation
A * tZAxis = tVector - B * perpendicular
Applying tZAxis.dotProduct() to both sides of the equation:
A * tZAxis.dotProduct(tZAxis) = tZAxis.dotProduct(tVector) - 0
The zero comes from the fact that tZAxis and the perpendicular vector are... perpendicular. We can thus safely ignore B, whatever value it may have had. This gives us the value for A, calculated from known values:
A = tZAxis.dotProduct(tVector) / tZAxis.dotProduct(tZAxis)
Here is a second equation:
tDistance * tRay = A * tZAxis + C * perpendicular
Here, again, we don't know the value of C, and we won't need to. Let's apply tZAxis.dotProduct() to both sides:
tDistance * tZAxis.dotProduct(tRay) = A * tZAxis.dotProduct(tZAxis) + 0
This gives us:
tDistance = A * tZAxis.dotProduct(tZAxis) / tZAxis.dotProduct(tray)
We know the value of A from the first equation above, so we can replace it. We'll find tZAxis.dotProduct(tZAxis) in both the numerator and the denominator, so it cancels itself out:
tDistance = tZAxis.dotProduct(tVector) / tZAxis.dotProduct(tRay)
We know where the camera is, which direction tray is in and how far along tray to go. This means that we can calculate the new position of the Cone model:
tLoc = tCameraLoc + (tRay * tDistance)
Here's the complete handler that calculates where the model should be when it is dragged by the mouse:
on mMoveCone(me)
  -- Find where the mouse is relative to the sprite
  tSpriteLoc = the mouseLoc - myTopLeft
  tSpriteLoc = tSpriteLoc - myDelta -- correct for the centre of model

  -- Find myModel and myCamera in the 3D world
  tModelLoc  = myModel.worldPosition
  tCameraLoc = myCamera.worldPosition

  -- Find a (distant) point beneath the mouse, in the world
  tDistantLoc = myCamera.spriteSpaceToWorldSpace(tSpriteLoc)

  -- Create an imaginary line between the user's eye and this point
  tray = tDistantLoc - tCameraLoc
  -- We need to work with a vector whose length is 1 unit
  tRay.normalize()

  -- Determine which axis the camera is looking along
  tCameraAxis = myCamera.getWorldTransform().zAxis

  -- Do a little mathematics, based on the fact that the dotProduct of
  -- two perpendicular vectors is zero.
  tVector   = tModelLoc - tCameraLoc
  tDistance = (tVector * tCameraAxis) / (tRay * tCameraAxis)
  tLoc      = tCameraLoc + (tRay * tDistance)

  -- Move the model
  myModel.worldPosition = tLoc
end mMoveCone
You'll find the full code in the xyzCone.dir movie: zipped file for Windows, stuffed file for Mac.
Exercise for the reader (top)
What happens you click on the model when its center is not visible within the sprite? Is there an elegant way to deal with this?
Conclusion
This two-part article has introduced you to 3D modelResources (which are something like 2D member), models (which are the 3D equivalent of sprites), textures and overlays, cameras, vectors and vector mathematics. After completing the two 3D behaviors, you should have some idea of the power and complexity of Shockwave 3D.
Copyright 1997-2026, Director Online. Article content copyright by respective authors.