Spot Lights, Angles, Faces and Distance
November 15, 2004
by James Newton
The 3D feature of Director 8.5 provides four kinds of lights:
- ambient
- directional
- point
- spot
A single ambient light is sufficient to determine how dark the shading created by other lights should be. One to three directional lights will give a sense of volume by creating shading of different intensities on faces that point in different directions. A point light gives the effect of a naked light bulb in the centre of some space.
Spot lights are the most complex, and the most CPU intensive, of lights. They do not light up the whole of the 3D space like the other light types do: they point in a given direction from a given position, like a torch. In addition (though this is not covered in this article), the intensity of the light can be made to decrease with distance, using the spotDecay and attenuation properties.
This article focusses on the relationship between a spot light and the model surface that it illuminates. The movie above demonstrates the three main variables:
- the distance between the spot light and the faces it illuminates
- the
spotAngleof the spot light - the dimensions of the faces
Shining a spot light at a low polygon plane
The Shockwave 3D sprite in the movie displays a plane. A spot light is placed at right-angles to the centre of the plane, pointing straight at it.
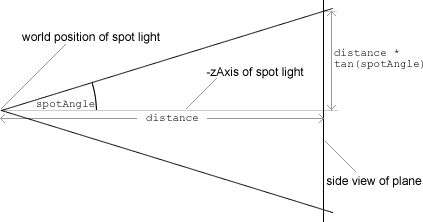
Moving the mouse from left to right will increase the distance between the spot light and the plane. Moving the mouse from top to bottom will increase the spotAngle of the spot light: that is, the angle of the cone of light. The spotAngle can vary from 0° to 90°. Low values create a thin shaft of light, high values create an effect similar to a wall light fitting. The values of distance and spotAngle are displayed in fields beneath the sprite.
You will notice that as the mouse crosses the curved red line, the entire plane will appear or disappear. Lighting is suddenly switched on or off.
So what does the red curve signify?
Calculating if the corners of the plane are lit
The plane is 200 world units by 150. The distance from the centre of the plane to the corners is thus 125 units:
put sqrt(75*75 + 100*100)
-- 125
If light from the spot light is to fall on the corners of the plane at a given distance, the spotAngle must be greater than a given angle:
spotAngle = atan(125.0 / distance)
The red curve maps spotAngle against distance. If the mouse is below and to the right of the line, the spotAngle is greater than the minimum angle required: the corners of the plane are lit. If it is above and to the left of the line, the corners of the plane will not receive any light from the spot light.
With the mouse just above the line, almost the entire surface of the plane is inside the cone of light from the spot light. Only the corners are not explicitly lit. And yet this is enough to deprive the entire plane of light. What is special about the corners?
Using the vertices of a face to determine if it is lit
Each face on the surface of the model is a triangle, defined by three vertices. If you check the #wire checkbox, you will see how the plane is divided into two triangles. The corners of the plane correspond to vertices for the different faces. Director determines whether a face is lit by determining whether the vertices are lit. If none of the vertices are lit, Director has no way of knowing that the centre of the face is supposed to be lit.
Use the sliders to set the number of lengthVertices and widthVertices to 3. This gives the plane eight faces. When you move the mouse just beyond the red curve, the four corners of the plane fall into darkness, but the five other vertices shared by the eight faces remain in the light. Director creates a gradient from pale grey at the lit vertices to black at the unlit vertices. As you move the mouse further to the top or left, you will first see the vertices on the vertical edges turn black, then the same will happen to the vertices on the horizontal edges. Finally, only the central vertex will remain lit: the plane will appear as a sort of star.
If you increase the number of lengthVertices and widthVertices further, you can create a realistic spot light effect on plane. Experiment with different settings until you have developed an understanding of the relationship between them all.
Conclusion
Spot lights and large polygon models are incompatible. To get a realistic effect, the size of the circle of light created on the model should be large compared to the size of the faces the model is made of.
Download the source code to find the handler that created the red curved line empirically, and another handler that tests the theoretical tangent relationship between spotAngle and distance from the spot light to the model.
Source files: SpotTest.zip (Windows) | SpotTest.sit (Macintosh)
Copyright 1997-2026, Director Online. Article content copyright by respective authors.