Double-Clicking a Document
December 2, 2004
by Tom Rockwell
Double-Clicking A Document
Thanks to the extensive range of xtras available, a Director projector can create any type of document and write it to the user's hard disk. In Windows Explorer and the Macintosh Finder, users expect that a double-click on a document icon will launch the program that created it. This article shows you how to associate files with the Director projector that created them. By the end of this article, you will have created a very simple word processor application which creates its own document files; double-clicking on the icon of one of these files will open your Director application so that you can edit the document.
Source files: MiniWord.sit (Macintosh) | MiniWord.zip (Windows)
There are many situations in which this technique will prove useful. For example, you may want to save the state of a game in progress, a customized slide show presentation, or mark-up data for a video sequence.
Recognizing the files created by a projector is not something that Director does naturally. By default, when the user double-clicks on a document created by a Director projector, the operating system prompts the user to select an application to open the file. If the user properly selects your projector then your projector is launched, but the document still doesn't open.
For my programs this was unacceptable. I'm selling programs that are often in direct competition with titles from major software vendors. Something like the double-click may seem trivial but the little things add up and the less my users have to think about the more likely they are to purchase the product. I like my projectors to be as professional as possible, complete with robust menus, keyboard shortcuts, user-defined preferences, and standard user interface elements. In the end if the user can't tell that the program was created with Director then I've done my job. This meant finding a way to deal with double-clicking on documents.
Thankfully Director has an undocumented feature - a system variable called the commandLine which corresponds to the operating system's command line. When the user double-clicks on a document the operating system's command line gets updated with the path to the document, and Director's the commandLine provides us with this information.
But figuring out which document the user clicked on is only half the battle. The operating system also needs to be told to launch your projector instead of prompting the user, and then your application has to be set up to deal with what happens so the file actually opens. This article will give you step by step instructions for getting this to work for Macintosh OSX and Windows platforms. the commandLine doesn't exist on pre-OSX Macintosh operating systems because those systems don't have a command line at all. So this technique will not work on Mac OS8 or OS9.
This article assumes you have a basic understanding of Lingo, movie scripts, frame scripts, and working with xtras. You will also need some additional tools besides Director. For Mac OSX you will need a program called Property List Editor which can be found on the Developer Tools CD which came with your copy of OSX. If you do not have that you can get away with just using a text editor, but you'll need to have a basic understanding of XML. Also you will need Director MX or Director MX 2004 since those are the only versions of Director that can create projectors for OSX. For Windows you will need a third party xtra since we will be editing the Windows Registry. This article uses the BuddyAPI xtra, but any xtra that can modify the Registry will work, such as the Registry xtra and others.
Setting Up Your Application
In order to have a document to double-click we will need to have an application which can save an open documents. In this article we will create a simple text editor that can save and open documents. It will function like a mini word processor, so I'll call it MiniWord.
Launch Director and create a new document with a white background. It can be any size, but there's no reason to make it huge so make it fit comfortably on your screen. Next, create a field member by selecting Insert > Control > Field. The field will appear on stage with a cursor in it. Leave it blank for now and find the field cast member in the cast window. Name the cast member "content". Now select the field sprite on the stage and open the Property Inspector. Click on the Field tab and click on the Editable check mark. In the Framing drop down menu select "Scrolling" and resize the sprite so it fills most of the stage. Leave some room at the bottom for some buttons which we'll create in a moment. Change the Property Inspector to list mode if it isn't already and set the border of the field to 1.
Open the score window if it isn't already and double-click on the script channel for frame 5. This will open the script window with an on exitFrame handler filled in for you. Type in go the frame to make the movie loop on this frame. We will be adding more to this script later.
The next thing we have to do is set the field member to clear it's content when the movie starts so the user is presented with a blank document. You don't absolutely have to do this, but it's easier than trying to remember to manually clear the field member before you publish the movie. There are a couple ways to do this. You can write a behavior and attach it to the script to clear the cast member on beginSprite. The other way is to do it on a movie script on prepareMovie which runs every time the movie is run. We'll be using on prepareMovie for some other stuff later so let's use that.
Open the script window and click on the + to insert a new script. Type in the following code:
on prepareMovie()
member("content").text = ""
end prepareMovie
Open the Script tab in the property inspector and make sure the Type drop down menu is set to Movie.
Now if you run the movie you'll be able to type into the field. Then stop and restart the movie and you'll see the field get cleared leaving you with a fresh new document.
Save The Document
Now that we've got a document we need to be able to save it. Create a push button by selecting Insert > Control > Push Button. A blank button appears on the stage with a flashing cursor. Type in Save As and move the button to the bottom left area of the stage below the content field. Select the button cast member in the Cast window and click on the little script icon either in the Cast window or in the Member tab of the Property Inspector. This will open the script window and create a script attached to the member with a blank on mouseUp handler. Type in the code below.
on mouseUp(me)
-- Initialize the FileIO xtra
vFileIO = xtra("FileIO").new()
-- Determine whether the application is running on Windows
vOnWindows = the platform starts "Windows"
-- If we are on Windows, ensure that only files with our custom
-- extension appear in the Save As... dialog window. Using
-- setFilterMask() has no effect on Mac OS X in Director MX +.
-- We will use a different technique further down.
if vOnWindows then
vFileIO.setFilterMask("MiniWord Files, *.minw")
end if
-- Display the Open File dialog box, which returns the absolute
-- path to the document that the user wants to save to.
vFilePath = vFileIO.displaySave("Save document as...", "Untitled")
case vFilePath of
VOID, "":
-- The user canceled the Open File dialog
exit
end case
-- If the user chose a file which already exists, an alert will
-- have asked if the file should be replaced. In the user chose
-- to overwrite the existing file, the next line will fail to
-- execute, but the user will not see an error message.
vFileIO.createFile(vFilePath)
-- Assuming that the user has write privileges for the parent
-- folder the file will now exist, if it didn't already. We
-- must now open it before we can write anything into it.
vFileIO.openFile(vFilePath, 0) -- means Read-Write mode
-- If the application is running on Macintosh, we need to set the
-- file type and creator codes for the file
if not vOnWindows then -- we're on Macintosh
vFileIO.setFinderInfo("minW MnWd")
end if
-- Copy the data from the text member and write it to the file
vSaveText = member("content").text
vFileIO.writeString(vSaveText) -- ends with End Of File character
-- vFileIO will be cleared from memory at the end of this
-- handler, and so the open file will be automatically
-- closed. However, it is good practice to close the file
-- explicitly.
vFileIO.closeFile()
end mouseUp
This handler makes use of the FileIO xtra which comes with Director. This is used to read and write text files with Lingo. Any xtra that reads and writes to the user's hard drive can be used in it's place, such as vList, BinaryIO, and others.
The first thing the handler does is create an instance of the FileIO xtra to use. Then it sets the filter mask to only allow the user to work with documents created with our program. It does this by defining our custom document type. Our document, although it will be nothing more than a text file, will be a "MiniWord Document." We can't just use a .txt file since both Macintosh and Windows already have programs to deal with those kinds of documents. So our documents will have a .minw extension on Windows, and a 'minW' file type on the Macintosh. (More on that in a moment.)
Note that this is platform-specific code, so I have an if...else statement to branch out to whichever platform is hosting the Director movie. This also allows you to code once and publish for both platforms without having to rewrite any of your Lingo. (Syntax note: The _system.environmentproplist.platform call is the new syntax introduced in DirectorMX2004. If you're still using DirectorMX you will need to replace this item with the platform in order to make the code work.)
Next the handler calls displaySave which pulls up the standard OS save dialog box so the user can select where to save the file and what to name it. This function returns the full path to the document the user wants to save, or an empty string (Macintosh) or <Void> (Windows) if the user hit Cancel. So the next thing we do is make sure the user didn't hit Cancel. If filePath is not an empty string then we can proceed. So we then create the file, open it, store the string we got from the Content member, write to the file, and close it.
On Windows file types are specified by a file extension such as .txt for text files and .doc for Microsoft Word files. These are kept track of by the Windows Registry which associates these file extensions with the proper application. This is why we set the filter mask above. If the user forgets to add .minw to the file name the system will take care of it insuring that the file keeps its program association. We haven't actually edited the Windows Registry yet, so right now the extension is meaningless, but we'll take care of that soon.
On the Macintosh file types and associations are traditionally marked in the file itself in a part of the file called the Resource Fork. The file will have a four character identifier called a creator code. It is traditionally written in single quotes and this is what tells this operating system which application it should use to open this document. DirectorMX2004's creator code is 'MDO3'. (Interesting that it's not 'MD04'.) You can pick any four character code for your application. I chose 'MnWd' for our MiniWord application. All ascii characters are acceptable, including spaces and special characters. So if you want to make your application's code '#$ !' that is perfectly fine. However there are some rules. The most important of which is that Apple has reserved all lower-case only codes for internal use. This is why my application code is 'MnWd' and not 'mnwd'. And although it's not required Apple suggests that you register your application code with them at their Developer site.
This is a good idea to make sure nobody else is already using your code. They used to require you register your file type code as well, but they no longer ask for that. The file type code is the same thing- a four character code that identifies the kind of file it is. Text files are identified with 'TEXT'. JPEG files are marked as 'JPEG'. This is why JPEGs created with Photoshop will reopen in Photoshop when you double-click on them instead of opening in your web browser as they do on Windows. Our MiniWord application will create 'minW' files.
Run the movie, type something into the content field, and hit save to make sure the document saves as expected.
Open The Document
Insert another push button and name this one Open. Drag it down to the lower right area of the stage next to the Save As button. Select the cast member and click on the script icon in either the script window or the Property Inspector. Type in the code as shown below.
on mouseUp(me)
-- Initialize the FileIO xtra
vFileIO = xtra("FileIO").new()
-- If we are on Windows, ensure that only files with our custom
-- extension appear in the Open File dialog window. (Using
-- setFilterMask() has no effect on Mac OS X in Director MX +)
if the platform starts "Windows" then
vFileIO.setFilterMask("MiniWord Files, *.minw")
end if
-- Display the Open File dialog box, which returns the absolute
-- path to the document that the user wants to open
vFilePath = vFileIO.displayOpen()
case vFilePath of
VOID,"":
-- The user canceled the Open File... dialog
exit
end case
-- Open the file manually
vFileIO.openFile(vFilePath, 1) -- 1 means Read-only mode
-- Read the contents of the file into the text member
vSavedText = vFileIO.readFile()
member("content").text = vSavedText
-- vFileIO will be cleared from memory at the end of this
-- handler, and so the open file will be automatically
-- closed. However, it is good practice to close the file
-- explicitly.
vFileIO.closeFile()
end mouseUp
This code is very similar to the Save As code. The main difference here is that instead of calling displaySave we call displayOpen which prompts the user to select a file and returns its path. And again if the user hit Cancel the path is an empty string. If not, we open the file specified by the user, read the whole file, store the text we just read in the Content member and close the file. That's it. Here, the setFilterMask handler only displays MiniWord files for the user to select. This way your program doesn't try to open Word or Photoshop documents.
The next step is to associate our file format with the application. This has to be done separately for each platform.
The Mac Package
A package is simply a folder with a certain hierarchy of sub-folders and files that defines how an application works. When the root folder is named with a .app extension the folder takes on the application's icon and acts like the application itself. Since we have to make the package manually the process is fairly involved, so here are step by step instructions for creating your package.
- Create a folder called MiniWord Mac. This will be the folder that will act as the application later.
- Open the MiniWord Mac folder and create a folder inside of it called Contents. The contents folder will contain 4 items. The first is a text file which contains the creator code and file type for our application. Applications always have a file type of 'APPL'. Since our MiniWord application saves files in text format we can just use that to generate this file.
- In Director play the movie and type APPLMnWd into the content field. That is, the standard application file type, and our custom creator code. Click Save As, name the file PkgInfo (with no extension) and save it in the Contents folder.
- Create a folder in the Contents folder called MacOS.
- Create another folder in the Contents folder called Resources. We actually won't be using the Resources folder for this demonstration, but it's a good idea to create it anyway. This is where icon files and other related items would go.
- Find the Director application icon in the Finder. If you have Director in the dock you can simply click and hold on the icon and select Show In Finder. Otherwise navigate through your Applications folder until you find the Director application icon. It's time to take a look at Director's package. Control-click (or right-click if you have a two-button mouse) on the application icon and select Show Package Contents from the pop up menu that appears. Open the Contents folder and then open the MacOS folder.
- Copy the following four files
- MacromediaRuntimeLib
- ProjLib
- IMLLib
- DPLib
- (Optional) In the MacOS folder create a folder called xtras. Place all the xtras you used in your projector into this folder. You'll need to copy them from the Director application folder. If you don't do this make sure all the xtras used in your movie are marked to be included in the Projector. You'll need to explicitly add the FileIO xtra to your movie under Modify > Movie > Xtras.
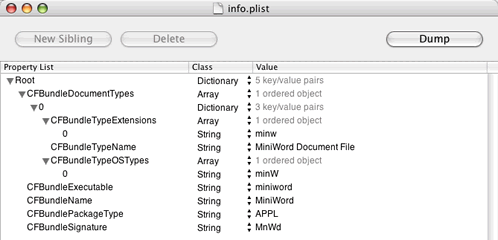
- Publish your Director movie. In the Publish Settings window in the Projector tab make sure that Player Type is set to Shockwave. Save the projector to another folder somewhere, not into the MiniWord App folder. Once we make this folder into a package you won't be able to save to it directly and we'll be making more changes to the Director file later. So save it somewhere else, and then move it into the MacOS folder. This way later you'll know exactly where to find it when we publish it again. Be sure to copy your published projector into the MacOS folder.In the next step we will be creating a file called info.plist. This is an XML file which explains how the application is set up and describes a lot of the components of it. The easiest way to create this file is with Apple's Property List Editor application which you can find on the Developer Tools CD which comes with OSX. If you don't have this you can use a text editor to create the file, but it's very easy to make mistakes doing it that way, and very difficult to find them to fix them when something doesn't work. A finished info.plist file is shown in below. If you don't have Property List Editor installed skip down to the next paragraph and copy the XML data below exactly as you see it using any text editor.
- Launch Property List Editor.
- Click New Root.
- Turn down the Root arrow and click New Child.
- Type in CFBundleDocumentType and set the class to an Array. This defines the file type.
- Turn down the CFBundleDocumentTypes arrow and click New Child. The program automatically inserts an item numbered 0. Change its class to Dictionary.
- Turn down item 0 and click New Child.
- Type in CFBundleTypeExtensions and change its class to an array.
- Turn down the arrow for CFBundleTypeExtensions and click New Child.
- In the value field for item 0 type in minw, all lower case. This defines the file extension for our documents.
- Close the CFBundleTypeExtensions arrow and click New Sibling.
- Type in CFBundleTypeName and in the value field type in MiniWord Document File.
- Click New Sibling and type in CFBundleTypeOSTypes and set it to an array.
- Turn down the CFBundleTypeOSTypes arrow and click New Child.
- In the value for item 0 type minW. This is our actual document type as stored in the Resource Fork.
- Close the CFBundleDocumentTypes arrow and click New Sibling
- Type in CFBundleExecutable and in the value field type MiniWord.osx, or whatever you named your projector. Make sure the name matches exactly.
- Click New Sibling, type in CFBundleName, and in the value field type in MiniWord.
- Click New Sibling, type in CFBundlePackageType and in the value field type in APPL.
- Click New Sibling, type in CFBundleSignature, and type in MnWd. This tells the operating system that this is our application's creator code.
<?xml version="1.0" encoding="UTF-8"?> <!DOCTYPE plist PUBLIC "-//Apple Computer//DTD PLIST 1.0//EN" "http://www.apple.com/DTDs/PropertyList-1.0.dtd"> <plist version="1.0"> <dict> <key>CFBundleDocumentTypes</key> <array> <dict> <key>CFBundleTypeExtensions</key> <array> <string>minw</string> </array> <key>CFBundleTypeName</key> <string>MiniWord Document File</string> <key>CFBundleTypeOSTypes</key> <array> <string>minW</string> </array> </dict> </array> <key>CFBundleExecutable</key> <string>miniword</string> <key>CFBundleName</key> <string>MiniWord</string> <key>CFBundlePackageType</key> <string>APPL</string> <key>CFBundleSignature</key> <string>MnWd</string> </dict> </plist> - Navigate back to the MiniWorld Mac folder and rename it to MiniWorld Mac.app. You will get an alert warning you about changing the extension. Click Add to add the extension. If everything is set up right the folder icon will change to a generic application icon. Or if you published your projector with a custom icon the folder will take on that icon.
At this point if you double-click on the MiniWorld Mac folder it will no longer open to reveal its contents, but instead will launch your projector. Additionally if you double-click on a saved document that MiniWord created it will also launch the projector. But it still won't open the file. We still have to add code to handle that.
The Windows Registry
Associating our file types with the Windows operating system isn't nearly as involved as it is on the Macintosh. However, it's also not something that can be done natively in Director or with another program. The first time your program runs it needs to edit the user's Registry file to make everything work. In order to do this we will need a third party xtra. This example makes use of the BuddyAPI xtra, but any xtra that can work with the user's registry will work. Check the documentation for the specific syntax you'll need with other xtras.
Ideally your program will only write to the user's Registry once. That means your program would need to keep track of the fact that it has done this with a preferences file or some similar method. Saving preferences files is beyond the scope of this article so for now we will do all our work on prepareMovie. This will run every time the program is launched which is not ideal, but will do for the purposes of instruction.
In your movie script in the on prepareMovie handler add a call to a handler called EditWindowsRegistry so the whole handler now looks like this:
on prepareMovie()
member("content").text = ""
EditWindowsRegistry()
end prepareMovie
Now we need to define this handler. Type in the code as shown below.
on EditWindowsRegistry()
if not (the platform starts "Windows") then
-- The following commands should only be run on Windows
exit
end if
-- Define the projector pathe and include instruction to open file
vApplicationPath = the applicationPath&the applicationName&" %1"
vHKey = "HKEY_CLASSES_ROOT"
-- Define the type extension and description of the document
vResult = baWriteRegString(".minw", "", "MiniWordDocument", vHKey)
-- Create the command key and till Windows which application to
-- launch
vCommand = "MiniWordDocument\shell\open\command"
vResult = baWriteRegString(vCommand, "", vApplicationPath, vHKey)
end EditWindowsRegistry
The next time your movie is run it will modify your Registry to associate the file types with your application. At this point double-clicking on a saved document will launch your projector but will not open it for the same reason as the Mac above - we haven't yet added the code to handle that.
Opening The Files That Were Double-Clicked
Now that our program is being launched when the user double-clicks on a file we need to figure out which file the user clicked on and open it. We can do this with an undocumented system variable called the commandLine. This variable takes the form of an apostrophe-delimited string. The second-to-last item in the string is the path to the file the user clicked on. The string ends with an empty item which is why we want the second-to-last item.
Not only does the program launch when the user double-clicks on a document, but if the application is already running it is brought to the front. So our program needs to periodically check the commandLine to see if it has changed. If it has we need to open the new document. To do this we'll create a global variable called gCommandLine and initialize it to an empty string. So let's modify our on prepareMovie handler to accomodate this.
global gCommandline
on prepareMovie()
member("content").text = ""
gCommandline = ""
EditWindowsRegistry()
end prepareMovie
If the user launched your program normally then the commandLine will return an empty string, which matches myCommandline. So all we have to do is see if the commandLine has changed, and since we have to do this periodically we'll just do it on the enterFrame handler we have running in a frame script.
global gCommandline
on enterFrame(me)
-- Check to see if the commandLine has changed.
vCommandLine = the commandLine
if gCommandLine <> vCommandline then
gCommandLine = vCommandLine
-- Open the file specified by the commandLine
OpenDocument(gCommandLine)
end if
end enterFrame
Checking the status of the commandLine every frame is usually not necessary. And certainly if you're authoring a game you don't want to take a speed hit by doing an unnecessary check every frame. I'd suggest only checking on the title screen or some other relatively calm screen.
The openThisDocument handler will now get called whenever the commandLine changes, which happens whenever a user double-clicks on a saved document that is associated with your application. It's structure is very similar to the code we attached to the Open button, but instead of prompting the user to select a file it simply uses the commandLine to find the file. In the movie script type in the code below.
on OpenDocument(aCommandLine) -----------------------------------------
-- SENT BY the enterFrame() handler in the frame script on frame 2
-- INPUT: <aCommandLine> will be a string with a format such as:
-- "'C:\Folder\FileName.minw'"
-- "Mac HD:Folder:FileName"
-- ACTION: Determines which document the user double-clicked on in
-- Windows Explorer or the Macintosh Finder, and opens it.
---------------------------------------------------------------------
-- Determine the path to the file from the command line
vSaveDelimiter = the itemDelimiter
the itemDelimiter = "'"
vItemCount = the number of items of aCommandLine
vFilePath = item (vItemCount - 1) of aCommandLine
the itemDelimiter = vSaveDelimiter
if vFilePath <> "" then
-- Read in the data from the file defined by the commandLine
vFileIO = xtra("FileIO").new()
vFileIO.openFile(vFilePath, 1) -- 1 means Read-only mode
vSavedText = vFileIO.readFile()
member("content").text = aCommandLine&RETURN&vSavedText
-- vFileIO will be cleared from memory at the end of this
-- handler, and so the open file will be automatically
-- closed. However, it is good practice to close the file
-- explicitly.
vFileIO.closeFile()
end if
end OpenDocument
This code is the same as the open code, except for the section at the top that gets the path from the commandLine. The way that works is it first saves what the current itemDelimiter is in a local variable so we can restore it later. Then it sets the itemDelimiter to an apostrophe and reads the entire commandLine. Then it gets the index number of the second-to-last item in the list and uses that to determine the filepath of the document that was double-clicked. Finally it restores the itemDelimiter to its default value.
This is the last step to make the program work. Publish your movie again. If you're on a Mac be sure to place the projector in the MacOS folder in your package. Double-click a saved document and it will launch your projector and open the document. Double-click another file and it will bring your program to the front and open that one.
Conclusion
You have seen how to make your projector behave like a professional application. All you have to do now is apply this technique to your own Director projects, and then sit back and wait for the shareware fees to come rolling in.
Source files: MiniWord.sit (Macintosh) | MiniWord.zip (Windows)
Copyright 1997-2026, Director Online. Article content copyright by respective authors.