Editable Rich Text Engine
September 10, 1998
by Alex Zavatone
Introduction
One of the beauties of Director is that if there is a limitation to the product, much of the infrastructure is there to allow you to write your own solution. This is the case with finding a solution to the lack of editable rich text in projectors and shockwave. Director doesn't support it but why can't we write it ourselves? One summer day in 1997, I was landing in Dallas when the thought of writing an RTF engine to allow on demand display of custom text in shockwave and projectors popped into my head right before touchdown. This concept was promptly discussed with the two multimedia developers who I was visiting, Don and Justin. Together, we brainstormed through most of the design over pizza, beer and one or two games of pool.
Evolution and Basic Design
Two years prior to that conversation, I had cooked up a very basic font display engine that was used to draw fonts on Director 4's playback support for the Panasonic's 3DO game console. It used fixed spacing for all the alphanumeric characters and didn't even have word wrapping but relied on trails to draw letter after letter with one sprite. This would not normally be an acceptable solution but the only other way to display text was as a straight bitmap. The cool thing was that the Director Player for 3DO was the first port of Director written on the new IML/Portable player codebase. Unlike the regular (m5 flavor of) Director, its trails were not "fragile" and did not go away on a refresh. You had to draw a sprite on top of the trails or use a transition to remove trails. This in itself was a big advantage and with a small amount of time determining how much space goes between each character for geneva 9 point, the following movie was created:
Note that this movie was created in 1995. Shortly after I got my car and well before I blew it's engine :/
The above movie shows that even though it is possible, text display sure can be slow. There was quite a way to go before creating a real engine that could be used in a professional application was a possibility. Putting the speed issue aside for a moment, this solution would need to work with Director's antialiased rich text. We would have to find some way to capture the spacing information for each character at the desired font size. While we're at it, why not throw in pair kerning as well? Pair kerning had been in apps like Pagemaker since 1987 - it was time to add it to Director. The next problem was that almost no RTF member info is controllable via lingo.
How can you display rich text through lingo if you don't even have lingo to do it? A good approach would be not to use lingo to control the uncontrollable but to create one cast member for each character of the font at the desired size and style, name the member with the character, or just use its number to represent the ascii value of the character within the member. Doing this manually for each font you want would more than tedious. Luckily, Director can place text into an RTF member through lingo at authortime so a text castlib creation engine could be created to build font castlibs for use within the display engine.
From our observations, the overview of the design for the on demand display engine would be a font display engine/object and component castlibs where each castlib would be the specific font, size, and style desired. The Display engine would have a handler to set the desired font to draw with and the draw command itself. Each castlib would have to have lingo routines that matched its castname. These routines would store all the character metrics - if we could find out a way to get them.
With the basic design of how this could work and format of the font castlib coming together, the exact dimensions of the characters would need to be captured. As luck would have it that that information is stored within a font's .AFM or Adobe Font Metrics file. If you have a font that is missing its .AFM file, Fontographer can create one for you. Even though character spacing, height and kerning data is stored in the .AFM file, it needs to be converted to get useful values. Thanks to a Direct-L-er from the Netherlands (pim I think), the exact formula for converting the units in the .AFM file to pixels was provided. Now the height and width of each character and the pair kerning information could be saved for each character for the font we want to display! And with this info, a drawing routine can be created to properly space letter sprites on the stage. This information would have to be saved along with the font castlib in a compatible list format that could be accessed at runtime. To do this, we'll have to work around problems that could be caused by storing the quote character and the line continuation character in a lingo list because the string versions of these chars in a list would break the list. They would have to be stored as ascii values. With this info accessible, the general format of the castlib would look like this:
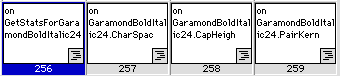
- members 1-255 containing ascii chars 1 to 255,
- member 256 would contain the lingo to get all the stats for that font from members 257-259
- member 257 would contain the char spacing list for the current font size
- member 258 would contain the cap height or "character height"
- member 259 would contain the kerning info for letter pairs when it was required.
Note: Kerning is a method of moving two characters closer or farther away from each other to enhance their look to the viewer. Certain letters look too close or too spaced when appearing next to each other. Therefore, the spacing between the character pair is adjusted to look better to the viewer. This extra information is the pair kerning info.

With a clear understanding of how the font info would be captured, the next challenge is to design a display engine. Director 6 allows 120 sprites in the score and with this in mind, the engine should have a flexible number of sprites to be reserved for drawing the text instead of just 1 in the old example. The reasons for this are that every time you update the stage, it takes a fair amount of time. Setting the text to display with more sprites and then updating the stage should proceed faster than drawing 1 letter at a time. Also, to correctly draw a text string, there needs to be a defined region to draw into.
For ease of setup, a quickdraw sprite rect provides a good way of doing it (easy to customize) and only takes up 1 sprite channel. The channel of this sprite needs also to be passed to the draw engine. Realizing this, it looks like the draw engine would have to be an object with an API (applications programming interface) to set any "specifics about the font and display region". This would allow the user to pass in the name of the font castlib to use in drawing, the sprite to draw within and the text to draw. Then a Draw command to the object would display it in a snap!
The only other addition to the drawing engine would be the optional capability of a word wrapping at the end of a line. To do this, the draw engine needs to be able to identify a word and add up all the widths + kerned pair widths of that word + the width of one space and see if that number + the current H position in the draw rect goes off the right of the draw rect. If so, reset the H position of the draw sprite to the left and move it down one line. Of course, we also have to check that that line the sprite is moving to is not within the draw rect as well. Simple right?
So the design comes down to a display engine that is passed the following info:
- The name of the castlib that defines the font to draw.
- The sprite that defines the rect that the font will display within.
- The starting sprite and ending sprite used to display the text.
The structure of the director movie would be:
- A global object which contains the draw engine for each region you want to draw into. This allows you to draw into more than one chunk at once.
- Linked or internal castlibs of all the fonts, sizes and styles you intend to use in your Projector or Shockwave.
Now, if you're going to be doing this in Shockwave, it is important to know that each font castlib that you add takes up space. Sometimes lots. Since there are many characters (in English) that will never be displayed, there should be the option when creating the font castlibs to limit the chars in the castlib to the standard alphanumeric characters. This not only saves space by removing undesired characters, but it also saves space in the lists that define the character's metrics. With this option, many font castlibs drop to between 15k and 30k after being compressed as a .cct! This means that they can be downloaded on demand with little or no delay to the user. In fact, a few week ago, I posted an article explaining how to download castlibs on demand for shockwave movies.
Another major kudo to the shockwave engineers is deserved here because once a castlib is downloaded, it is cached -- not in the browser's cache but in shockwave's own cache. This enables you to switch between previously downloaded font castlibs without having to redownload the castlib each time. It just becomes as easy as "set the filename of castlib = myCastlib".
The Main Act
Enough talk already! You want to see it work right! Well the demo below is the technology in action.
A quick explanation of start up procedures to show how the above movie works follows:
- read a file from directory defined as the movie path & "fonts" called font descriptor.txt. This is just a text file that shows what fonts, sizes and styles are available in the fonts folder. It is controlled by the author.
- Enable all the UI when this file has been read in and parsed.
- When the display button is clicked, check the font popups to see that they match a font style that is describes in the font descriptor file.
- If the font is legit, start a download thread for that castlib. If it is already in the cache, it will reset immediately. Also set the "I want to draw the text" flag to true.
- When the download is complete set a flag stating that "the download's done man".
- When both the "I want to draw the text" and the "the download's done man" flags are true, set the font in the draw engine, erase any displayed text and call the draw handlers.
For a scenario where you do not have to download the font on demand, the setup is MUCH easier. Just import the font, instantiate the object, set the desired font & specs and call the draw handler. PIECE 'O CAKE.
Creating the Font Castlibs
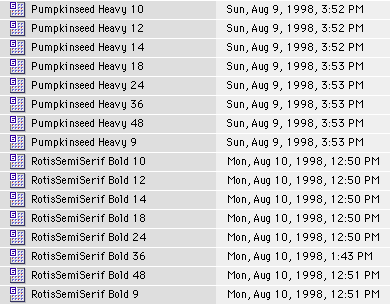
This is all well and good but how do you create the font library in the first place? The builder exists for that purpose. In this world, the font castlibs exist as separate castlibs as seen in the screenshot below:
Since each castlib exist separately, a primer for how to create a set of font castlibs would probably be a useful thing to have. Here goes.
Find a font that you want to create castlibs out of. Make sure that is has a .afm file. Most mid 1990's type 1 fonts come with .afm files. If you have a TrueType or type 1 font that does not have a .afm file, you can convince Fontographer to export one for you. Place the .afm file in the same directory as the builder file. Now this process has been heavily tested with TrueType and Type 1 fonts under Mac OS8. TrueType fonts antialias in Director without a hitch but Type 1 fonts require that ATM is installed or you'll go to a lot of effort to create a castlib that won't antialias.
When your .afm file is placed in the right location and the desired font is installed correctly, it is very important to note some naming conventions. The .afm file MUST match whatever you are calling the font in your castlib and both are subject to the following limitations:
- You can't have spaces in the name of the font that you are using to name the castlib and also in the .afm file.
- It is a very good idea(tm) to use proper case
- When creating the castlib, director likes to add 4 characters (.cct) at the end of the castlib name. The name of the font + a space + the style + a space + the size can not exceed 32 chars. Trim the name of your font castlib and .afm file appropriately.
Ex: Geneva Plain 10 is perfect but AntiqueOliNorOutPReg Plain 10 will cause problems. Ex: Geneva Plain 10 is still perfect but geneva plain 10 will cause problems if the castlib is named Geneva Plain 10.cct and you are downloading it over the net. Pay strict attention to case sensitivity.
Once you've made it beyond this point, in an empty director movie, create an external castlib with 1 RTF member in position 1. Put a character like the ! in it. Set the font, size, style and color of the character in that member to be what you want. Click get info on the member and make sure that the settings for this character are to "antialias all sizes" or text at the size of 12 point or less will be rendered with icky jaggies. Name the castlib appropriately.
Save the castlib and duplicate for all sizes. Rename all your copies to include the size you want it to end up displaying. Back in Director, create a new file, save changes to the castlib only and then import all the new castlibs you created. Set the size of the first cast member in each to reflect the desired size to be used in your castlib. Save and double check that you did this correctly. Do it again just to make sure. These cast members are the templates from which the font castlib will be created.
When done, open the castlib builder and again import all the castlibs that you are going to build. Run the movie, fill in the font name in the field named, of all things, "font name". This name must match that of the .afm file and the castlib. Example: If your castlib is named Geneva plain 10, and your .afm file is named Geneva.afm then the contents of font name should be Geneva. Not rocket science, I know, but neatness counts. :]
When entering your castlib sizes, you can enter them one at a time or enter each size separated by a comma. Finally, enter the style of the font. If everything was done correctly, the screen should look like this:
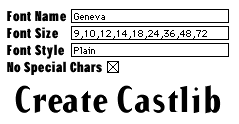
If everything looks OK, click Create Castlib. If there are any errors, recheck your castlibs, .afm file and naming conventions. Note that the name fields will reset when the movie is stopped.
Notes: Large font sizes may result in more information for spacing and than can be saved in a lingo list. This will require your doctoring of the scripts around member 256-259. You should familiarize yourself with the scripts in simple, smaller sized font castlibs. The kerning info is the result of the ascii value of the first letter followed by the ascii value of the next letter. Use that info to determine which kerning values to modify if necessary. Spaces are also added to the list by lingo. You can get more info in the lists if you manually remove the spaces in the lists by hand.
While the castlibs are being created, status is displayed in the right hand field. The castlibs that will be created will be about 300k each if "No Special Chars" is checked, 800k if otherwise. When turned into compressed casts by the update movies option, their sizes drop dramatically. The "No Special Chars" option is probably not desirable for titles not being created in English since all the accents, umlauts etc... will be removed. Remember, you can always remove characters by hand if space becomes a concern. In any case, save and compact those castlibs.
In the sample local displacer file, import the castlibs you have just created and change the InitFonts routine to match your newly created fonts. Run, select your fonts, type some text and click display. If all checks out properly, create a new folder called Font Source and update and select "Convert to shockwave movies" from the xtras: Update Movies menu. Select the new folder Font Source as the destination to move the source to and compress those castlibs. You've now created your first castlibs for displaying rich text on demand.
Incorporating the Code into Your Movie
Once you've created some castlibs, adding the RTF on demand functionality to your production is an easy task. There are two routes to take though. If you are creating a shockwave movie, I prefer to download the castlibs at idle time and link to them with a set the filename of member on demand. The code for this is based on my article at buildArticle.php?id=145 and is provided in the download at the end of the article. If you are creating a projector, you can simply place the castlibs in a fonts folder and import the ones you want to use. I like to have multiple font sizes available so that the user of the production can pick the size that they want to use to view the text you are presenting.
Once the castlibs are imported, you'll need to bring in the display engine, set up your score structure and the basic lingo. To Start, copy the Draw text object script from either of the samples and paste it into your movie. When you plan on drawing the text string into a region on the screen, you can immediately instantiate the object or use one that you set up previously. If you will be drawing to one text block per screen, it is convenient to set up a global object called gTextObj. If you are using more than one text block, you can create as many objects as you need. Once your objects are created, you'll have to reserve the sprite that will be the bounding box for the draw region and the sprites that you will use to draw into. Code to set up the text object and reserve channels is listed below. It is a good idea to place dummy sprites in the reserved draw channels and move them off the screen to point (-1000,-1000).
on InitTextObject
  global gTextObj
  set gTextObject = new (script "Draw text")
  set startSprite = 20
  set reservedChannels = 50
  SetDrawChannels( gTextObject, startSprite, ¬
    reservedChannels)
end
Now that you've got the object set up, Drawing is the easy part. Simply set the font you will be using, adjust the "tightness" or horizontal and vertical space between characters and execute the draw as listed below:
on DrawText myString
  global gTextObj

  -- define the font and castlib to use.
  -- myFont does not contain spaces
  set myFont = "GaramondBoldItalic24"

  -- used to access lingo routines
  set myCastlib = "Garamond BoldItalic 24"

  -- used to access castlib members
  SetFont( gTextObj, myFont , myCastlib)

  -- shameless plug
  if voidP(myString) then set myString = "By Zav for ¬
    Director-Online. 8/10/1998. Zav / at / Sirius.com"

  -- amount of pixels to override vertical
  -- and horizontal spacing
  set vAdjust = 0
  set hAdjust = 0

  -- turn word wrapping on
  set wordWrap = true

  -- define the bounding box sprite
  set maskSprite = 16

  -- hard coded value for the draw region sprite,
  -- usually a big QD rect

  -- Draw the text
  DrawText( gTextObj, myString, maskSprite, ¬
    hAdjust, vAdjust ,wordWrap)
end
That's basically it! Of course you'll need to add erase routines. I normally modify the visibility of the mask sprite and let that do it for me.
So if that's it, what are the caveats? Well, from what I noticed, some fonts like to draw outside of their bounding box and leave artifacts around the edges of the draw box. Also, I've put trailing spaces in front and behind all the characters in the castlibs but some fonts have descenders or ascenders that will go outside their rect. This will result in the ascenders and descenders getting clipped to the rect of the character. All in all, pretty minor caveats if you ask me.
Expanding the Code's Functionality
This code is but a start. It is not really optimized; it does not yet support an editable mode, nor does it right or center justify. Nevertheless, the starting point is there for you to take and modify the code to suit your needs. Just make sure to give me and Director-Online credit when you do :] and have fun using on demand RTF in your projects!
FIles available in ZIP (1.2 MB) format.
Contents of download
shockwave -- folder
dummy -- folder
font source -- folder
-- put your source font castlibs here
fonts -- folder
-- compressed font castlibs
Text Demo012.dir -- the source for the shockwave example
local -- folder
Local Text Demo012.dir -- a simple non shockwave demo
FontCastlibBuilder017.dir -- the castlib building tool
Credits:
Many of fonts used in this presentation are from The Type Quarry and Kiwi Media.
Thanks to Pim for the algorithm to decode the font metrics.
Copyright 1997-2026, Director Online. Article content copyright by respective authors.