Not quite Director
January 29, 1998
by Bill Ford

Everybody has a story to tell. This is about a simple storytelling system made with a combination of mBED Interactor Lite and Dreamweaver. Note: A trial version of mBed Interactor (Mac or PC) can be downloaded if you'd like to try the techniques illustrated in this article..
The system, loaded with a story about Tibet, can be viewed on my site at http://www.littleyellowhouse.com/recognize/tibet.html. It is an interface of five main sections with three sets of themes and images per section. The main sections are marked by buttons across the top and the subsections by buttons down the left. Another class of buttons down the left calls up supporting materials and links.
The buttons are "radio" style meaning those selected remain highlighted until others are picked, in this way marking one's place in the story. There are also mouseover frames in the buttons to further track one's place.
The button palettes were made in mBED Interactor Lite and were framed together with html pages of text in Dreamweaver. Interactivity is provided by the 36K mBED Java classes that download with the site.
The Main Button Menu.
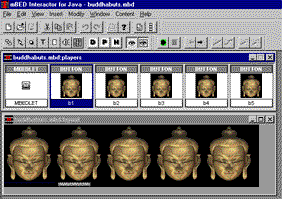
The main menu is a five button mbedlet, or multimedia interface built with mBED players. Here is how it is built.
![]()
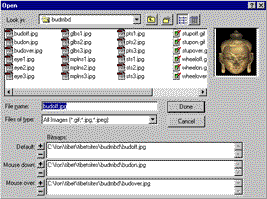
Clicking Button (third from the left above) in the Players palette of Interactor Lite places a button next to mbedlet in the players window. Clicking Data (the big "D" on white button) brings up a dialog box in which default, mousedown and mouseover jpg's are entered.
Clicking Properties (the big "P" on white button) opens the Properties box where the button is named and configured as radio type using a mouseover frame.
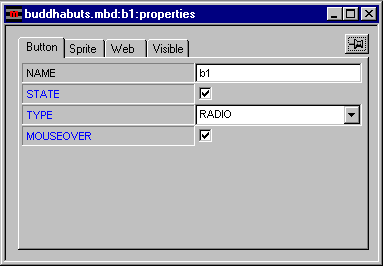
Click Visible (the eye button) to make it appear in the Layout window. Save and name the mbedlet.
Select mbedlet in the Players window and click Properties to open a box where size and color of the mbedlet is configured. In this case, black backcolor, 510 by 125 pixel size. Now the button is copied, pasted, renamed and repositioned every 100 pixels in the layout. In the Properties box of the first button check State to have this button pre-selected. Click Play, the green arrow button, to see the buttons perform in a runtime window. Click View in Browser ![]() and the button palette appears in an html page.
and the button palette appears in an html page.
Notice what Interactor has done behind the scenes. It has taken care of a rather complex set of mouseup and mouse enter/ leave handlers which define radio buttons. It has created an html page with the same name as the mbedlet and inserted the applet tags.
5 Subbutton Menus.
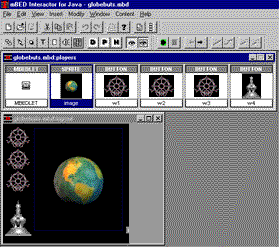
Make a second mbedlet, 252 by 240 pixels, for the first subsection buttons. In the same way as before make three buttons, this time entering the wheel gif's, and arrange them vertically. Copy, paste and drag down a fourth then change its data from wheel gif's to stupas. Now place a Sprite player to the right and enter the three globe jpg's and name it "image". Test it in the Runtime window and in a browser.
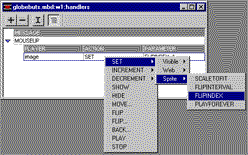
So far all the events, like mouseenter and mouseup, have been handled behind the scenes. Now select the first button and click Handlers (the big "H" in white) to add a mouseup handler.
Click Add and a mouseup message appears. Click Insert and a Player/Action/Parameter line appears. Right click Player (Control click for Mac users) and select "image", Action and select Set. Drag right in the cascading menus to select Sprite/Flipindex. Enter 1 in the dialog box that pops up. In the next two buttons do the same but enter 2 and 3 respectively in the flipindex dialog box. Test it in the runtime window and see that as each button is selected a corresponding image appears in the sprite.
Using this mbedlet as a template resave it four times with different names. In each subsequent mbedlet change the data of the sprite to the three images of the potola, the mandala, the stupa and the eye. Delete the fourth button from the other mbedlets.
15 Text Files.
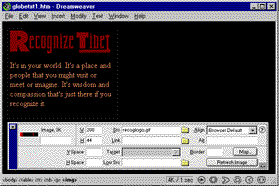
There are a sequence of three text files for each section, a total of fifteen. Open Dreamweaver. Select Modify/Page Properties to enter colors and a title for the first text of the first section - globetxt1. Save the file with the same sequential name as the title - globetxt1.htm (for some reason Dreamweaver defaults to .htm rather than .html). Select Insert/Table and enter 1 row/1column, 220 pixels. In the first text file only there is also a title graphic. Select Insert/Image and browse for the title gif. Once that is in place simply enter text into the table. Use this file as a template to make the other text files.
5 Sub and Text Framesets.
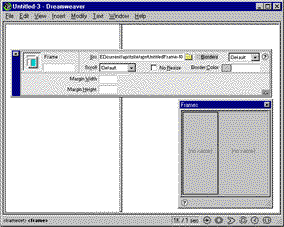
Open a new file in Dreamweaver. Select View/Frame Borders then Alt/Drag the left border over a few inches to the right. Select Window/Frames. In the floating window that comes up, two frames are represented. Click on the left frame. Notice that the floating properties window now says Frame.


Enter the name "sub" in the Properties window then set Borders and Scroll to Auto. Check No Resize and make Margin Width and Height each 0. Now make the Src, or source for this frame, the html file that Interactor made for the globe buttons file. Name the right frame "texts". As before set its Borders to No, its margins to 0. Set Scroll to Auto but don't check No Resize. Bring the first globe text into Src. Select View and deselect Frame Borders.
Note here that only frames can be scrolled, not grouped framesets. This requires setting Auto scroll throughout and results in a gruesome breaking up of the overall design on small screens.
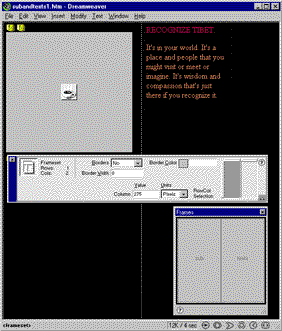
The frameset is now loaded and needs to be tightened up. As represented in the floating Frames window the screen now has three files up - two frame sources and a frameset. Keeping them straight takes a little getting used to. In the floating Frames window select the frame border. Now the floating Properties window says Frameset. At this point select Modify/Page Properties and enter a title into the dialog box that pops up. Call it "subandtexts1" to represent the frames it holds. Now select File/Save Frameset and save it with the same name as the title. In the floating properties box set the frameset Borders to No and the Border Width to 0. Notice that on the right hand side of the the floating properties window there is a representation of the two frames. Click on the left column then set Column Width, just to the left, at 275 pixels. Click the right column and set that to 1 Relative. Select File/Preview in Browser and test the frameset.

Use the file "suband texts1" as a template to make framesets for each of the five sections. In each instance insert the appropriate source for left and right frames and remember to rename both the title in the page (actually a frameset not a page) properties box as well as in the name of the frameset file.
The Main Frameset.
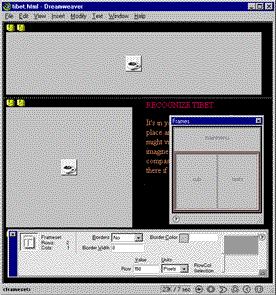
After testing each of the five sectional framesets open a new file and divide it by the same steps but into two horizontal rather than vertical frames. Name the top frame "mainmenu" and the bottom "subs". Give the frameset a title and save the frameset. Do this naming now because it will be harder to keeps things straight later. As before, say no to borders and set borders and margins to 0. In the top frame have no scroll and no resize but in the bottom frame set Scroll to Auto. Make the top frame 150 pixels and the bottom 1 relative. Do all this now because once the subandtext frameset is nested here the only way to get to some settings is in raw code.
Once this top level frameset has been spec'd and saved set the source of the top frame to the file Interactor made for the main menu mbedlet. Set the source of the bottom frame to the first of the five subandtext framesets you made. Select File/View in Browser and test the frameset. Everything should be in position, radio buttons should be working in terms of highlights but no actual changes should be happening because the links have not been set.
20 Links.
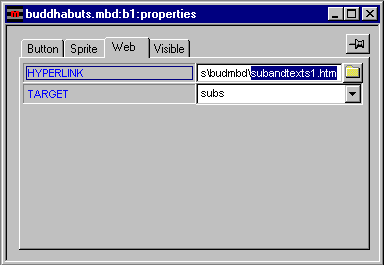
Return to Interactor Lite and open the main menu, five button mbedlet. Select the first button in the Players window and double-click it to open its Properties box. Notice that there are four tabs for properties. Click the Web tab then the folder button and browse for the "subandtexts1" page. Enter "sub" into Target. This link will place the first "subandtexts" frameset into the "subs" frame of the main frameset. In the other four main menu buttons hyperlink the other "subandtext" files into the "subs" target.
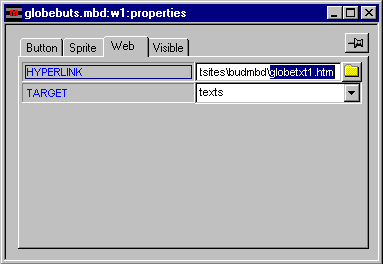
Going down a step in the hierarchy, open the first submenu mbedlet. For each of the first three buttons, hyperlink the appropriate globe text into the "texts" frame of the "subandtexts" frameset. Then do the same for each of the other four sets of three buttons.
Open the main frameset in a browser and test the links.
A Support and Links Page.

Finally, a support and links page. Open one of the text files in Dreamweaver to reuse its table and color settings but put in a new title then save it to a new filename. Enter information that supports the themes illustrated in the story and enter links to associated sites. Use the _blank target so that associated sites pop up in their own window. Open the first submenu mbedlet in Interactor Lite and choose the fourth button in the players window. Double click it to open its properties and under the Web tab, Hyperlink the support page into the "subs" frame of the main frameset.
When everything is finished and tests out in your primary browser on your primary platform, check out the rest of the possibilities. Expect differences that might require adjustments.
Alternative Approaches.
The question of alternative approaches hinges on how integrated you choose to make your page. A complex page like the one described above could be built, using tables, as a completely integrated page. But everytime a button was clicked a whole new page would have to be generated resulting in bad performance for the user and nightmares of linking and maintenance for the webmaster.
The storytelling system was built instead as a frameset, a loose confederation of pages that appear more or less as a single page to the user. The main menu never has to be regenerated. The submenus are only regenerated when switching sections. Text pages swap in and out regularly but, being only text, they do so with little disruption. The only major drawback is the way the framesets break up on small screens.
The frameset approach is fairly efficient and fits the habits and experience of designers and webmasters at this time. But it's tediously complex and quirky resulting in less than satisfying experiences for both builders and users. mBED players provide a path to higher integration with both better performance for the user and easier building and maintenance for the designer and webmaster.
Trading up from Interactor Lite to Interactor Standard edition the designer could easily integrate the sub menu and text pages, eliminating a whole level of complexity in the main frameset. Using Interactor Standard the designer would simply add a text player to the mbedlet and set its "data" to a text file. Handlers could then swap different texts in and out of the same mbedlet just as they are now swapping jpg's. The designer could even eliminate the main frameset itself by expanding the size of the main menu mbedlet, adding a Sublet Player and setting its "data" to the submenu mbedlet. Handlers in the main menu would then swap sublets within the mbedlet rather than pages or framesets in a frameset. And there would be no breakup on small screens.
Although the issue being discussed here is integration, not additional functionality, there is also a great deal of added functionality available on the mBED upgrade path including animation, scores, graphics masking, audio streaming and slider controls.
The DHTML Dilemma.
The combination of HTML and Javascript results in a more dynamic HTML or DHTML. Both Interactor and Dreamweaver provide ways to take advantage of DHTML. Interactor encapsulates Javascript into the mBED players providing more power and ease of use. Dreamweaver merely provides a user shell to Javascript called the Behaviors window.
Something roughly like the main menu of the the storytelling system can be made in the Behaviors window of Dreamweaver. But it won't have mouseover frames and it won't behave consistently over different browsers and platforms. For instance, in Internet Explorer the selected button will have a border around it even when the setting says no border. And it pretty much won't work at all in 3.0 browsers. I got a rocket scientist friend of mine to play directly with the Javascript function and force the mouseovers but even still it wasn't quite right, the mouseover also fired on the selected button. And anyway this ain't supposed to be rocket science.
Dreamweaver puts the latest Javascript functions it has found up on its site for downloading and invites programmers to make and post theirs. They also pass through 3rd party packaged behaviors at a price. It's reminscent of the utopian swap meet atmosphere of HyperCard in its heyday. Nice to think about but not what you want to bet the ranch on.
DHTML is just emerging and how it will mature is unclear. It is likely however that Interactor and Dreamweaver will continue to complement each other in whatever way things go.
Copyright 1997-2026, Director Online. Article content copyright by respective authors.