Tweening sprite motion
February 14, 1999
by Pat McClellan
Dear Multimedia Handyman,
I am very interested in learning a technique that has become very popular lately in director interfaces, that which the button sprites can be grabbed and "slung" across the stage etc. and then come to a graceful stop as seen on the http://www.whereishere.com site produced by the makela's. Any help or pointers would be greatly appreciated....
John Peele
Dear John,
Let me start this discussion by saying that none of what I'm going to write about here has any basis in the laws of physics. There are many programmers out there who have done amazing programs using physics as the basis for their algoritms, but I'm not one of them.
First, let's look at what Director provides for this effect, using standard Score animation techniques. In this first demo movie, I have animated a sprite (one of D7's new vector images) sliding across the stage over a period of 30 frames. In the top example, note the yellow line with dots. That's showing you the locH of the sprite in each subsequent frame, moving left to right. Notice that they are evenly spaced. That means that the speed of the sprite will remain constant throughout it's journey across the stage.
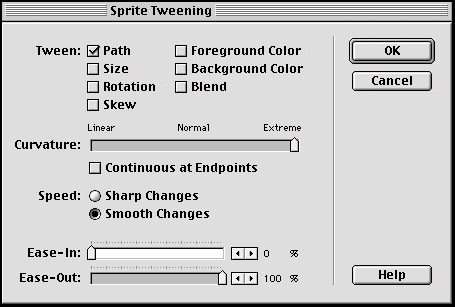
In the lower example, I used Director's Tweening options, so you'll notice that the yellow dots are not equidistant. Rather, they start out far apart and get closer together at the end (right side). This means that at the beginning of the path, the sprite is moving further per frame than at the end, when it creeps only a few pixels per frame. This will give it the effect of "slowing to a stop." To achieve this effect, open the Tweening dialog box for the sprite. I selected the option to tween the path, set the Curvature all the way to Extreme (for maximum effect), selected Smooth Changes, and set "Ease-Out" to 100%.

This score based solution will work in many situations, but in other cases, you'll want to achieve the same effect without being tied to the score. For this, we'll need to create a behavior. Let's make a list of the things we'd want to be able to set as parameters when we're authoring.
- Starting point (locH and locV)
- Ending point (locH and locV)
- Number of frames for the move
- Number of frames to "Ease In"
- Number of frames to "Ease Out"
The EaseIn and EaseOut numbers essentially give you the same control you'd have using the Curvature slider in Director's Tween Options. They allow you to designate how fast your sprite will accelerate and decelerate. The lower the number, the more sudden the acceleration or deceleration.

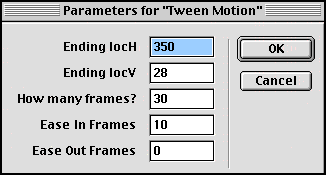
This is what our dialog box should look like when we drop the behavior on a sprite. Here's the code for declaring the properties and setting up the getPropertiesDescriptionList.
--Tween Motion Behavior
--copyright © 1999, ZZP Online, LLC
property pSprite
property pStartH, pStartV
property pEndH, pEndV
property pFrames
property pEaseIn, pMidFrames, pEaseOut
property pFlag
property pPixH, pPixV
property pDeltaList
on getPropertyDescriptionList me
  set pSprite = the currentSpriteNum
  set pStartH = the locH of sprite pSprite
  set pStartV = the locV of sprite pSprite
  set pdlist to [:]
  addprop pdlist, #pEndH, [#comment:"Ending locH", ¬
    #format:#integer, #default:pStartH]
  addprop pdlist, #pEndV, [#comment:"Ending locV",¬
    #format:#integer, #default:pStartV]
  addprop pdlist, #pFrames, [#comment:"How many frames?",¬
    #format:#integer, #default:30]
  addprop pdlist, #pEaseIn, [#comment:"Ease In Frames", ¬
    #format:#integer, #default:0]
  addprop pdlist, #pEaseOut, [#comment:"Ease Out Frames",¬
    #format:#integer, #default:0]
  return pdlist
end getPropertyDescriptionList
Notice that I'm assuming the startH and startV of the sprite will be the current locH & locV of the sprite at the time the behavior is applied. Also, I default the endH and endV to the same points, so it'll be easy in many cases to figure out what to input for this number. For example, for a straight horizontal motion, you'll leave the endV at the default (same as the startV). And, you may know that you want the sprite to move 300 pixels, for example, so you can simply add 300 to whatever number appears as a default. The last thing to note is a property called pFlag. This is simply the "switch" that will be responsible for starting the motion. I initialize that property in the beginSprite handler that follows.
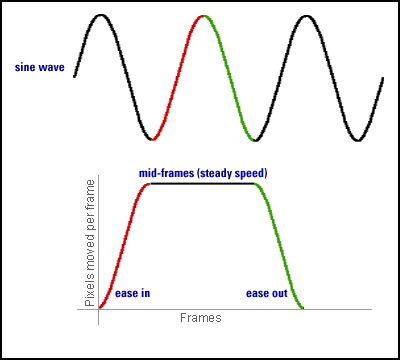
Before we get into the code, we need to cover the concepts and some math. In order to get a geometrically smooth acceleration and deceleration, I decided to use the smooth curves of a sine wave -- at least a portion of the sine wave cycle. If you think about how we'd describe the smooth acceleration that we want, you could graph it like this:

In this illustration, you can see that the red segment of the sine wave represents the way that we want to "ramp up" the speed of the sprite -- easing it into motion. Note that it is a more gradual slope as the motion begins, and then smoothly comes out of the acceleration as well. The green segment represents Easing Out of the motion, again with gradual transitions at the beginning and end of the deceleration. Attempting to simulate this sort of motion is complicated, but the results will be smooth as silk.
In this example, I'm only moving horizontally and I've turned trails ink on so that you can compare the motion of the various sprites. Note that the dots are closer together as the sprites easeIn and easeOut of motion. Download this *.dir file and look at the Tween Behavior. (Mac or PC)
In our beginSprite handler, we'll start by determining the total number of pixels to be moved (both horizontal and vertical). I call these values deltaH and deltaV, and they're evaluated by simply subtracting the starting H & V from the ending H & V. Next, I want to find out how many (if any) midFrames I have. I'm using the term midFrames to describe frame represented by the flat black line in the diagram above -- the frames that are neither easeIn or easeOut frames. This is simple to calculate: midFrames = total frames - easeIn frames - easeOut frames. I added a simple if statement to assure that the number of easeIn and easeOut frames doesn't exceed our total frames for the motion.
Now comes the complicated part. We have to figure out how many pixels per frame the sprite will be moving during the midFrames. If the motion is linear, with no easeIn or easeOut, then it's simply the total number of pixels divided by the total frames. The problem is that easeIn and easeOut -- by definition -- change that formula. For example, let's compare the first ten frames of two different animations. Example A moves steadily, a distance of 100 pixels, over a period of 20 frames. It's easy to see that -- with steady motion -- the sprite moves 5 pixels per frame. Now consider example B, which also moves a total of 100 pixels in 20 frames, but eases into that motion. If it's going slower (moving fewer than 5 pixels/frame) at the beginning in order to ease into the motion, then, it will obviously need to move MORE than 5 pixels/frame during the last 10 frames to make it to the destination in time. So, after the first 10 frames of example B, how far will the sprite have moved? Something less than 50, but what?
Since the motion wil be defined by a sine wave, I thought that there might be a constant which represents the portion of the motion that we could expect it to have moved. In fact, it's not a constant, but it's always pretty darned close to .65. It varies based on the number of frames for the easeIn or easeOut. Therefore, in the behavior, I set it up to calculate this "inFactor" and "outFactor" dynamically, based on the number of frames for each. Once they're calculated, I can figure out the average number of pixels per frame that the sprite will need to move (horizontally and vertically).
Once I know the average number of pixels per frame, I can build a list of points which represent the H & V change for each frame in the animation. This is done in the buildPointList handler. I'm not going to explain this process (or the math for calculating the easeIn and easeOut points). I figure that if you're into the math, you'll understand what I've done, and if you're not, I won't waste your time.
Ultimately, we end up with a list of points in which each item describes the amount of horizontal and vertical change for the next frame. When the sprite's motion is activated with a mouseUp, a flag changes to #move, and then the exitFrame handler simply resets the sprite's loc and deletes that item from the list. When the list is empty, the move is over and the flag is reset to #stop. Easy, right?
Good luck with your project, and let me know what sort of fascinating variations you make with this. You should also read the excellent work that Darrel Plant has done with Bezier curves.
Copyright 1997-2026, Director Online. Article content copyright by respective authors.