Alpha Channel Importing in Director 7
March 2, 1999
by Andrew White
One of the most requested features for new versions of Director has been support for alpha channels. Medialab's excellent Alphamania Xtra has provided that functionality for some time now but using Xtras in Shockwave has been fraught with problems. What was needed built-in support for alpha channels and with Director 7, Macromedia has finally given us that capability. Unfortunately preparing images for use with Director 7 isn't as straightforward as it could be.
Most people in the Multimedia biz use alpha channels on a regular basis without thinking about it. Photoshop's ability to combine multiple image layers with complex transparency relies on alpha channels, but users don't realise it because of good design. The way an alpha channel works is relatively simple - a value between 0 and 255 defines how much of the background shows through the foreground image, e.g. a value of 128 shows a even mix of foreground and background color. This can be represented by the following algorithm:
imagecolor = fgcolor * alpha / 255 + bgcolor * (255 - alpha) / 255
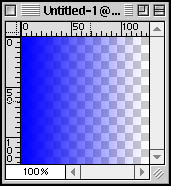
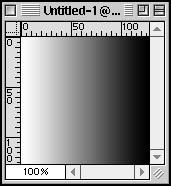
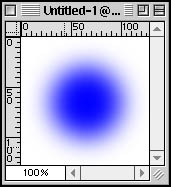
The figures below show how by varying the alpha channel pixel values between 0 and 255 can achieve a smooth blend from transparent to opaque.
The problem comes when this alpha information needs to be stored on disk. Any parts of the Photoshop image that are partially transparent need to have an rgb value assigned to them. What Photoshop does is to assume a white background and mixes in this background color to calculate the final rgb value. Photoshop also assumes this white background color when flattening the image into a single background layer.
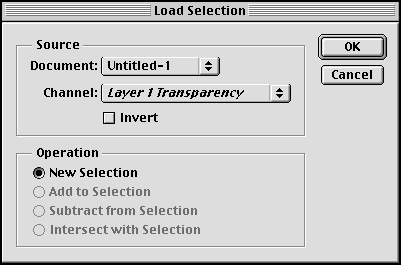
One important point when flattening a Photoshop file is that any alpha information attached to layers is lost so you need to save that information first. To do this combine all of the layers into a single layer but don't flatten it. Load the single layer's transparency using the 'Load Selection...' menu command. Save this selection to channel 4 and then flatten image.
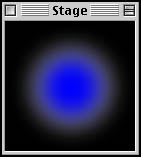
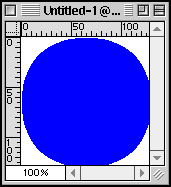
When this file is imported into Director every thing appears fine in the paint window but with the right type of image a white 'halo' can appear round the sprite. The figures below show this effect.

What's happening here is that Director is taking the rgb value from the Paint window and then applying the embedded alpha channel value. But the rgb value in the Paint window has an amount of white background color mixed in that Director doesn't know about. Photoshop and animation tools like After Effects allow you to subtract this white from the image based on the alpha channel value. Because Director needs to composite sprites as fast as possible then subtracting the white background color every time the sprite moves is an unnecessary overhead.
What we need to do is to go back to Photoshop and change what happens when the image is flattened. When the image is flattened we need Photoshop to ignore the alpha value and use the color of the foreground pixel, e.g. a foreground pixel with an rgb value of (255,255,255) and an alpha value of 128 needs to keep it's value of (255,255,255) rather than be converted to (128,128,128).
To do this in Photoshop you need to install the Factory Filter from the 'Goodies' folder on your master CD. This filter allows the mathematical manipulation of the r,g,b and alpha values. When you've created your transparent image, combined it into one layer and saved the alpha information to channel 4, run the Filter Factory with the following settings:
R: r
G: g
B: b
A: 255
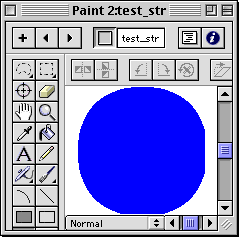
This will strip the alpha info from the layer and leave no transparent areas. The figures below show the before and after of this operation.
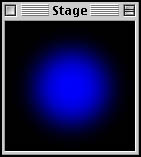
Flatten and save the image and re-import into Director. While the Paint window doesn't look pretty when the image is dragged to the stage it all looks fine. The figures below demonstrate this.
This process is rather long winded but luckily it can be automated in a couple of ways:
- Save the Filter Factory settings as a custom plugin. While the Filter Factory is open choose 'Save...' to save the settings as a plugin that can be dropped in and used without the original Filter Factory plugin.
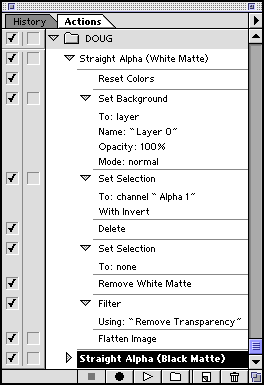
- Build a batch action to automate the process of conversion The example action below converts an image on a white background to a D7 friendly format. A similar action can be written for images on a black background commonly outputted from 3D software.
To help you we've created the plugin and actions already:
Photoshop plugin (Mac and PC)
Photoshop Actions (Mac and PC)
For those of you who bought the Shockwave Internet Studio and are using Fireworks as your image editor you'll be glad to know that you don't need to bother with this problem. Firework's PNG format stores the rgb image in the correct format for import into Director.
Copyright 1997-2026, Director Online. Article content copyright by respective authors.