OpenSpace 3D Review
May 24, 1999
by John Elstad
OpenSpace 3D adds a whole new dimension to your Director projects, the third dimension. By combining a robust 3D-authoring environment with extensive Director support (including many proprietary Lingo commands) OpenSpace3D delivers a welcome solution for your PC-only high-end Director projects.
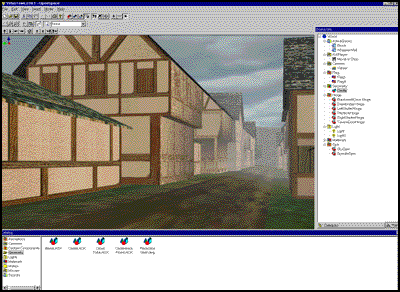
OpenSpace 3D is really two products in one. The first "product" is an authoring environment that allows you to import 3D models and create a scene complete with lights, cameras, animations, movies, and links to URLs among others. The second is the interface and support for these files in Director 6.5 or later. This support includes 16 simple behaviors for animations like spinning, sliding, or following a path as well as numerous Lingo commands to control the properties of just about everything in the scene including which camera to view from, lighting effects, and whether or not the t.v. should turn on when you enter the living room. The result is that you can create everything from architectural walkthroughs, to product training, to 3D games, all dynamically rendered on-the-fly with gouraud shading, perspective correct texture mapping, specular highlights, and reflections.
System Requirements
Currently, OpenSpace 3D (hereafter referred to as "OS3D") is a Windows-only application. You cannot author or deliver on the Mac. Virtus says they are in the product planning stage for a Mac version and are awaiting Apple developer support. The minimum requirements for scene authoring:
- Pentium II 233 with 64MB of RAM
- Windows 95, Windows 98, or Windows NT
- 50MB of free hard disk space
- Hardware accelerated 3D with 4MB video RAM available (on-board or via AGP
- 3D sound (mid- to high-end sound card produced in last 12 months)
- Macromedia Director 6.5 or later
The minimum system requirements for playback:
- Pentium 200 with 64MB of RAM
- Windows 95 or Windows NT
- Free hard disk space equal to the presentation siz
- Hardware accelerated 3D with 4MB video RAM available (on-board or via AGP
- 3D sound (mid- to high-end sound card produced within last 12 months)
Installation
Installation of OS3D is about as quick and painless as you could hope for a Windows-based application to be. I had no problems with the installer or getting the application to run once installed.
The Authoring Environment
If you've done any 3D modeling, the OS3D environment should look familiar.
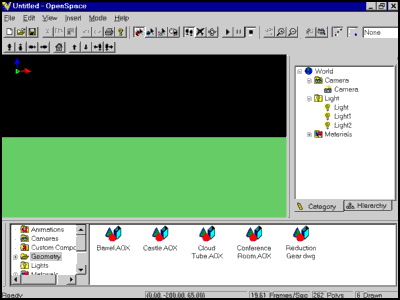
The main window is the 3D View where you see all your elements as well as attributes that have been assigned to them (spin, paths, slide, move, etc.). Below it is the Catalog window which contains the Explorer pane (left) and the List pane (right). The Catalog window functions much like Windows Explorer in that when items in the Explorer pane are selected, their contents appear in the List pane. To the right of the 3D View is the Scene Information window which has two panes, Category and Hierarchy. With these two panes, you can get quick access to all the elements in your scene either categorically or hierarchically. For your convenience, the windows are moveable should you want to change the layout.
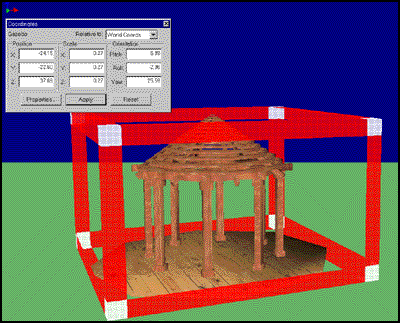
To add elements to the scene, you simply drag the icons directly from the List pane into the scene. Afterwards, you can precisely position them by either dragging them directly, dragging their manipulation frame (the red bounding box), or by setting the properties manually by using the Coordinates window.
OS3D includes 17 different libraries (primitives, architecture, transportation, etc.) for a total of over 100 3D models. Additionally, there are over 300 textures (bricks, fabrics, doors, natural textures, stone, wood, etc.), 46 Sound files (.wav format), 21 movie files (.avi format), 16 simple behaviors (spin, roll, slide, path, etc.), and 12 motion files for the human avatar which is also included. If you'd prefer to import some stuff of your own, OS3D supports 3DS, DXF and DWG files. There is also a 3D Studio Max plug-in to export the OS3D format directly from 3D Studio Max. I should mention at this point that OS3D is not a 3D modeling application. You cannot create any 3D models from within the application, nor edit the models once they're imported (other than scaling).
Once you have some models in your scene, applying textures is surprisingly quick and easy. Simply drag the textures from the List pane onto the object and see how it renders. To make this even simpler, OS3D lets you classify the type of wrapping you want to apply to better match the object. So, if you're applying a texture to a sphere, choose Sphere from the list of mapping options and you're done. Additionally, you can change the color, opacity, and even reflectivity of the materials, though you can't edit the textures from within the application. By increasing the reflectivity of a plane, you can actually create a functioning mirror. However, one of my favorite features is the ability to add a movie as a material to an object. This allows you to have elements like t.v.'s, fireplaces, or even aquariums. Like with virtually everything else, if you have textures of your own, you can import them directly into your OS3D scenes.
In addition to 3D models, you can import additional cameras, lights, and even sounds that get louder as you approach them. OS3D even includes a human avatar which you can have walk, run, or dance along a path if you're so inclined (more on paths later). There's also a flag component that in addition to waving in the wind can be modified to simulate liquid surfaces.
Regardless of what you bring into your scene, you'll find that you have an awesome amount of control over every individual item. Virtus has done a wonderful job of making the product accessible and useful to 3D novices and experts alike. Building a simple scene is as easy as dragging and dropping. For many users, this and the ability to navigate (which is built in) will be all they care to do. However, if control is your thing, or if you intend to create a large scene with hundreds of communicating objects, each changing their properties on the fly, there's nothing stopping you.
The drag and drop metaphor is extended to include adding animations to your elements so that they'll spin, slide, move, or follow a path, among other things. Once an animation has been assigned to an element, the appropriate 3D icon is attached to it so that you can keep track of what your elements will do once the scene starts.
If you'd like to add a little sophistication to your animations, you can attach them to a path. Creating a path is much like tweening in Director. Simply set the key frames/points of the path, then assign an object to that path. OS3D gives you several options on how the objects orient themselves to the path. By attaching a camera to a path, you can create a very smooth tour of a house for example. For cameras, OS3D includes the ability to follow the terrain at a certain height (for instance, eye level) so you don't have to endlessly tweak your paths to create a realistic animation.
Once you have all your elements in place with all their appropriate animations assigned to them, it's time to figure out just how everything is going to work together to make for the most effective scene. Perhaps a Director equivalent would be a bunch of sprites in the score with some scored animation, but no Lingo to bring everything together and give it life. This is where the Scheduler comes in.
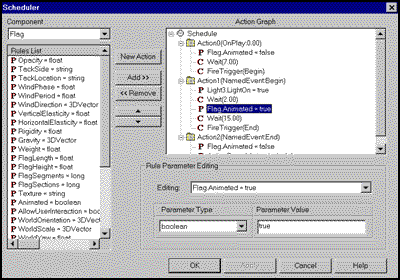
The Scheduler lets you control your objects based on certain events triggered within your scene. These events can be triggered by elapsed time, the start of an action, the end of an action, the proximity of two objects, or explicit declaration. In the screenshot above on the right side you can see the series of events I have lined up based on the elapsed time. At the start of the scene (Action0), I turn off the flag animation and wait seven seconds. After seven seconds, Action1 is explicitly called. This turns on Light3, waits three seconds, then starts to animate the flag. To add components to the Scheduler, you select the component from the drop down list at top, then add the appropriate properties to the Action Graph. In the screenshot above, the flag's properties are being displayed in the Rules List (left). If you're familiar with VisualBasic, this should be a snap to get your head around, and even if you aren't, it should take less time to get comfortable with than, say, Director's score metaphor.
By the way, at any point you can Play your scene and navigate around using the mouse to see how it's coming along. You can move forward, back, rotate, or even orbit objects if you like. You can also click on objects to trigger whatever events they might have attached to them.
OpenSpace 3D in Director
 To bring your scene into Director, you'll open OpenSpace3D for Director from the Xtras menu. This causes about 13 new cast members to be created, some sprites are placed in the score, and a MIAW dialog box to appear.
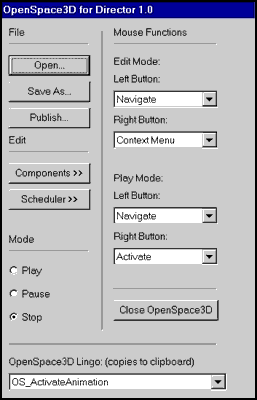
The MIAW is essentially your OS3D interface while in Director. You'll still need to open the appropriate scene, place it on the stage, perhaps make some modifications, and then Publish it (more on this later). OS3D includes a slew of proprietary Lingo commands so that you can either trigger events within the Scheduler, communicate between objects in your scene, react to user input, or all of the above. Virtus even includes an event-handling template in their documentation to help you get started. They also include two Lingo dictionaries for the Component API and the ActiveX Control API. The difference between the two is that the first controls individual components and the second controls the environment. All told, there's hardly anything that you can't dynamically control through Lingo. Even potentially daunting tasks like changing the density of fog, lighting effects, or switching cameras is relatively painless. By the way, OS3D includes error checking for its Lingo so you won't be flying blind.
Once you've got everything dialed-in for your scene in Director, clicking on the Publish button will create an ActiveX Control specifically for your scene. OS3D will also add another 35 cast members to your file to handle everything. At this point, you're ready to create a projector (and only a projector). OS3D doesn't currently support Shockwave.
Summary
In all, I'd have to say that OS3D is a substantial product that delivers what it promises, 3D in Director. It's especially impressive if you consider how mature it is for a 1.0 product. After reading the 200-page manual cover-to-cover and spending a week with OS3D, I didn't run into any aspect of the product that I thought was poorly thought out, thin, or just dumb. On the contrary, it's apparent that Virtus gave a lot of thought to who would be using the product, what they would want to accomplish, and then set about the task of making those goals a reality. In all, OpenSpace 3D is a product that will significantly expand the types of products you can develop for the PC without requiring you to become a full-time 3D modeler.
Odds and Ends
Here are some things about OS3D that stood out in one way or another.
Pros
- Great documentation
- Well thought out
- Tons of models, elements, and motions already included
- Multiple undos
- Cool fog effects
- AVI's as textures
- "Shadows" (negative lights)
- Collision detection
- No Mac support
- High-end PC system requirements
- Currently no Shockwave support
- Limited tech support (40 days)
More information about the Virtus line of products can be found at http://www.virtus.com. OpenSpace 3D retails for $395 US through the Virtus website.
Copyright 1997-2026, Director Online. Article content copyright by respective authors.