Drag to Click Dial Rotate
June 27, 1999
by Pat McClellan
Dear Multimedia Handyman,
I need some idea of how to create a volume slider, however I don't want a boring slider. What I have in mind is more like a volume knob, that you actually turn by dragging in a similar way as a slider.
Gavin Rossow
Note: Gavin sent along this jpg to illustrate.
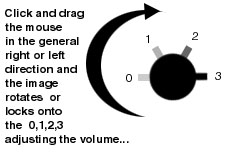
Dear Gavin,
Instead of only having 3 or 4 divisions for your knob, let's have a range from 0-7, which corresponds to the possible values for "soundLevel" -- 0 being no sound, and 7 being the maximum volume. Note thate soundLevel is a system wide setting, so your computer's volume is actually affected. If you only want to change the volume of a single sprite, you should use "the volume of sprite (x)" instead of soundLevel.
In Director 7, you have the ability to rotate sprites. In fact, there's a great behavior called "Drag to Rotate" that comes in the library palette. This behavior (written by James Newton, I believe) allows you to click and drag-rotate a sprite around and around. This is what we want to do, except that we want to add two characteristics to it. First, we want to limit the range of the rotation (from 0 to 180 degrees). Second we want to have the dial "click-rotate" -- only rotate to set detente points in the rotation.
Download a sample movie in Mac or PC format.
Instead of starting from scratch, let's start with the Drag to Rotate behavior and make some modifications. Before you get freaked out by the complexity of the overall behavior, keep in mind that we don't really have to understand all of the slope calculations that it does. All we need to do is find the point in the behavior where the rotation of the sprite is finally set. That happens in the "on Turn me" handler. Here's what it looks like un-modified.
on Turn me
  -- sent by prepareFrame
  slope     = the mouseLoc - mySprite.loc
  newAngle  = myPrevAngle + getAngle (me, slope) - myClickAngle
  mySprite.rotation = newAngle

end Turn
Note that the third line is where the rotation is set. So, we'll jump in right before that line to make our modifications -- based on the value of "newAngle".

We're going to need to declare some additional properties: pLowLimit will be the lower limit of our rotation, and pHighLimit will be the upper range. In our demo movie, I've used 0 for the low limit and 180 for the high limit. That means that the sprite will only rotate from 0 to 180 degrees. If that's all we wanted to do, we could simply change that last line to read...
if newAngle > pLowLimit and newAngle < pHighLimit then
  mySprite.rotation = newAngle
end if
Understand how that works? Now let's look at that second characteristic -- rotation that snaps to click points on the dial. In the image of the dialog box above, you'll see I've asked how many click points there are on the dial. This will allow you to reuse the behavior in many applications. For our example, we want 8 click points (corresponding to 0, 1, 2, 3, 4, 5, 6, and 7 on the dial). In order to make this work, I declared two additional properties: pMarks which is the value entered by the author in that dialog box, and another property called pClickAngle.
This is the angle of rotation between each click mark. That value can be calculated automatically if you know pMarks. Since the author supplies the value for pMarks, I did the following calculation in the "on initialize me" handler (which is called from the beginsprite handler).
range = (pHighLimit - pLowLimit) * 1.0000
pClickAngle = range/(pMarks-1)
The variable range is set by subtracting the low limit from the high limit. In our example that value is 180. I multiply it by 1.0000 to make it a 4 decimal place float value (so that the following calculation will be most accurate.) Then I set pClickAngle by dividing that range by the number of click marks (minus 1) which the author specified. I subtract 1 from that value because between 0 and 7, there 8 clicks, but only 7 "pieces of pie". In our example, a range of 180.0000 divided by 7 pieces of pie will give us 25.7143 degrees per segment.
Now that we've laid the groundwork, let's look at the modified "on Turn me" handler. I've commented each step.
on Turn me
  -- sent by prepareFrame
  slope     = the mouseLoc - mySprite.loc
  newAngle  = myPrevAngle + getAngle (me, slope) ¬
    - myClickAngle

  -- modifications start here
  -- convert angle value to range between -360 and 360
  newAngle = newAngle mod 360

  -- convert angle to positive number 0-360
  if newAngle < 0 then
    newAngle = newAngle + 360
  end if

  -- test lowLimit and highLimit
  if newAngle > pLowLimit and newAngle < pHighLimit then

        -- divide the newAngle by the clickAngle
        -- and round to nearest integer

    whichClick = integer(newAngle/pClickAngle)

    -- whichClick is a value 0-7
    -- comment out the following line if you want
    -- to use the behavior without changing the soundLevel

    set the soundLevel to whichClick

    -- set the newAngle to one of the click points
    newAngle = 0 + whichClick * pClickAngle

    -- set the sprite's rotation to the newAngle
    mySprite.rotation = newAngle

  end if

end Turn
The essence of these modifications is to jump into the behavior after the newAngle has been calculated, then converting newAngle's value with some math formulas into the values which we need. Since Director allows rotation values of plus or minus 21 million, we start by converting it to a value between -360 and 360. We use the mod function for that.
newAngle = newAngle mod 360
Next, we want to convert this value to one between 0 and 360. For example, a rotation of -270 (which is lower than our lowest limit) would be converted to 90 (which is an acceptable value between our low and high limits). To do this, we simply add 360 to any value below 0.
if newAngle < 0 then
  newAngle = newAngle + 360
end if
The next step tests to see if the current value for newAngle is between our low and high limits (0-180). If not, nothing happens and the dial doesn't change position. But, if the value is acceptable, the following calculations are needed. We need to convert the value to an integer between 0 and 7. Actually, 7 is just what we're using in our example. More generically, we need to convert newAngle to an integer between 0 and (pMarks - 1). To do that, we simply divide newAngle by the degrees per click (pClickAngle) and round it off to an integer.
whichClick = integer(newAngle/pClickAngle)
It happens that in our example we can use this value of whichClick to set our soundLevel -- which I do immediately after the last line of code. However, you can comment out that soundLevel line if you want to use this behavior for another purpose. You'd insert whatever you want to do at that point.
Finally, we need to figure out exactly what angle of rotation is needed to correspond to whichClick. To do that, we simply multiply whichClick by the pClickAngle.
newAngle = 0 + whichClick * pClickAngle
That ends our modifications. The final line was in the behavior previously. It sets the rotation of the sprite to the value of newAngle.
mySprite.rotation = newAngle
I hope you find this behavior helpful. More than that, I hope this illustrates an approach to modifying existing behaviors for your own purposes. It's like hacking -- you don't have to understand everything about what was there before. You can simply figure out where to "jump in" and "jump out".
Copyright 1997-2024, Director Online. Article content copyright by respective authors.