Director 8 First Look: Part 1
February 13, 2000
by Zac Belado
 Director 8 is a very discrete product. At first look it might not seem like there is really all that much to differentiate it from Director 7. Part of this is a result of a deliberate response by Macromedia to developer concerns. Over the past year, developers have resoundingly asked for an emphasis on stablity.
The end result is that you will see fewer new features in Director 8 (certainly far fewer than Director 7 which had an avalanche of new additions) but the features you do see will be far more useful and stable.
So what will you see in Director 8? The most immediate changes are the new authoring changes, including the new Property Inspector and guides. But of equal importance are new features like the Publish commands, linked scripts and Imaging Lingo.
This "first look" will examine some of the more important changes in Director. There is a lot of material to cover so we'll be looking at the new features and changes in two parts. The first part will examine changes to the Stage and Score and authoring. Part 2 (next week) will look at Shockwave, Lingo and media changes. Let's start our look at Director 8 with an examination of the changes to the Stage and the Score.
Please note: this article was written with a beta version of Director 8. Though not probable, some details of these features may be different in the final shipping version of Director 8.
Stage and Score
 The score in Director 8 looks is almost unchanged from Director 7. The only real change being Locked sprites.
Locked Sprites
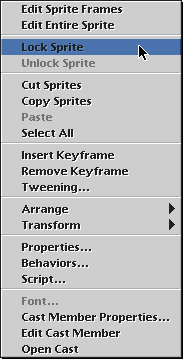
You can now lock sprites during authoring. You don't have to worry about inadvertently repositioning your background graphics or setting your nav bar's visible to false because you inadvertently selected one graphic when you meant to modify another.
You can lock a sprite in three ways: through a menu selection, the Property Inspector or a keyboard shortcut. There are two menus that you can use to lock a sprite: use the Modify: Lock Sprite menu item; or select Lock Sprite from the contextual menu. The third (and quickest way) is simply to use Cmd-L. These options are available if you select the sprite in the Score or on the Stage.
Locked sprites are indicated by a small lock icon in the score and also on the sprite's info box on the stage. Locked sprites cannot be selected on the Stage (except by using the Select All command) but they can be selected in the score. In either case you still cannot modify a sprite even if it has been selected. You can't move locked sprites in the score. Very handy if you want to lock the UI elements of a project so you don't move or delete them.
![]()
Locked sprites are only locked out from direct, UI changes. You can still modify locked sprites using Lingo.
Guides
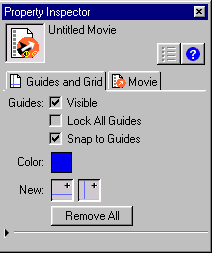 Almost every illustration and graphics program has guides of one sort or another. They are darned handy when you need to create positioning grids and for ensuring that elements have a consistent position on screen. And now you can use them in Director.
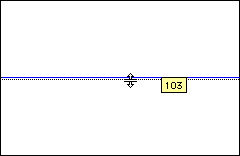
Guides are placed by using the horizontal and vertical guide icons in the new Property Inspector. Simply click inside the icon and drag it onto the stage. As you move the guide over the stage a tooltip will appear to indicate the exact current position (either horizontal or vertical) for the guide.
The Property Inspector also contains checkboxes that will allow you to turn the guides on or off, lock all guides, and force sprites to snap to guides when you are positioning them on the stage. If you've worked with guides in other programs, these should seem pretty intuitive.
Zoom Stage
The biggest change to the Stage is that it is now zoomable. What this means is that you can enlarge or shrink your view of the stage and the sprites on the stage. For example, zoom the stage to 200% and the sprites on stage will appear twice as large as will the stage itself. This feature can zoom over a range from 12% up to 800%.
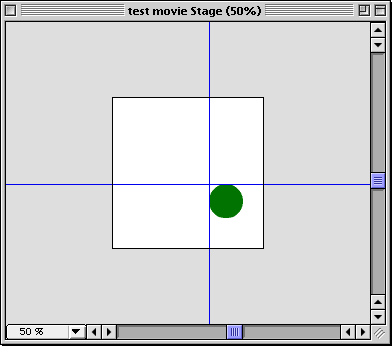
Luckily the Stage is now scrollable as well . When you zoom the Stage to 200% (or larger) the Stage window will "grow" scrollbars so you can maneuver inside the stage window. These scrollbars are even available to you when viewing the Stage at 100% but this can be toggled off in the General Preferences dialog.. If you disable Stage scrollbars they will also be disabled if you use the zoom tool to magnify the stage. The Stage can be repositioned inside its window by using the new Hand tool if the scrollbars are disabled.
If stage scrollbars are enabled, you also have access to the stage's new pasteboard area. The window that the Stage is in can expanded and the extra area inside the window (around the outside of the stage) can be used to place sprites.
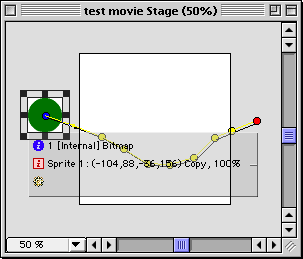
People familiar with DTP packages or illustration programs like Illustrator or Freehand will recognize this "pasteboard" area, but it's a new concept for Director users. What it allows you to do is position elements offscreen and still be able to select them, edit them and interact with them. So if you have a sprite that will start an animation offscreen, you will now be able to place that sprite offscreen directly and still be able to quickly select it at a later date.
Authoring
 Director 8 adds some interesting new authoring tools and some changes to existing tools to help make working in Director much easier.
Property Inspector
The biggest, and most useful, change is the inclusion of the Property Inspector. The PI is similar to the inspector palettes in applications like Visual Basic and REALbasic. It takes many disparate dialog boxes (like the Cast Member Properties) and combines them into one palette.
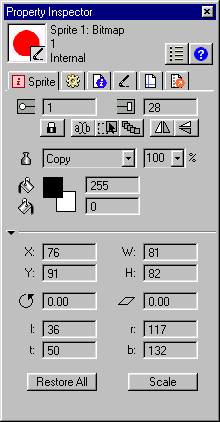
The Property inspector has a series of tabbed panels that contain a variable number of property pages depending on what type of sprite/member you have selected or what window is active. If you select a sprite on the Stage or in the Score the PI will display six property panels:
- Sprite properties
All of the properties that you would have seen in the Sprite Inspector in Director 7 including; start frame and end frame, ink, blend, location, width and height. - Behavior
A small subset of the Behavior Inspector. It lists the behaviors attached to the sprite, the declared properties in the behavior and the current values for them (but not the events declared in that behavior). It allows you to add and remove behaviors and also a script button that will open the script member for that behavior. - Member Properties
All of the properties that are accessible through the Member Properties dialog. - Media type properties
Properties specific to the type of member for that sprite. So a bitmap sprite would have a Bitmap property page with all the properties applicable to a bitmap (palette, compression, etc) and a vector member would have a panel composed of the properties available to vector members. - Guides and Grid
The controls for creating and modifying the appearance and display of the grid and guides. - Movie properties
All the movie properties from the Movie Properties dialog including stage size, position, background color and the number of score channels in the movie.
The aim of the Property Inspector is to consolidate a large number of dialogs and palettes into one location. One result of this is that you will need to remember fewer keyboard shortcuts. For instance using the keyboard shortcut for Modify: Movie: Properties or Cmd-Shft-D will now open the Property Inspector (with the Movie tab selected) instead of opening the Movie Properties dialog as it did in Director 7. The same holds true for dialogs like the Cast Member Properties and Sprite Properties.
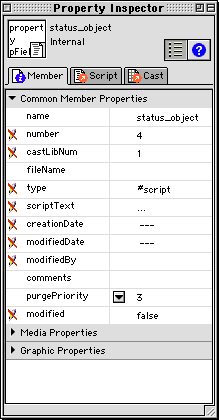 The Property Inspector has two distinct organizational views. The default is the graphical view which has controls for each of the properties that allow you to modify them. So in graphical view, the Movie tab displays a popup list of palettes for the Movie Palette property. The Table view lists the properties in a simple table arrangement with the property name and the value. The Table view also includes properties that you can't edit. These are marked with a small graphic of a pencil with a red slash through it.
The Table view also displays many more properties than the graphical view. In the case of the Member property page, the Graphic view displays seven properties (and two controls to edit the member or the member's script) but the Table view displays 23 properties. In order to make these easier to view the Table view has the ability to organize properties into groups that can be expanded and collapsed.
And if you don't like the way the PI panels are arranged then you can modify them. All the property pages are defined in external files called VDL (View Description List) files. Property pages are divided into five types; sprite, movie, member, cast and publish. These are all stored in the Props directory. So if you wanted to modify how vector member properties were displayed in the PI you could look for the vectorshape.txt file in the Member directory of the Props directory.
Asset Management Fields
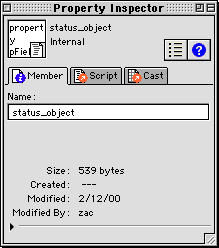 Director 8 adds four new cast member properties: creationDate, modifiedDate, modifiedBy and comments.
The modifiedDate and creationDate are (as they would appear) the date that the member was created and the date of the last modification. These values are returned as Lingo data variable types.
put member(4).modifiedDate
-- date( 2000, 2, 12 )
Members created in movies prior to Director 8 will have a <Null> value for these properties. The modifiedBy property is set when the member is modified and is the username value in the general preferences dialog. The final property, comments, is used to store general comments about the member. There is no fixed limit to the size of the comments field.
The comments and modifiedBy properties can be tested and set but the modifiedDate and creationDate properties can only be tested.
Cast Window List View
The Cast window also sees some updates for Director 8. You can now view the contents of a cast in a new List view. This list view functions in a fashion similar to the Finder on the Macintosh or the Explorer in Windows. You can switch between views by either using the Cast View Style toggle button on the cast window or by selecting the view type you want from a contextual menu.
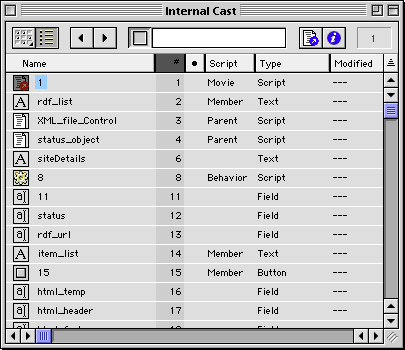
The List view can display up to 11 items
- Number
The member number of the item. - Modified
A boolean variable that indicates whether the item has been modified since the last time the file was saved. - Script
Shows the type of script that the member is or displays "member" if the item has a member script attached to it. - Type
The type of the member. - Size
The size of the member in bytes, KB or MB as appropriate. - Created
The creation date of the file. - Modified Date
The date that the member was last modified. - Modified By
The user who last modified the file. This value appears to be obtained from the name entered in when you register Director 8, but it can be changed in the General Preferences dialog. - Filename
The full pathname to the member if it is a linked member. - Comments
Any comments entered into the comments property of the member.
These items are enabled or disabled in the Cast Preferences dialog box. The List view can be sorted based on any column in the Cast window by clicking on the column name. Sorting in descending order can be achieved by clicking on the column again, under Windows, or by clicking on the order indicator (the little arrowhead in the upper right corner of the cast window) if you're using a Mac.
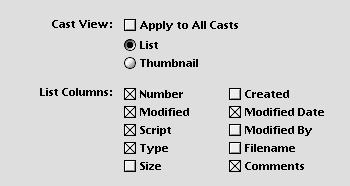
When sorting the cast by any column other than name, the name field is used as a secondary sort criteria. So if you sort by member type all of the members of similar type would also be sorted by name.
The great thing about these new sorting features is that all you are sorting is your view of the cast members. They're not actually destructively shifting locations within the cast. So you don't have to worry about broken score references for external casts.
Linked Scripts
Director 8 also offers developers the opportunity to create linked script files and to import script members from external text files or the Web. This is an authortime feature only. When you create the projector or Shockwave movie, the linked scripts will be compiled into the program. During runtime, Director will use the compiled script inside the movie and will not link to an external script. So you can't use this feature to allow movies or Shockwave files to update themselves during runtime.
You can create linked scripts by clicking the "Link Script As..." button in the Script property page of the Property Inspector. Doing so will create a new text file that contains the current script text of the member. Linked scripts are indicated in the Cast by having a "fold" on the top left corner of the icon. Additionally linked scripts will contain a full filename in the cast List view if you have enabled filenames in the Cast Preferences dialog.

The linked scripts can be edited in an external text editor, such as BBEdit, and changes made in the file will be propagated in the accompanying scripts in Director as soon as the file is saved. As well, any changes you make to the file in Director will also be saved to the external file once you save your Director project.
While this new feature is primarily aimed at developers who use a code versioning system it can also be of use to almost any programmer.
You can test and set some of the properties of a linked script through Lingo
put member(4).filename
-- "Alexander:Desktop Folder:status_object.txt"
put member(4).linked
-- 1
member(4).linked = 0
put member(4).filename
-- ""
Setting the .linked property of the script to 0 will unlink the script and bring it back internal to the cast.
You can also create new linked members using Lingo.
thisMember = new(#script)
thisMember.linked = TRUE
thisMember.filename = "d:\scripts\foo.txt"
You can also do this without setting the member's linked property to TRUE but if you do so Director will not import and link the script correctly unless the file has a .ls (presumably, "linked script") extension. This applies on both the Mac and the PC.
You can also get Director to save the scriptText of a script member as an external file via Lingo.
member(4).linkAs()
The linkAs() function will open a save dialog box which will allow you save the script externally.
As you can see, Director 8 has added some interesting twists to the way that you use Director. The Property Inspector should prove to not only be a great time saver (don't forget that you can toggle it on and off using the "/" key on the numeric keypad) but it might also serve as a very handy way to examine different Director properties that you might not have been aware of. Linked Scripts should make it easy for almost any developer to develop a series of reusable code that you can guarantee will always remain up to date.
Next time we'll look at some of the remaining changes in Director 8, including the new Shockwave Publish command which allows for scalable Shockwave movies, Lingo speed improvements, new sound features and options and Imaging Lingo which will let you create and alter bitmaps on the fly.
Copyright 1997-2025, Director Online. Article content copyright by respective authors.