Director 8 First Look: Part 2
February 24, 2000
by Zac Belado
Despite all the talk about Director 8 being an evolutionary update to the features added in Director 7, Director 8 still has a large number of additions that will make it a significant upgrade to Director. Last week we looked at the changes to the Stage and Score and the authoring changes. This week our Director 8 First Look will focus on Shockwave, Lingo and media changes including some extensive changes to how director handles sound.
Shockwave
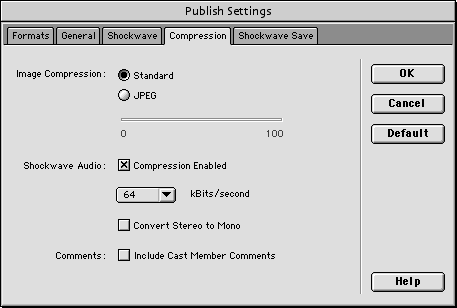
The three main changes to Shockwave in Director 8 are primarily delivery related. Shockwave movies can now scale to the size of the browser window like Flash movies and the functionality of Aftershock has been brought into Director. Additionally, developers now have the ability to apply JPEG compression to Shockwave movies.
Scalable Shockwave
Once enough Director developers started to use Flash it was only a matter of time before they started to ask for Flash's "stretch to fit" functionality in Shockwave. Now with Shockwave 8 the engineers at Macromedia have provided this functionality.

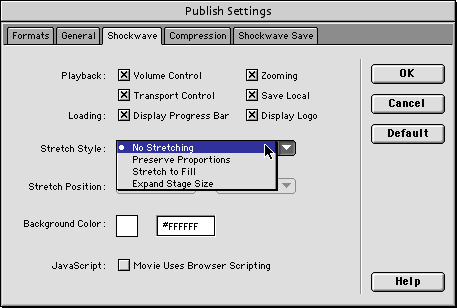
There are 4 stretch options
- No stretching: Shockwave functions as it did previously.
- Preserve Proportions (meet): The Shockwave movie is scaled proportionally to fit the dimensions specified in the HTML file.
- Stretch to fill (fill): The Shockwave movie is scaled non-proportionally to fit the dimensions specified in the HTML file.
- Expand Stage Size (stage): The Shockwave movie is not scaled but extra space is also used as the stage.
The "Expand Stage Size" option is different in that it doesn't actually scale the content. What it does is allow you to use the extra space that you have defined as the stage without scaling the actual elements in the movie. This means that you can build a movie that is 300 pixels wide and then define a space that is larger, say 600 pixels, and use that entire 600 pixels in the movie without modifying the elements that make up the movie.
This stretching is accomplished using an swStretchStyle parameter in the object and embed tags that are used to display the HTML. The values for the parameter are meet, fill or stage. The simplest way to add scaling to your Shockwave movies is by accessing the stretch values and parameters via the Publish Settings dialog for the Publish command.
Publish Command
In order to use the new scalable Shockwave features you can add the code to your HTML files manually or you can use the new Publish Settings in Director 8. The Publish menu command replaces the "Save as Shockwave..." menu item in Director 7 and it is functionally similar to the AfterShock application that you could use with previous versions of Director. Whereas "Save as Shockwave..." would simply create a Shockwave movie, the Publish command does more than just that. It can now create HTML to display the Shockwave movies as well as create the Shockwave files themselves. You can choose from a series of HTML templates (10 ship with Director 8) which allow you to do things such as display a loader movie, display a progress bar, let the user play a game while your content loads or display alternate images if Shockwave is not installed. You can create your own templates or modify those that ship with Director 8.

The Publish command uses a series of tags in the templates to act as placeholders for the particular information for your movie. Some of the place holders are
- $SS - stretch style
- $TT - start of template title
- $TS - end of template title
- $DS - start of template description
- $DF - end of template description
- $MO - relative URL to DCR
- $TI - movie title
- $WI - width
- $HE - height
- $PO - object params
- $PE - embed params
- $PR - remote params
- $BG - background color
- $IS - relative URL to image
- $LC - Live Connect (browser scripting)
- $JC - Java class file name
- $JB - Java codebase
- $LM - start of loader movie name
- $LS - end of loader movie name
And inside a template you might see HTML code such as
<HTML>
<HEAD>
<TITLE>$TI</TITLE>
<meta http-equiv="Content-Type" content="text/html;
charset=iso-8859-1">
</HEAD>
<BODY bgcolor="$BG">
When Director creates an HTML document using a template it will substitute the placeholders with the appropriate values from the Publish Settings dialog. So in the HTML sample above the $TI placeholder (between the title tags) would be replaced with the title of your Shockwave movie and the $BG placeholder would be replaced with the background colour indicated in the Publish Settings.
The Publish command also allows you access to all the Shockwave Remote tags and options, some underutilised older options and also includes some useful new features.
These include the option to include the background colour used by the Shockwave plug-in (which now defaults to the background colour set in the Movie property panel). No more giant white Shockwave apps on black HTML pages! As well the Publish Settings allow you to disable the Shockwave logo and the "mini" progress bar that, up till now, would display while your content loaded and also enable or disable all of the options for the Shockwave Remote.
The Publish command also supports three different types of user feedback while your Shockwave content loads. There is the "default" progress bar that you can show while your movie loads. This is a simple thermometer progress bar that offers no other feedback for the user. There is a second option that allows you to link to a progress bar movie via one of the templates. This movie has more feedback and shows the user useful information like the percentage complete. This movie is fully customisable and you can also edit the exiting templates, or create your own, to point to your own progress bar movie. The final feedback element is a game that the user can play while your movie loads. The game that ships with Director 8 is a simple breakout clone but, as with the other movies and templates, you can customise this movie or modify the templates to use your own game.
The Publish command is very flexible. If you don't want it to create HTML you can turn this option off. If you don't want to preview the movie in a browser, you can disable this option as well. The templates are fully customisable and it "levels the playing field" in that users of all experience levels will be able to create Shockwave content that plays back with a very professional look. Additionally, the Publish command allows larger workgroups to maintain a consistent look by creating and using templates.
Bitmap Compression Control
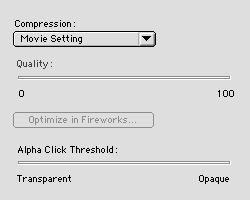
Shockwave also gets smaller in Director 8 with the inclusion of JPEG compression of bitmap members. You can now apply JPEG compression to the bitmaps in a Shockwave movie on a global basis or on a member by member basis. This compression only happens when the Shockwave movie is created so you can't actually see the compression at work while you are authoring. The only way to see the compression's effects is to either use the "Optimize in FireWorks" button in the Property Inspector to view the image in FireWorks with the JPEG compression applied, preview the Shockwave movie in a browser or open the Shockwave file as a MAIW while you are authoring.

The results can be quite substantial though. A sample created with a 32 bit png file with alpha channel shows the dramatic effect that compression can have on Shockwave sizes.
image file: large.png (32 bit png w/alpha) = 659K
D7 Shockwave (no compression) dcr size = 726K
D8 Shockwave (JPEG compression at default 80%) dcr size = 66K
(Note: alpha channel data is saved separately in a lossless format in order to maintain the integrity of the alpha channel data)
There are some obvious problems with using JPEG compression though. The compression scheme is lossy so you will see compression artifacts in your images if you use it. This isn't as much of an issue if the images are animated, but large, static graphics might show some compression artifacts that might not be acceptable depending on the level of compression you use.
To overcome this, you can override the global movie compression settings and set the JPEG compression for each bitmap. You could even turn it off for some bitmaps in order to ensure that they appear in their original, pristine condition.
Another caveat is that ink effects might not work correctly when played back because of the effects of the compression artifacts. Bitmap compression will probably require some extra testing in order to ensure that playback and visual effects are the same as they are in authoring but the file size savings will be more than worth the effort.
Media changes
Director 8 also has some substantial changes to some of the media elements that you use in your movies. D8 now offers substantially more control over sound playback that previous versions of Director. New Imaging Lingo gives you the ability to create and modify bitmaps in Lingo and vector members can now have multiple vectors in each member.
Multiple Curve Vectors
One of the most requested additions since D7 must be the ability to have multiple vectors inside a vector member. Director 7 added this useful new member type but it was hindered somewhat by the fact that you could only have 1 open or closed vector in each member. This meant that even the simplest vector illustration or even text could not be brought into Director as editable vectors.

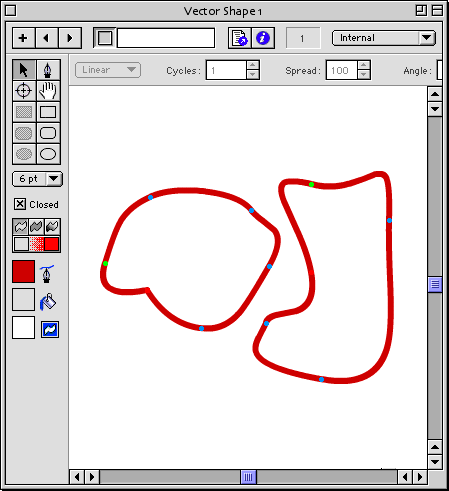
The new multiple vector support in Director changes this because it now allows you to have, as you would expect, multiple vectors in the same member.
The vector members are still not as functional as the vector support would be in an application such as Freehand or Illustrator. All the vector shapes in a vector member must be open or closed. As well, properties such as fill, stroke width or colour are set for the entire member, not the individual vectors in each member.
When editing vectors in the Vector Window, the first vertex will be coloured green, the last coloured red and all intermediate vertices will be coloured blue. Vectors can now be moved in the Vector Window by clicking anywhere on the curve. If you are drawing one vector you can start drawing a new vector simply by double clicking the end point of the first vector.
The new multiple vector capability also means that you need to be able to join and split vectors. The Modify menu now has both a Join Curve and Split Curve command. To split a vector simply select any two adjacent vertices and then Select the Modify: Split Curve command. To join two vectors together you need to select a point in each vector and then select the Modify: Join Curve command.
Sound Runtime Control
Director 8 greatly expands the control that developers have over sound playback. This new control is implemented, for the most part, by adding new properties and features to the sound channels. There are a very large number of new capabilities, so let's just look at the most important ones for now.
All of the sound channels now have a playback list that you can use to queue multiple sounds. If you need to play back 5 sounds in succession you can queue them in the sound channel and have Director handle the playback issues.
The simplest way to add a sound to a channel's queue is to add the sound's member to the queue. The Lingo command...
sound(1).queue (member(10))
...will add the sound in member (10) to the queue for sound channel 1. If the channel is currently playing a sound it will wait until it is finished playing the initial sound and then immediately start to play the new sound you added into the queue. If the sound channel is not playing any sounds then any sounds you queue up will not play until you issue a play command.
play sound(1)
If you want, you can provide the queue with more information in the form of a playlist entry. These entries are a property list which describe the details of the sound you want to play. Using the queue example above is actually a shorthand for saying
sound(1).queue ([#member:member(10)])
Director just assumes that by providing only a member reference that you don't need or want to supply any other details and it changes the playlist entry into the format it requires.
A playlist entry can have any of the following parameters. Only #member is required
- #member : a member reference to the sound
- #startTime : the start time in milliseconds
- #endTime : the end time in milliseconds
- #loopCount : the number of loops in the sound
- #loopStartTime : the start time of the loop in milliseconds
- #loopEndTime : the end time of the loop in milliseconds
- #preloadTime: the amount of the sound to preload
The first important thing to notice is that the start and end times of the sound do not have to be the actual start and end times of the sound. If you want you can start a sound at 50 milliseconds and end it at 2755 milliseconds. As well you can loop over a portion of the sound and loop for a limited number of times.
You can also combine them all. Say, for instance, that you want to have a sound start playing, loop over a phrase 4 times and then end at the end of a sentence you can supply all of this information in the playlist.
thisList = [#member:member(10), #startTime:40, #endTime:2300, ¬
  #loopCount:4,#loopStart:1200, #loopEnd:1900]
sound(1).queue (otherList)
It's quite simple then to stage a number of sounds and then play them back. Director 8 also offers a breakLoop command that will stop the current sound from looping and play from the loopEnd to the sounds's end time.
sound(1).queue (member(9))
sound(1).queue (member(10))
sound(1).queue (member(11))
And once the sounds are queued you can get the sound channel's playlist in order to view it to see what sounds are playing.
put sound(1).getPlayList()
-- [[#member: (member 9 of castLib 1)],
[#member: (member 10 of castLib 1)],
[#member: (member 11 of castLib 1)]]
The getPlaylist function returns the entire playlist with each sound's particular data.
Once you have sounds playing in a channel you can also pause them...
pause sound(1)
...and then restart the sound from the point it was paused by issuing another play command. The existing isBusy() function will now also return true if the sound channel is paused. You can skip a sound and go to the next sound in the queue by issuing a playNext command:
playNext sound(1)
And you can go to the beginning of the currently playing sound by using the rewind command:
rewind sound(1)
While in authoring mode you can get a dump of a sound channel's current properties by using the showProps function.
put sound(1).showProps()
currentTime:         2159.0000
elapsedTime:         2159.0000
startTime:           0.0000
loopStartTime:       0.0000
loopEndTime:         2384.9888
endTime:             2384.9888
loopCount:           1
loopsRemaining:      0
member:              (member 9 of castLib 1)
preLoadTime:         1500
pan:                 0
volume:              255
currentChannel:      1
channelCount:        2
sampleCount:         52588
sampleRate:          22050
sampleSize:          8
mostRecentCuePoint:  0
status:              3
Of the properties shown above, the two most important are the status and pan.
Status can have one of 5 values.
- Idle
Nothing happening in the sound channel. - Loading
Sounds are queued and the first is being pre-buffered. - Queued
Sounds are queued and the first is fully pre-buffered. - Playing
Channel is playing. The next sound to play is being pre-buffered. - Paused
Channel is paused. The next sound to play is being pre-buffered.
The pan value can be tested and set and it indicates the sound balance between the right and left channels. Note that the pan value is a property of the sound channel itself and not of any of the sounds playing in it, so you can't supply a pan value in a playlist entry. The pan property can be a value from - 100 to 100. -100 indicates that all the sound is in the left channel and 100 indicates that all the sound is in the right channel, a value of 0 is equal balance between left and right channels.
Imaging Lingo
One of the most exciting and challenging new additions in Director 8 is Imaging Lingo. The new Imaging command in Lingo will allow you to directly control the composition of members directly. You will be able to composite and modify graphics via Lingo. An example of this is a side-scrolling game like Super Mario Bros. The graphics on screen are all created from small tiles. In previous versions of Director you would have had to created this game using numerous sprites. If the game had an area that was 10 tiles wide and 10 tiles high you would have needed 100 sprites to create the game area..
Now in Director 8 you can create the same game area with one single sprite by using imaging Lingo to composite the 100 different tiles into a single image.
In Director 8 each bitmap, vector, Text or Flash member has a new .image property that represents the bitmap for that member. Even the stage and MIAWs have this property. So if you wanted to take a snapshot of the stage you could use
thisImage = the stage.image
thisMember = new (#bitmap)
thisMember.image = thisImage
Director 8 also adds a new data type, the image. So if you reference a member's .image property the result you get is of this new type.
put thisMember.image
-- <image:79e61ec>
This result is similar to behaviors or objects in that the result indicates the area in memory that the data is being held and also indicates the type, image in this case, of that data. You can also get the ilk of an image...
put thismember.image.ilk
-- #image
...which is very handy when you need to test to make sure that you are working with image data. The image datatype has five properties. These properties are all read-only with the exception of useAlpha which is settable only if the image is 32 bit.
- width : width of the image
- height : height of the image
- rect : the rect of the image
- useAlpha: 0 or 1 to indicate whether the image has an alpha channel
- depth: can be 1, 2, 4, 8, 16 or 32
put thisImage.width
-- 300
put thisImage.height
-- 300
put thisImage.depth
-- 32
put thisImage.useAlpha
-- 1
put thisImage.rect
-- rect(0, 0, 300, 300)
Text, vector and Flash members will have an image that also has alpha channel data that corresponds to the transparency data of the original member. So if you create a vector shape and then get the image data from that vector the bitmap will have a black fill. But since the image also has an alpha channel it will appear the same on stage as the original text, vector or Flash member.

Imaging Lingo adds quite a few new commands to the Lingo Dictionary. Here are the details of some of the more useful commands.
image (width, height, bitDepth, alpha depth, palette reference)
Function used to create a new image reference.
copyPixels (source image, destination location, source location, params)
Copy the pixels from the source image's rect and apply them to the destination image at the specified rect. The copyPixels function can use either a rect or a quad as the destination location. You can also supply a series of optional parameters: #color, #bgcolor, #ink, #blendLevel, #dither, #useFastQuads, #maskImage and #maskOffest.
The optional parameters allow you to set ink modes, blend levels, foreground and background colors for colourisation and the mask of the pixels in the destination image. These can be very useful as they allow you to generate some very sophisticated effects.
getPixel (location, #integer)
Gets the color data from an image. Location can either be a set of x and y values or a point. Returns a colour object that describes the colour of the pixel at x,y. If getPixel is sent an optional value of #integer it returns the integer value of the colour instead.
setPixel (location, color data)
Sets the colour value of a pixel. Location is either a set of x,y values or a point. The data can either be sent as a colour object or an integer value.
crop (rect)
Function that returns a cropped version of an image. The new image is the original image cropped to the supplied rect. You can use this to crop one member to the rect of another member quite easily.
member(3).crop(member(5).rect)
fill (location, color)
Fills a rectangle with the supplied colour. For 8 bit images you should use an integer value for the colour, for images of 16 bits or greater you should use a colour object. The location can either be a rect, a set of two points or a list of locations in the form left, top, right, bottom.
extractAlpha
Function that creates a new image based on the alpha channel data of the original image.
thisImage = extractAlpha (member(3).image)
setAlpha (image or integer)
Function that sets the alpha of a member to either a image (perhaps created using the extractAlpha function) or an integer value.
So even though Director 8 might not have the large number of new features and additions that Director 7 did it does offer some very compelling new features. These will not only change the way you use Director but also open up new ways to approach your projects. The Imaging Lingo features alone will radically alter the way that developers create content in Director.
Copyright 1997-2026, Director Online. Article content copyright by respective authors.