Putting your Director project on a CD-ROM: Part 2
March 28, 2000
by Will Turnage
Last time we talked about how to create and optimize your Director movies for delivery on a CD-ROM. Today, we'll learn a little bit about CD technology itself, and then get into the nuts and bolts of actually making your own CD-R. Finally, we'll deal with preparing it for mass duplication and give an estimate of typical rates and turnaround times for CD replication.
CD-ROM, CD-R, and CD-RW: A brief explanation
When reading about CD technology (or talking to a replication house about it), you'll often hear these three terms tossed around: CD-ROM, CD-R, and CD-RW. Each one of these are distinct physical formats. Here's a brief explanation of each one:
CD-ROM - (Compact Disc Read Only Memory). CD-ROMs are pressed using an injection molding process based on a high quality glass master. They are mass produced at a factory, and its contents are permanent and unchangeable. They are extremely durable and the most cost-effective CD technology when distributing a large number of CDs (more than 1000).
CD-R - (Compact Disc Recordable) is what most developers and people at home create when they burn a CD. The underside of a CD-R has a dye on it, and the CD recorder uses a laser to burn small pits in this dye layer, effectively mimicking the miniature grooves on a normal CD-ROM. CD-Rs can be burned once, and then the data is permanently there. The dyes used on CD-Rs make them slightly less durable than CD-ROMs, but CD-Rs are a much more cost effective way of distributing a small to medium number of CDs (less than 500).
CD-RW - (Compact Disc Re-Writeable) is a relatively new CD format. CD-RW are similar to CD-R in that they use a laser to burn pits in the underside of a CD. However, CD-RWs use a technology called "phase change" on their undersides which allow you to re-write over grooves that have already been made on a CD-RW. Current CD-RWs allow you to write over data about 1000 times before the media itself breaks down. The biggest downside to CD-RW is that you must have a drive that supports CD-RW in order to read the contents of a CD-RW. This makes CD-RW ideal for individual storage purposes, but not very practical for wide distribution.
Color Books and Computer Formats
When reading about CD technology or talking to your replicator, you might hear them talking about 'Books'. What they're referring to is a set of international standards called 'color books'. Each standard describes specifically how and where data is physically placed onto a CD-ROM or CD-R. Each color stands for a different type of format, as listed below:
- Red Book - This is the format used with all standard audio CDs you'd find at the record store.
- Yellow Book - This format is used to store computer data on CD-ROM. The Yellow Book itself does not specify how files are to be stored and retrieved on the CD, this is handled by the file system format which we'll cover later.
- Green Book - This is the format used by standard CD-I devices.
- White Book - This is the format used for Video CDs.
- Blue Book - This format refers to all Enhanced Music CDs, that is, CDs that contain both audio tracks and computer data.
- Orange Book - This format is used for storing data on a CD-R or CD-RW.
Choosing a File System
While all of this CD information is good to know, let's get back to your specific Director project. In order to make a CD, you need to know which File System(s) you should use to store your files on your CD. There are four different file systems to choose from:
ISO 9660 - This is the oldest, most standard file system used for CD-ROMs. Unfortunately, it limits file names to an 8.3, all uppercase DOS format. This standard has been around the longest, and is the most compatible with all types of CD drives. If you have to use this format, though, make sure that all of your project's file names conform to the 8.3 format.
JOLIET Extensions - When Windows 95 introduced longer file names to the DOS world, suddenly people needed to use them on CDs. The JOLIET extensions allow you to use longer file names on an ISO 9660 CD by adding a supplementary volume descriptor (SVD) to match your long file names with their ISO counterparts. You should always use JOLIET when dealing with any long Windows file names. One warning though, JOLIET extensions are not supported on the Macintosh. If you create an ISO only CD that has long file names, when you read the CD on a Macintosh, you will just see the short, truncated names. You can alleviate this problem by making your CD an ISO/Mac Hybrid.
Macintosh (HFS) - This native Mac file system allows you to use Macintosh folders and long file names on your CDs. It also allows each file to have both a data and a resource fork to ensure that your files don't lose their proper associations.
ECMA 168 - This is a lesser used format primarily used to preserve many UNIX conventions, like long file names, permissions, and an extremely deep directory structure.
Tips and Tricks for Creating your CD-R
So now you're a CD technology genius, but you still don't know how to create the best CD possible. In the following example, I'll walk through the process of creating a hybrid CD-R. This CD will contain some parts that are Mac and Windows specific, and some elements that will be shared between both sides. (The images used in this example were created using Astarte's Toast software for the Macintosh. I know there are many other software packages out there for both Mac and Windows, so this should be considered more of a CD burning checklist than a tutorial on how to use Toast.)
The first thing you should do is separate your files based on whether they are Mac or Windows. For now, any files you want to share between both Mac and Windows should go on the Macintosh side and NOT on the Windows side. In addition, everything that is going on the Macintosh part of the CD should be on its own volume. This can be any blank hard drive (or even a SCSI Jaz drive) you happen to have lying around.
If you don't have an extra volume available exclusively for CD burning, many CD burning software packages allow you to create a 'virtual volume' that will hold all of your files. A virtual volume can be any size, but in order to create one, you need have enough contiguous free space on your hard drive to host the entire virtual drive. If you don't have enough contiguous free space, you should use a disk optimization program to defragment the hard drive and free up enough space for your virtual volume.
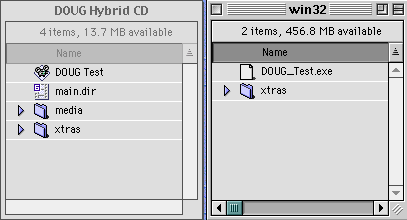
Once all your files are separated between Mac and Windows, they might look like this.
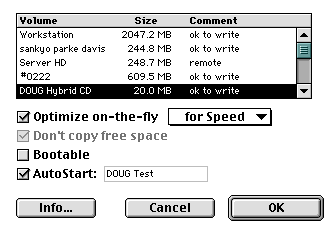
Next you should select the Mac volume that you want to burn on your CD. This part of the process is where you select the Autostart file for the Macintosh (to do this on Windows, read about creating an autorun.inf file in Part 1). Just click the Autostart checkbox, and then a dialog box will allow you to select the file that you want to start automatically when the user puts the CD into his or her computer. The only limitation of Autostart files that the file name cannot be more than 11 characters long (It can include spaces though).
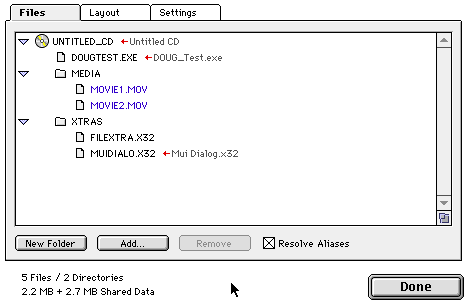
Next, you should add the Windows files to your CD. Once they are added, you should re-select the shared files (that are currently on the Mac volume), and add those to the Windows section as well. When finished, the result might look like this:

Notice that under the ISO9660 partition, it tells you the amount of data that is shared between the two volumes.
Finally, there are a few things we need to double check and optimize on the ISO 9660 partition. The first thing you should check is that your file names are correct. At first glance, the file names might have changed.
Most of the time, this is due to the fact that your CD burning software is set to use ISO 9660 Level 1 mode which doesn't allow long file names. To correct this problem, go to your CD-ROM settings, and make sure that JOLIET is selected.
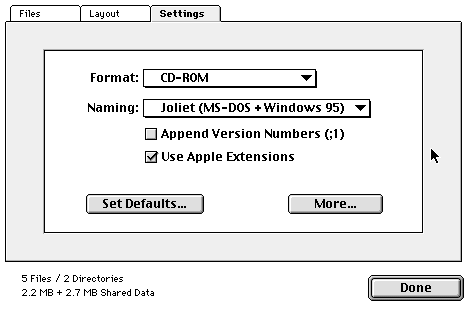
Now when you go back and view your files, you will notice that all of your file names have been restored to their intended names.
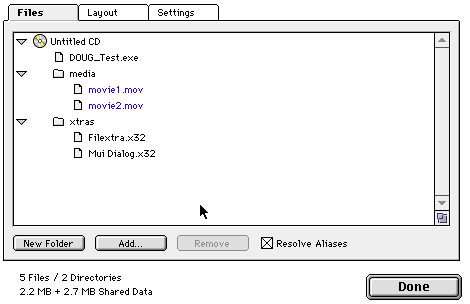
The last thing you should do to your CD before burning is to optimize the layout based on your project's needs. The layout screen determines the order in which each file is burned onto the CD. This can improve performance of your CD by grouping together Director files with their appropriate video files, or putting Xtras and autorun.inf files with the Projector itself at the beginning of the disk. By paying close attention to your CD's layout, you can reduce the amount of seek time that your program will spend hunting around the CD to find the file it needs.
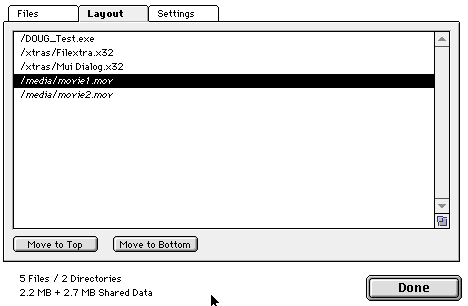
Once you've optimized the layout, then click the Write CD button, and you're all set… for now.
Dealing with replication houses
So your CD is completely burned, completely tested and bug free, and you're finally ready to send it off to the duplication house to have hundreds of thousands of them printed. When planning your project, the three things you need to remember about the CD replication process are time, packaging and costs.
First of all, CD-ROM replication takes time. Normal turnaround for creating CD-ROMs is 7-10 business days. However, that timeline includes just the CD replication. Often, your inserts and packaging can take two to three weeks to print. And then you have to allow time to assemble it all. When you combine that with the shipping time between your location and the replication house, you're looking at a schedule of many weeks from the time the CD leaves your office to the time the finished product arrives on your doorstep. Yes, replication houses can speed up every aspect of CD-ROM production, but it's going to cost you a whole lot extra to do that. They will bill you rush charges for CD-ROM duplication, printing, assembly, and shipping, which can all add up pretty quickly. When planning your project's timeline, you can save yourself a lot of money by allowing at least one month for the whole duplication process.
For those needing fewer number of CDs, or for those requiring a much faster turnaround, you should consider having your CD burned onto a CD-R. The CD-R format doesn't allow as many printing options as CD-ROM, but if you need a quick turnaround of 100 CDs, and the quality of printing doesn't matter that much, many places can turnaround 100 CD-Rs for you in one day.
The next thing that should be thoroughly planned out before you call the replication house is the type of packaging that your CD will have. Is it a see-thru sleeve, a standard jewel case, or some other non-traditional packaging? Are the contents printed full color, or just one or two color? Also, if you're including a booklet, how many pages are in the booklet?
If you have questions about packaging, one of the best resources I've found is the web sites of CD replication houses. Many of them have detailed pictures and illustrations of all types of CD packaging, and some even had downloadable templates that graphic designers can use to make sure that their artwork will fit the exact dimensions of a CD jewel case.
Once you know the type of CD you're making and the type of packaging and printing you'll be using, then a replication house can give you a sense of the one thing everyone wants to know: How much will it cost? I talked to a few replication houses and tried to get a sense of average costs for basic CD-ROM and CD-R production. Some replicators might charge more or less for certain components, but the following figures are meant to be approximate average costs. (all figures are in US dollars).
The following numbers are for a single CD-ROM in a jewel case with a full color one page insert and full color printing on the CD itself.
| Number of CDs | Total Cost | Cost per CD |
| 300 | $1350 | $4.50 |
| 500 | $1400 | $2.80 |
| 1000 | $1800 | $1.80 |
| 2000 | $2800 | $1.40 |
| 5000 | $5150 | $1.03 |
| 10000 | $9600 | $0.96 |
Looking at this price list, you can see why people don't normally have CD-ROMs made when all they need is one or two hundred. The setup costs are too high to make it practical. The rule of thumb is that you should make CD-ROMs for any run greater than 1000, CD-R for anything less than 500, and for those needing between 500 and 1000, it should be determined on a case by case basis. In these cases, your decision will most likely be influenced by time, packaging, or overall quality rather than cost alone. On a side note, when pricing different replicators, you'll notice that the cost per CD never really gets that far below $1. While the cost of printing 10,000 CDs is only 96 cents per CD, the cost of printing 100,000 CDs is only 93 cents per CD.
But for those small client projects that require less than 500 CDs, it can get pretty expensive to make CD-ROMs, so you should consider having CD-Rs made instead. Since CD-Rs are individually burned instead of created through an injection molding process, there is hardly any setup costs, thus making them more ideal for smaller runs. The downside to CD-R creation is that since the data has to be burned on each CD, companies often charge based on the amount of megabytes on your CD. So a 50MB project would cost significantly less than a 500MB project. The following chart should give you an idea of what some typical costs are for small runs of CD-R duplication.
| Number of copies | |||
| 1-50 | 51-100 | 101-250 | |
| Size in MB | |||
| 1-200 | $4.25 | $3.00 | $2.25 |
| 201-400 | $4.75 | $3.50 | $2.75 |
| 401-650 | $5.25 | $4.00 | $3.25 |
Hopefully, you now have a better sense of the CD creation process, and how you can integrate it into your development and planning processes.
Copyright 1997-2025, Director Online. Article content copyright by respective authors.