Making thumbnail images
April 30, 2000
by Pat McClellan
Dear Multimedia Handyman,
Is there any way to import a graphic file into a member as a thumbnail of itself without going through the lingo of placing it on the stage and copying it back smaller? If not by lingo, have you seen an Xtra for both Mac and PC that will do it?
Liz Patten
Dear Liz,
I'm not sure what you're suggesting about placing it on the stage and copying it back smaller. I think you must mean that you're importing the images at full size, then placing them on the stage and scaling the sprite down. Then doing a screen shot and reimporting. That's definitely not the way to do it.
Creating thumbnail images is a fairly common need -- either during authoring or at runtime. There are a couple of easy methods you can use. The easiest during authoring is to use a command under the Modify menu, Transform Bitmap...
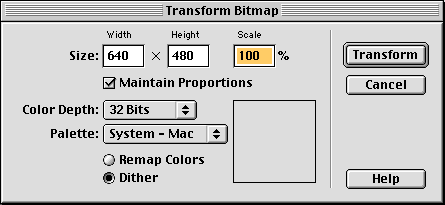
This dialog box is probably familiar to most people because you use it to change the color depth of cast members. In fact, I has almost forgotten the scaling controls at the top of the dialog box. These setting default to 100%, but obviously this is the ideal place to quickly scale down one or a group of cast members. This process is destructive to the original cast members, so you might want to make copies and scale the copies instead.
This method only works during authoring. If you need to create thumbnails during runtime, we'll need to find a different way. You might want to create thumbnails as part of a image viewer utility, where a directory of images is identified and you want to browse through the thumbnails of those images. Take a look at my previous article, DIY Slideshows, about creating your own slide show, for info about the directory operations.
To make the thumbnails on the fly, we'll use some of D8's nifty new Imaging Lingo. Here's the process. We'll call a movie script called "makeThumb", supplying it with the name of the member to be scaled and the scale percentage. The makeThumb handler will do the following:
- convert the scalePercentage to a decimal scaleFactor
- create a new bitmap member
- name the new member based on the source image's name
- grab the image of the source member
- calculate the rect of the thumbnail image by multiplying the source image's rect by the scaleFactor
- copy the pixels from the source image and paste them into thumbImage's rect
- paste the thumbImage into the new bitmap member
Here's the code:
on makeThumb sourceName, scalePercentage
scaleFactor = scalePercentage/100.00
newThumb = new(#bitmap)
newThumb.name = sourceName & "_thumb"
sourceImage = member(sourceName).image
thumbRect = sourceImage.rect * scaleFactor
thumbImage = image(thumbRect.width, thumbRect.height, sourceImage.depth)
thumbImage.copyPixels(sourceImage, thumbRect, sourceImage.rect)
newThumb.image = thumbImage
end
As you can see, the code is pretty simple. The only tricky part is getting used to the new concepts behind Imaging Lingo. There's this new "thing" called an image -- or an image object which is a property of bitmap and text cast members, (or of the stage or another window). Think of it as a snapshot of the cast member, which is held in memory. We do all of the opertations on the image object. Then, when we're finished, we assign that image back to the cast member -- or to a different cast member.
I mentioned that there can be an image of the stage or other windows. There's also a property called "picture". For example, you can have a picture of the stage, or the image of the stage. What's the difference? Reading the descriptions in the Lingo dictionary doesn't yeild a clear understanding of the differences. But a few experiments do. First, all of the Imaging Lingo appears to be built around the image, not the picture. Substituting picture for image won't work. I also found that the picture of a member doesn't have many of the properties that an image does -- such as a rect, width, height, etc.
So why might you want to use picture instead of image. I'm not sure you would, but here's one possibility. Michiel Knaven created this nifty little utility called screenShot. He graciously donated this utility to DOUG readers, so you can download the Director 8 file for Mac or Win. It's a tiny dir file that you can drop in your Xtras folder. Then, when authoring, you can select screenShot from your Xtras menu and a screenshot of your stage window will instantly appear in your cast as a new bitmap member. Quite handy.
I checked Michiel's code, and he's using the stage.picture to capture the screenshot. A few experiments yeilded the discovery that there is a difference in what is captured by picture vs. image. In Director 8, you can make your stage window larger than the dimensions of your stage. The stage.picture captures everything in the stage window, while the stage.image restricts itself to the dimensions of the stage. So, if you like the utility but would prefer to use image, you can just alter the code.
I hope you'll pardon my digression from thumbnail images. The new Imaging Lingo is really opening up the possibilities -- forcing us to look at new ways to think about using Director. Have fun with it!
Copyright 1997-2026, Director Online. Article content copyright by respective authors.