Intro to Imaging Lingo: Part 1
May 3, 2000
by Zac Belado
Imaging Lingo gives developers the ability to generate their own graphics, on the fly, in Director. As you may have seen in some of the other articles on the site, this is a very handy thing and can give you a great degree of flexibility when it comes to building elements for your movies. This new feature has some considerable depth to it, so let's start off our look at Imaging Lingo with an examination of some basic routines to draw bitmaps using the copyPixels() function.
Author's Note: Before you continue you should realise that I have the math skills of a stunned beagle. And a fairly math deficient beagle at that. I mention this only so that you understand that some of the things I do in this article can probably be done in a more mathematically efficient manner and also to prove that you don't need advanced math skills to make use of Director 8's Imaging Lingo.
If you build it, they will come
One of the easiest ways to start using Imaging Lingo is to build graphics from a series of tiles or by modifying a single tile to create different images. This can even be combined with some small math calculations to create a single bitmap that acts as if it has numerous active areas that the user can interact with. Think of a game of Tic-Tac-Toe. Instead of making a series of 9 sprites into the game board you could simply use one sprite. Or a better example might be a game or Othello or Reversi that is played on an 8 by 8 board for a maximum of 64 possible areas where the user could click.
You could still place 64 sprites in the Score and then place behaviors on each of those 64 sprites. Since Director has a ridiculous number of sprites that you can access in the Score, there is really no reason why you can't do this. But using one sprite certainly makes your movie easier to organise. And it also makes it much simpler to actually build the game board in the first place. So let's build a small movie to generate an Othello board and add some code so that the squares on the board will toggle states from the base color, to white, black and then back to the base graphic again as you click it.
Being that I am a lazy individual, I don't want to have to actually make more than 3 graphics for this entire movie: a base graphic to represent the board when there are no playing pieces on it, a tile with the white playing piece and a final one for the black playing piece. From these three building blocks you will need to create the rest of the bitmaps in the movie. All these tiles will be 32 pixels wide and 32 pixels high (square tiles are easier to deal with) which makes our final playing area graphic 256 pixels (32 times 8) square.
Colouring within the rects
In order to get started you need to understand two new Lingo keywords: image and copyPixels().
Almost every member in Director now has an image property. This new property simply refers to an image object in memory that is the bitmap representation of that thing, be it a bitmap member, a Flash asset, a Text member or even the Stage. Test it out in the Message Window:
put member("base").image
-- <image:1f26fda0>
The image property is a reference to the actual data.
The "image object" is the actual data in memory that makes up the member. This is important to remember because any changes you make to an image are immediately displayed in your movie. So if you store a member's image in a variable and then modify that variable you are not modifying a new image but the image of that original member.
Thankfully you can create a new image using the, confusingly named, image() function. The function returns a "new" image that isn't associated with any member in the cast so it is safe to modify this image object. Once you have created this image object you can then use the copyPixels() function to add data to it. The image function, at its most basic, requires a width, height and bitdepth for the new image object:
image (width, height, bitdepth)
thisImage = image (256,32,16)
The variable thisImage is our new image object - think of it as a blank palette in the computer's memory. It has the dimensions 256 x 32, and a bit depth of 16. Now let's see how to paste something into that blank image.
The copyPixels() function is used to take the bitmap data from one image and copy it to another image. What information you copy and where it is copied to is determined by source and destination rects or quads. The format for copyPixels() is:
targetImage.copyPixels(sourceImage, destinationRect, sourceRect, <parameters>)
We'll get to some of the parameters next week, but the most important thing to understand is how the rects (or quads) correspond to each other. The rect (or quad) is calculated from the top left pixel of the member's image. Not from the regpoint of the member or even the sprite's location. So if you wanted to copy the data in a sprite on screen from the mouse location you would first have to find out where the mouse is relative to the top left of the member's image. And if you just wanted to copy the entire image then you would just refer to the whole rect of the image.
A tangential discussion about rects
To illustrate this, let's take a short detour from our Othello example and look at another example. Move the mouse over the nitmap image to display a 50 x 50 "snapshot".
Download all the Director 8 sample movies in Mac or PC format.
This movie takes a 50 x 50 pixel "snapshot" of the bitmap data in the picture (purloined from Gary Rosenzweig's quad example from last week) and then copies that data into a second image.
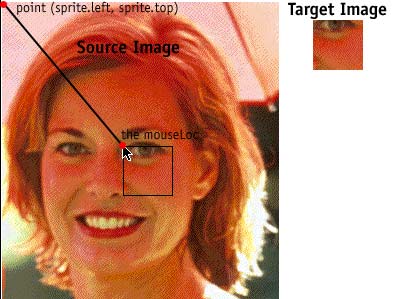
The process has three steps.
- take the current mouseLoc and find the position relative to the sprite
- build a rect based on this new point
- copy the data in that rect to the target image
To find the current cursor position relative to the image you simply take the mouseLoc and subtract a point made up of the top and left of the sprite (pMySprite is a property of the behavior in the sample movie).
thisPoint = the mouseLoc - point (pMySprite.left, pMySprite.top)
top = thisPoint.locV
left = thisPoint.locH
Once you have that point you need to make a rect that is 50 pixels wide and high using that point as, in our example, the top and left of the rect.
sourceRect = rect (left, top, left + 50, top + 50)
Now you have a rect that defines a 50 x 50 pixel area that we want to copy. Since the destination image is also a 50 x 50 pixel area and we want to fill that entire image with the data in the larger image the source rect for the copyPixels() function is just the rect of the target image. So to copy the data in the rect from the larger image you would use…
member("target").image.copyPixels (member("picture").image, member("target").image.rect, sourceRect)
…and Director would copy the pixels you asked for and, as mentioned before, immediately update the member. Notice that since we're copying to the image of a member, the new bitmap data is drawn on the stage right away and also modified in the cast.
Now back to our regularly scheduled example
The simplest way to build the 8 x 8 area for the Othello example would be to create a new bitmap member and image object and then use two loops (one for each row and then another for each tile in that row) to build up the larger image form the base tile. This is the reverse of our last example. In this case we are taking all the data from a source and copying it to a precise rect on the target.
First step is to create the new image and the new bitmap member. The playing area is 256 pixels square.
base = image(256, 256, 16)
targetMember = new (#bitmap, member 10)
Then we need to get the image of the tile and store the rect of the tile. We don't actually "need" to store the rect but this will be faster than getting Director to re-reference it each time you refer to it and it also makes the code a bit easier to write and read.
tile = member("base").image
sourceRect = tile.rect
Then it's simply a matter of looping through each row (8 of them) and each tile in the row (8 tiles per row) and then calculating a new destination rect for each iteration of the tile
repeat with row = 1 to 8
repeat with column = 1 to 8
top = (row - 1) * 32
left = (column - 1) * 32
targetRect = rect(left, top, left + 32, top + 32)
base.copyPixels(tile, targetRect, sourceRect)
end repeat
end repeat
The top and left variables are calculated by using the tile's height and width, luckily both 32, and multiplying it by the row and column we are currently drawing. You need to subtract 1 from the row and column number to ensure that the top and left of the first tile in each row and the entire first row start at 0.
Once it is finished drawing this new image, the code just assigns the image to the image property of the member that was created.
targetMember.image = base
Now where did I just click?
Now the final part of the example is to build some code to handle drawing the tiles on the playing area when the user clicks on them. The idea is that when an area is clicked it will toggle, with subsequent clicks, from the base tile, to a white playing piece tile, to a black playing piece tile and then back to the base tile again.
In order to facilitate this you need two things: a global list of the tiles in the order that they will appear and a second global list to represent the state of the playing area. This second list, as ominous as it might sound, is just a large list that contains individual lists for each row. In the list for each row is an entry for the current tile being displayed at that position.
So when the game begins the list might look like…
put gImageList
-- [
["base", "base", "base", "base", "base", "base",
"base", "base"],
["base", "base", "base", "base", "base", "base",
"base", "base"],
["base", "base", "base", "base", "base", "base",
"base", "base"],
["base", "base", "base", "base", "base", "base",
"base", "base"],
["base", "base", "base", "base", "base", "base",
"base", "base"],
["base", "base", "base", "base", "base", "base",
"base", "base"],
["base", "base", "base", "base", "base", "base",
"base", "base"],
["base", "base", "base", "base", "base", "base",
"base", "base"]]
And after it has been modified by a few player moves, it might like so…
put gImageList
-- [
["base", "black", "base", "base", "white", "white",
"base", "base"],
["base", "base", "black", "base", "white", "base",
"base", "base"],
["base", "base", "base", "black", "base", "base",
"base", "base"],
["base", "base", "base", "black", "base", "base",
"base", "base"],
["base", "base", "base", "white", "base", "base",
"white", "base"],
["base", "base", "base", "base", "base", "base",
"black", "base"],
["base", "base", "base", "base", "base", "base",
"base", "base"]]
Building this list is quite simple.
on buildImageArray
gImageList = []
repeat with row = 1 to 8
temp = []
repeat with column = 1 to 8
append temp, "base"
end repeat
append gImageList, temp
end repeat
end
In order to determine where the user clicks we need to refer back to the earlier example and modify its code to get the mouse click's location relative to the top left of the sprite. As well, since we are dealing with tiles, we need to determine which tile was clicked on. Since the state of each position on the playing field is being held in the global list, we aren't concerned so much with the point the user is clicking on but which row and column they have clicked on.
Let's assume for a second that the user clicks on a point that is 148 pixels across and 118 pixels down from the top left of the sprite.
We can use Director's integer division to find out how many tiles each of those distances represents by dividing by the height and width of the tile (width for the horizontal distance and height for the vertical distance).
put 148/32
-- 4
put 118/32
-- 3
We then add one to each value to get the precise tile that the user clicked on. This needs to be done to because if the user clicks on the first tile, any point less than 32 in this case, Director returns 0.
We can write a small behavior to handle this
property pMySprite
on beginSprite me
pMySprite = sprite(me.spriteNum)
end
on mouseUp me
-- get the mouse click loc relative to
-- the top left of the image
thisLoc = the mouseLoc - point (pMySprite.rect.left, pMySprite.rect.top)
thisX = (thisLoc.locH / 32) + 1
thisY = (thisLoc.locV / 32) + 1
processPuzzleClick thisY, thisX
end
The behavior takes the location of the mouse click, calculates where it is in relation to the sprite's top left corner and then hands this location, as two integer values to a handler for processing.
Once we have the tile the user has clicked on it simply a matter of finding what the current tile name is, seeing what the next value in the list of tile names is and then storing this new name back in the list.
-- get the current image at this location
thisImage = gImageList[thisY][thisX]
-- get the next image
listPos = getPos (gImageNames, thisImage)
listPos = listPos + 1
-- make sure it isn't outside the bounds of the lsit
if listPos > gImageNames.count then listPos = 1
newImage = gImageNames[listPos]
-- insert the new images
gImageList[thisY][thisX] = newImage
Finally the new tile is drawn onto the graphic of the playing area. As with the code that built the playing area graphic this code will need to take the tile location and generate a rect from that data. Once the rect has been calculated the image from the tile at that location can be drawn onto the playing area
on writeTile thisY, thisX
baseImage = member(10).image
tileName = gImageList[thisY][thisX]
tile = member(tileName).image
top = (thisY - 1) * 32
left = (thisX - 1) * 32
destRect = rect(left, top, left + 32, top + 32)
baseImage.copyPixels (tile, destRect, tile.rect)
end
Click the image to toggle the tiles through each of the three states.
Now to make things a bit more interesting, and also to see how fast Imaging Lingo can be, you can get write a small exitFrame handler to pick a random tile and then draw it.
on exitFrame me
thisX = random(8)
thisY = random(8)
processPuzzleClick thisY, thisX
go to the frame
end
The results can be seen here.
Summing up
Those are the basic steps you need to take to build bitmaps using the copyPixels() function and rects. Next week we'll look at some of the optional parameters that you can use with copyPixels() to do things like change the ink effect and blend of the pixels you are copying..Copyright 1997-2026, Director Online. Article content copyright by respective authors.