Intro to Imaging Lingo: Part 2
May 16, 2000
by Zac Belado
Previously on Director Online…
When we last looked at Imaging Lingo we examined the image property, the image() function and the copyPixels() function. As well, we looked at some simple methods to draw the data contained inside a rect to a rect on another image.
This article will expand on that by showing you some of the optional parameters that you can use to modify the copyPixels() function and change how Director draws data.
Note: This article is not meant to be read independently of part 1. This article makes reference to the sample movies in the first part of this article. As such you will need to be familiar with the code and concepts from that first article before you read this one.
Optional parameters
The copyPixels() function has 8 optional parameters that you can use:
- #color
The foreground colour that is used for colorization effects. The default is black. You can use this to modify the colour that a bitmap gets drawn to on the stage. Similar to selecting a bitmap member on the stage and then selecting a new foreground colour using the colour picker in the toolbar. - #bgcolor
The background colour used to draw the bitmap data. Very useful for adding transparency effects. - #ink
The ink mode used to draw the pixels being copied. - #blendlevel
The blend value (from 0 to 255) that is used to copy the pixels. If you need to use values from 0 to 100 to maintain compatibility with your Lingo code then you can use #blend as a property instead. If you assign a #blend or #blendLevel parameter then the #ink parameter is changed from copy to blend or, if the #ink was already set to backgroundTransparent, then it will be changed to blendTransparent. - #dither
A boolean value that determines whether pixels will be dithered if you are copying to an 8 or 16 bit image. By default this is off which means that the pixel data gets translated to the palette of the destination image. - #useFastQuads
A boolean value used to determine whether Director uses a faster mothod to calculate quads when they are used in copyPixels() functions. The default is False. - #maskImage
Used to specify a mask or matte image that is used to mask the pixels being copied - #maskOffset
Used to offset the images defined in #maskImage relative to the upper corner of the destination image. Defined as a point value.
Color
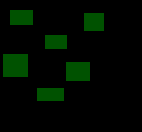
If you checked out the demo movie from Part 1 of this article, you'll remember that it used 5 different bitmaps to draw different coloured tiles onto the screen. By using the #color parameter you can use a single member to accomplish the same thing, because you can set the colour that Director uses when it copies the bitmap data from one image to another.
Download the sample movies for this article (Mac (316 K) or PC (244 K) format) and open up the file called "Imaging_Lingo_2.dir".
In the Message Window type:
member(10).image.copypixels(member("base").image, member("base").rect, member("base").rect)
Note: member (10) is the black bitmap that is displayed on the Stage. Member("base") is a small black bitmap that is used as a tile to draw onto the member on the Stage.
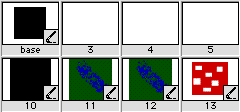
You should see nothing happen because what we did was copy a black bitmap onto another black bitmap.
Now try this:
member(10).image.copypixels(member("base").image, member("base").rect, member("base").rect,[#color:rgb(255,0,0)])
What should happen is that a red square should get drawn onto the large black image on the stage.
The difference between the two Lingo statments is that the second Lingo command specified a red colour (the rgb(255,0,0)) as the foreground colour as an optional parameter: [#color:rgb(255,0,0)]. Try the same code again but change the colour to a dark green (rgb(0,80,0)):
member(10).image.copypixels(member("base").image, member("base").rect, member("base").rect,[#color: rgb(0,80,0)])
If you cast your mind back to the example movie in the first part of this article you'll remember that it used separate bitmaps to create different coloured tiles in the stage. Now you can see that this is entirely unnecessary. You can take the same bitmap image and then add a #color parameter to "paint" it in a different shade.
Like the sample movie from part 1, the sample movie for this article defines a series of colours in a list and then toggles through them one at a time when the tile area is clicked (or picked randomly by the computer). Unlike the movie in the first article though, it defines these colours not by referring to new bitmaps but by using rgb color objects.
In the first movie we simply had a list of member names…
gImageNames = ["blue", "red", "green", "purple", "mustard", "base"]
..but in the new movie we also have a list of colours (defined as hex values).
gColorList = [#blue:rgb("#0000EE"), #red:rgb("#ff0000"), #green:rgb("#007700"), #purple:rgb("#CC00FF"), #mustard:rgb("#666600"), #base:rgb("#000000")]
So now when the movie goes to draw a tile onto the stage it uses the same bitmap each time but it simply changes the #color parameter in the copyPixels() function.
on writeTile thisY, thisX
-- get the base image
baseImage = member(10).image
-- get the colour value from the list
colourName = gImageList[thisY][thisX]
colorValue = gColorList[colourName.symbol]
-- get the tile's image
tile = member("base").image
-- do some math for the rects and locs
sourceRect = tile.rect
top = (thisY - 1) * 32
left = (thisX - 1) * 32
destRect = rect(left, top, left + 32, top + 32)
-- get a random blend value if we are drawing a coloured tile
if colourName <> "base" then
blendvalue = random(255)
else
blendvalue = 255
end if
-- copy it!
baseImage.copyPixels (tile, destRect, sourceRect, [#color:colorvalue, #blendLevel:blendvalue])
end
All this from a a single bitmap.
As an added twist, the code also adds a random #blendlevel value so that when the new tile gets drawn over the existing bitmap it will be, for the most part, opaque. Run the movie and have a look at how it works. Notice that as the tiles get drawn in each location they aren't solid colours but blend each new colour into the previous one because of the added #blendlevel parameter. Try setting the #blendlevel to 255 for each type of tile…
-- get a random blend value if we are drawing a coloured tile
if colourName <> "base" then
blendvalue = 255
else
blendvalue = 255
end if
...to see the difference that it makes. Don't forget to click on the Random button.
Bgcolor
The #bgcolor parameter is used to change the background colour that Director uses when it copy pixels from one image to another. The default value for this is white. According to the "Using Director" manual what this means is that white pixels will be filled with the new background colour and "light" pixels will be blended with the new background colour. As well, any colours darker than the background colour will not be drawn at all. (The author is lead to believe that "light" means any colour lighter than the background colour but he may be wrong.)
Let's experiment a bit to see just what that means.
In the sample movie you may have noticed some odd looking bitmaps and wondered what they were for… well we are going to use them to experiment with #bgcolor effects.
First, start and then stop the movie so that the main image on stage is redrawn in black. Then use Lingo to copy the image in member 13 onto member 10 (the member currently on stage). Before you look at the Lingo code below try to write the code yourself.
Now if you used something similar to this:
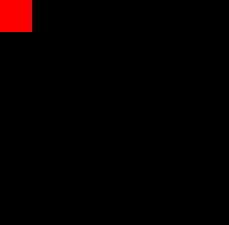
member(10).image.copypixels(member(13).image, member(13).rect, member(13).rect)
You would just have the red and white bitmap drawn on top of the black bitmap like so:
Now let's add a bgcolor parameter and see what happens. We'll use the same dark green from our earlier examples:
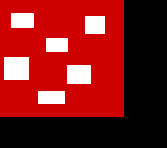
member(10).image.copypixels(member(13).image, member(13).rect, member(13).rect, [#bgcolor:rgb(0,80,0)])
And now the white areas are filled with the dark green and the red areas are not drawn at all.
And now, we'll try a variation. Copy the image from the first green and blue bitmap (member 11) onto the member on stage.
member(10).image.copypixels(member(11).image, member(11).rect, member(11).rect)
Now let's assign a #bgcolor that is the same value as the green in the bitmap's background. In order to be sure of the colour we can use getPixel() to find the rgb value of the background. The topleft most pixel is the colour we want so:
put member(10).image.getPixel(1,1)
-- rgb( 0, 80, 0 )
We can copy this bitmap again but this time assign that dark green colour as the #bgcolor parameter.
member(10).image.copypixels(member(11).image, member(11).rect, member(11).rect,[#bgcolor:rgb(0,80,0)])
The green colour should be drawn in and the blue (since it is darker) will be missing. Instant inverse mask!
Now if you want to do the opposite -- display the blue but knock out the green colour -- you just need to set the #ink parameter to background transparent. Check the Lingo Dictionary for the numeric values for the different inks; background transparent is 36.
Note: Before you do this you need to make sure that the green colour you copied earlier is no longer on the large black rectangle on stage. To remove it either start and stop the movie or enter "buildMainImage" in the Message Window to get the bitmap on stage to be filled with black.
member(10).image.copypixels(member(11).image, member(11).rect, member(11).rect, [#bgcolor:rgb(0,80,0), #ink:36])
You should see that the green colour is now "masked" out and only the blue areas of the bitmap have been copied.
![]()
Director uses the background colour that we have specified (the dark green) as a transparent value instead of white as it would normally.
Masks
The last two parameters that we will deal with in this article are the #maskImage and #maskOffset parameters. Both of these parameters are used to set masks and modify the position of them relative to the position of the source image.
The #maskImage parameter is not like the other optional copyPixels() parameters in that it requires you to provide a mask object. What's a mask object? A mask object is a type of object similar to an image object. They are created by using the createMask() function on an image.
put member("mask").image.createMask()
-- <mask:1f67b71c>
Mask objects are of limited overall use because you can only use them as the value of the #maskImage parameter. But they are still very handy.
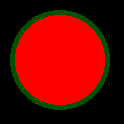
As an example, let's recreate the flashlight example that Gary Rosenzweig provided in his Lingo Lounge column. If you haven't had a chance to read it, you should do so because it provides an excellent example of using alpha channels (you'll also want to look at his original movie to see how his solution differs from the one I'll provide).
In his example Gary modifies and moves the alpha channel of a member to simulate the flashlight effect. In order to use a mask we'll have to do something different. We'll need to copy the source image onto a member on stage (a black bitmap of course) and then move a mask object using the #maskOffset parameter to sync the mask to the mouse location.
In this example the "source" member is the bitmap of the forest scene that the we will be moving our flashlight over. The "mask" member is the same soft edged circular bitmap that Gary used as an alpha channel in his example and the target image will be a solid black bitmap. Unlike the alpha channel example, this example will create the same effect by masking the forest scene and then copying those masked pixels onto the black bitmap on the stage.
We'll write a behavior to handle the processing. First off we'll need to store references to the mask object, the source image, the image we are going to "paint" the masked bitmap onto and the rect of the mask.
property pMask
property pSourceImage
property pMouseOffset
property pMyImage
property pMaskRect
on beginSprite me
-- build the image and mask references we'll need later
pSourceImage = member("source").image
pMask = member("mask").image.createMask()
pMaskRect = member("mask").image.rect
pMyImage = sprite(me.spriteNum).member.image
pMouseOffset = point(pMaskRect.width/2,pMaskRect.height/2)
clearImage me
end
What this does is speed up the subsequent calculations that we will need to do each frame. The mask and all the images are already referenced and stored in memory and Director will not need to spend any extra time accessing them again. The pMouseOffset variable is used to center the mask on the mouse.
Each frame, we will need to find the current mouse location (and then subtract the pMouseOffset variable so that the mask will be centered) and then apply the mask and offset it relative to the overall image by the current mouse position.
on exitFrame me
-- determine the location of the cursor
thisLoc = the mouseLoc - pMouseOffset
clearImage me
-- now copy the image and use the new loc as a maskOffset
pMyImage.copyPixels(pSourceImage, pMyImage.rect, pSourceImage.rect, [#maskImage:pMask, #maskOffset:thisLoc])
end
This code will only work with bitmaps though. While you can easily use createMask() to make a mask from a bitmap member, remember that members like Flash, vector and Text members are always created with an alpha channel and the actual bitmap data if their image object is filled to the extent of their rect. So in order to use these types of members as a mask you need to create a mask from their alpha channel. While I won't get into the specifics of it here, the Lingo needed to do this is quite simple. To create a mask, as we did above, from a Text member you would use :
pMask = member("mask").image.extractAlpha().createMask()
You can see an example of this here.
The only downside to using a masking technique instead of the alpha channel technique that Gary showed is that for each frame we need to "clean up" after the last frame. An efficient way to do this might be to store the last mouse position and then draw a black bitmap, the same size as the rect of the mask, over top of the last area of forest scene that was copied. But since this is just an example and not a shipping project we can use a brute force approach and just cover over the entire bitmap.
on clearImage me
pMyImage.fill(pMyImage.rect, rgb(0,0,0))
end
To do this we just use the fill() function to fill the entire background bitmap with black. Which is as good a segue as you get from me this late in an article…
Fill and stand on
The fill function(), as you would expect, takes an image object and fills it with a colour… or, as you may come to expect from commands and functions in Imaging Lingo, a list of parameters. And also, as you may have come to expect, you can use fill() with either a rect (as we did above), two points, or 4 integer co-ordinates for the top, left, right and bottom of a rect.
image.fill(left, top, right, bottom, <color or params>)
image.fill(rect, , <color or params>)
image.fill(point(left,top), point(right,bottom), <color or params>)
The fill() function can take up to four parameters:
- #shapeType
Either #rect, #roundRect, #oval or #line. Determines the shape that is used to draw the fill - #lineSize
Integer value used to determine the size (in pixels) of the line used to draw the shape. - #color
The color object used to determine the fill colour of the shape being drawn - #bgcolor
Used to determine the colour of the border, if any, of the shape being drawn.
So if you wanted to draw an oval 100 pixels wide and high (in other words a circle) that started 10 pixels from the left and ten pixels from the top of the image being drawn on, with a border 5 pixels wide, a red background and a green border colour you could use:
fillRect = rect(10,10,110,110)
parameterList = [#shapetype:#oval, #linesize: 5, #color: rgb(255,0,0), #bgcolor:rgb(0,80,0)]
member("display").image.fill( fillRect, parameterList)
Notice that the filled circle that gets drawn is not anti-aliased. This is important to note as none of the drawing and fill routines (including using copyPixels() to draw to a quad instead of a rect) are anti-aliased. The mask example shown earlier in the article has soft edges only because the mask we used was soft edged. So fill() works fine with rects but if you use it to draw ovals, or even lines, you will see some noticeable artifacts.
All's well that ends well
So there you have it. Far from being all that difficult, using Imaging Lingo in Director 8 is quite easy once you get a solid grasp of the basics. There are still several issues that these two articles haven't touched: using quads with copyPixels(), the draw() function, and a fuller discussion of alpha channels. For more information about using quads have a look at Gary Rosenzweig's "Goo" article and also check out his flashlight article for an example of using alpha channels.
Copyright 1997-2026, Director Online. Article content copyright by respective authors.