Look, no sprites!
June 20, 2000
by James Newton
© 2000 by James Newton
Before we get into the specifics of the Lingo techniques that are going to be discussed in this article take a second to play with the demo to see what it is we are hoping to accomplish. Use the movie below to have fun painting in the style of Piet Mondriaan. Simply click on the black canvas and drag the mouse while holding the mouse button down. Click on the palette chips to change the color.
Download this Director 8 movie in Mac or PC format
When you click on a paint chip, notice how it passes in front of the others. Notice how the palette always appears in the foreground: you can't paint over it. Notice that the rectangles you paint leave no trails: when you shrink the rectangle in any direction, the area behind the rectangle reappears as before.
Click on the last rectangle you painted. You can now move it around with the mouse, as long as you hold the mouse button down. If you change colors before moving on the rectangle, the rectangle changes color to match.
Nothing up my sleeve
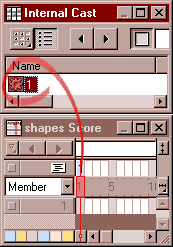
Download the sample movie and open it in Director 8. Once you have opened the movie in Director 8, take a look at the Score window. What do you see?
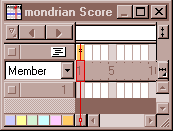
Nothing.
The movie uses no sprites. The sprite channels are all empty. Oops, sorry, there is a little behavior in the Script channel of frame 1. Now open the Cast window.
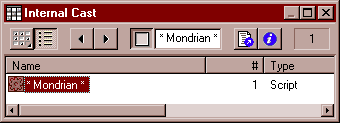
You may be surprised to discover that this movie contains a single script and nothing else. Yet you have been manipulating colored rectangles; you have been changing their shape, size, position and locZ. Where do these shapes come from?
Imaging Lingo
Director 8 proposes a whole new set of commands for dealing with images. These commands are fast and powerful. You can create images on the fly, stock them in RAM, and manipulate their pixels in many ways. You can use ink effects and quad distortions. You can save the result in a bitmap member, and even send it over the Internet via the Multiuser Xtra.
In this article, I will show you how to:
- Draw directly onto the Stage;
- Fill part of an image with a flat area of color;
- Detect mouse clicks in different areas of the screen;
- Create an image in RAM starting from scratch;
- Copy part of one image into another;
- Manipulate the image of the Stage to simulate sprites.
This is only an introduction to the possibilities of Imaging Lingo.
Despite appearances, my purpose is not to encourage you to stop using sprites in your projects. In a complex movie, controlling what appears on the screen without using sprites would be somewhat like reinventing the wheel. On the contrary, I hope that my demonstration will help you to understand better how sprites work "under the hood". This knowledge could help you to use Imaging Lingo as a complement to the existing sprite features.
Drawing on the Stage
Here are two simple handlers that draw shapes on the Stage:
on redSquare
square = rect(60, 20, 260, 220)
red = rgb(255, 0, 0)
(the stage).image.fill(square, red)
updateStage
end
on blueCircle
square = rect(50, 10, 270, 230)
blue = rgb(0, 0, 255)
options = [#color: blue, #shapeType: #oval]
(the stage).image.fill(square, options)
updateStage
end
As you can see, the fill() command accepts several types of syntax. To insert the basic syntax automatically into your handlers, remember than you can use the "L" (for Lingo) button in the tool bar of the Message and Script windows.
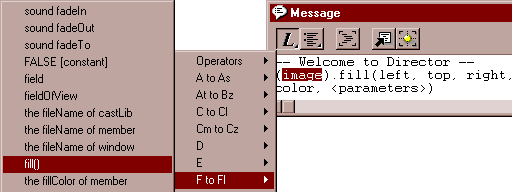
Note that in order to draw an ellipse, you first have to define a rectangle, then use a list of options to indicate that Director should fill the rectangle with an oval shape. Test the different properties that can be used in this options list: #shapeType, #lineSize, #color and #bgColor. Check the Lingo Dictionary for more details.
Director 8 has a new image property, which gives you direct access to the pixels. Bitmap, Flash and Vector Shape members also have an "image" property. You will shortly be using the similarly-named image() function to create a "raw" image and stock it in a variable.
Create a new movie, open the Script window, and paste the two handlers quoted above into it. For the moment, it is useless to run your movie, since it contains no sprites and will stop as soon as you start it. You can, however, type the following commands into the Message window while the movie is halted.
redSquare
blueCircle
Other shapes with quads
You can create even more interesting shapes by using a quad as the destination area, rather than a rectangle. A quad is a list of four points: each point defines the corner of an arbitrary quadrilateral shape. In the example below, two of these points coincide, and the quad thus forms a triangle.
on yellowTriangle
left = point( 50, 35)
right = point(270, 35)
bottom = point(160, 235)
triangle = [left, right, bottom, bottom] -- triangular quad
yellow = rgb(255, 255, 0)
square = image(200, 200, 8) -- square image is blank
square.fill(square.rect, yellow) -- square image is now yellow
(the stage).image.copyPixels(square, triangle, square.rect)
updateStage
end
Add this handler to your script, then type the following into the Message window:
yellowTriangle
Note the image() function, which allows you to create a new image out of nothing, directly in the computer's memory. The pixels of this new image are all white by default. (To test this, comment out the line that fills the square image with yellow, by placing two hyphens "--" at the beginning of this line).
Note also the copyPixels() command. You will find a simpler use of this command further on. Here, it is used to copy a square image onto the Stage, and to deform it by limiting it to an area defined by the quad "rectangle". CopyPixels is a very powerful command. You can, for instance, use a list of parameters to modify the way the copy is carried out. You can thus manipulate:
- #color and #bgColor: the color of the opaque and transparent areas;
- #ink and #blendLevel: ink effects and transparency;
- #maskImage and #maskOffset: the black and white image use to delimit non quadrilateral areas;
- ... and other even more specialized parameters.
Check the Lingo Dictionary for more details. Or read the two part "Introduction to Imaging Lingo" published here on DOUG (check out part 1 and part 2).
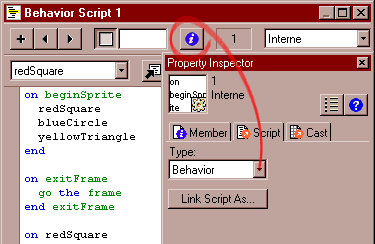
Sketching a behavior
Now, let's try to automate this task. Convert your Movie script to a behavior. You can do this by clicking on the button with a white "i" (for Information) in a blue circle. This opens the Property Inspector, new to Director 8. You can now choose "Behavior" in the pop-up menu.
Add these handlers to your behavior:
on beginSprite
redSquare
blueCircle
yellowTriangle
end
on exitFrame
go the frame
end exitFrame
Drag your behavior into the Script channel of the first frame of your movie, then run the movie.
The on beginSprite handler is executed before the contents of the first frame are drawn onto the Stage. But the Stage remains empty. No shapes appear. This is not due to a mistake in your Imaging Lingo handlers. It's a question of timing. The handlers on redSquare, on blueCircle and on yellowTriangle have been called too soon. You can make the on beginSprite handler execute again, in order to call these three handlers, by typing the following command in the Message window:
sendAllSprites(#beginSprite)
Abracadabra, the three shapes appear. But why did they not appear automatically before?
Too quick on the draw
When displaying the image of a given frame, Director recognizes several stages. It punctuates these stages with messages that can be fielded by your handlers. As far as we are concerned here, this is the order:
- #beginSprite...sent to behaviors that will begin in the coming frame
- #prepareFrame..sent just before the frame is drawn
- #enterFrame....sent after the frame has been drawn
- #exitFrame.....sent before leaving the current frame
If you use Imaging Lingo in an on beginSprite or on prepareFrame handler, Director is likely to draw any sprites over the top of your images. In the current case, Director flatly refuses to execute the updateStage command, since this command forces it to redraw the Stage and thus to send out new #beginSprite and #prepareFrame messages. If this were allowed, it would lead to a vicious circle: your computer would freeze.
To make your shapes appear, you must therefore wait for the first #enterFrame message. Replace the current on beginSprite handler with the following:
property startFlag
on beginSprite
startFlag = TRUE
end
on enterFrame
if startFlag then
-- These lines will only be executed once
redSquare
blueCircle
yellowTriangle
startFlag = FALSE
end if
end
Run your movie again. This time the shapes appear as expected. Timing is important when you are using Imaging Lingo.
Changing the locZ
A sprite's locZ determines the order in which its image will be copied on to the stage, compared with those of the other sprites. You can easily simulate this effect by redrawing one shape in front of the others.
Since we are using areas of a single flat color, we can determine which shape is clicked by testing the color under the mouse at the moment it is clicked. (In the sample movie, I use a list of rects to achieve the same result).
Add the following lines to your behavior (the properties must be declared at the very top of the script, before the handlers on redSquare, on blueCircle and on yellowTriangle):
property red
property blue
property yellow
on mouseUp
colorUnderMouse = (the stage).image.getPixel(the mouseLoc)
case colorUnderMouse of
red: redSquare
blue: blueCircle
yellow: yellowTriangle
end case
end
This competed behavior is demonstrated in the shapes.dir movie.
Run the movie again. Now, click on any part of a shape that is not covered by the foremost shape. The shape you click on is redrawn in front of the others.
getPixel() gets a facelift
In Director 7, the getPixel() function already existed, but it was not officially supported by Macromedia. It therefore did not appear in the Lingo Dictionary, and Macromedia reserved the right to change its syntax. As a result, in Director 8, getPixel() does not work the same way as in Director 7. If you are updating a movie where you used the function unofficially, you will have to modify your scripts. In the same way, setPixel() has also taken on a new form. Check the Lingo Dictionary for details.
Screen buffer
When you move a sprite across the Stage, the background reappears, unchanged, in the wake of the sprite. Director must hold in its memory any part of the background that is hidden by a sprite, or it would not know what to show once the sprite has moved on. To do this, Director reserves a block of memory know as the "Screen buffer", where it stocks the entire image of the Stage before it displays it on the screen.
In order to imitate the sprite's independence with respect to the background, you are going to create your own screen buffer. This is a very memory-hungry step. The dimensions of the stage need to by multiplied by the screen's color resolution. Try this in the Message window:
put the stage.rect.width * the stage.rect.height * the colorDepth / 8 / 1024 && "Ko"
If the Stage is 800 x 600 pixels and the screen has a resolution of 32 bits, this represents almost 2MB. Since Director already monopolizes a memory block of this size, it is not usually good practice to grab the same amount of memory for your scripts. I only do this here in order to show you how sprites work... and I use a small Stage.
A two-tiered image
Here is a stripped-down version of the "Mondriaan" behavior. It allows you to draw a series of red rectangles on the screen. (In this simplified version, you have to drag from the top left to the bottom right). Create a new behavior and paste this script into it. Drag the new behavior into the Script channel of the first frame, to replace the behavior that is currently there. Now run your movie.
property myStartH -- the mouseH on mouseDown
property myStartV -- the mouseV on mouseDown
property myOblong -- rect of the current oblong
property myStageImage -- copy of (the stage).image before painting
on mouseDown(me)
-- Start to draw a new oblong
myStartH = the mouseH
myStartV = the mouseV
myOblong = rect(0, 0, 0, 0) -- dummy value
myStageImage = duplicate((the stage)Image) -- current state
end mouseDown
on exitFrame(me)
if the mouseDown then
-- Restore the area that was modified the last time round
(the stage).image.copyPixels(myStageImage, myOblong, myOblong)
-- Remember which area is about to be changed
myOblong = rect(myStartH, myStartV, the mouseH, the mouseV)
-- Draw the oblong in its new position
(the stage).image.fill(myOblong, rgb(255, 0, 0))
end if
go the frame
end exitFrame
Note that the zone previously hidden by the rectangle myOblong is drawn first, and the colored rectangle is then drawn on top. The screen is not refreshed between these two actions: there is no updateStage command, and Director waits for the next frame before it redraws the Stage. As a result, the user only sees the result of the two actions: the Stage image only changes once.
Also, note the duplicate() function, which is used on the image of the Stage. For Lingo, an image is a pointer. That means that it contains the address in the computer's memory where the pixel information is stored. It doesn't contain the pixel information itself. If two variables contain the same memory address, they can both be used to manipulate the same pixels. A change made using one of the variables is immediately detected by the other. It is as if two doors open into the same room.
If you set the variable myStageImage directly to the (the stage)Image, then the pixels addressed by myStageImage will change continually so as to reflect the changes on the Stage. This is why we had to make a separate copy of the current state of the Stage, by using the duplicate() function; this is where that massive extra chunk of memory is commandeered. To use the same metaphor, the duplicate() function here creates a whole new room, then tells us where to find the door.
The copyPixels() command is used here in a straightforward fashion. In this example, it is used to copy the pixels from an area of the screen buffer to the corresponding area on the Stage. The source and destination image are the same size and the areas in question have the same coordinates in both. In the on yellowTriangle handler above, the area that the pixels were copied to was more complex. In this case, the image being copied is not a simple area of flat color. You create a custom painting on the Stage: copyPixels() deals with copying a part of the unique arrangement of different colored rectangles, just as if you were using a cookie cutter.
This behavior is completed and demonstrated in the simplified.dir movie.
Way to go
The sample movie offers a richer set of features. The "Mondriaan" behavior is constructed in a more rigorous fashion and is well commented. You could try to complete the two simplified behaviors that you have studied here, using the "Mondriaan" behavior for inspiration. You could even add your own features: a choice of shapes (line, oval, quad ...); an "Undo" button"; or a button to "Replay the creation", ...
If you have any questions on the issues dealt with here, you can contact me at newton / at / planetb.fr.
Copyright 1997-2025, Director Online. Article content copyright by respective authors.