Dynamic width adjustment of text members
July 16, 2000
by Pat McClellan
Dear Multimedia Handyman,
I am currently working on a Lingo database project and I have run into a bit of a problem. I have three text members on the same line, and each text member is of variable length. However, each text member must have the same distance separating it from an arrow bitmap inserted in between. How can I make these sprites dynamically align based on the length of the text?
Francis
Dear Francis,
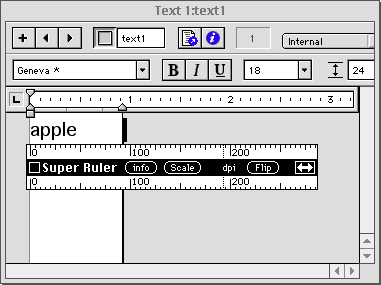
This is a really good challenge. I searched in vain through all the Director docs for any property that relates to the actual pixel width of the text that is entered into a text member. You can obviously check for the width of the member, but that has no correlation to the text string that is actually contained in the member. Oddly, there are several ways to test for the height, but not the width. Take a look at this example:

In this image of a text member called "text1", you can see that the width of the cast member is just over 90 pixels wide. But the width of the text string is only about half that. So how do we capture that value in Lingo?
As I was researching this, I was reacquainted with the locToCharPos function. According to the docs, locToCharPos...
returns a number that identifies which character in the specified field cast member is closest to the point within the field specified by location. The value for location is a point relative to the upper left corner of the field cast member.
Though it says that the function is for Field members, it appears to work on Text cast members as well. Let's refer back to the image above for the following tests.
put member("text1").width
-- 92
put locToCharPos(member("text1"), point(10,0))
-- 2
This tells us that the second character of the text string is located at the point 10 pixels from the left margin. Since we're only dealing with a single line (no wordwrap), the vertical distance can be zero.
put locToCharPos(member("text1"), point(20,0))
-- 2
put locToCharPos(member("text1"), point(30,0))
-- 3
This tells us that the second character is still at 20 pixels from the left margin, but we'd be over the third char at 30 pixels in. Now, let's try to find the last character -- the fifth one in this case.
put locToCharPos(member("text1"), point(45,0))
-- 5
put locToCharPos(member("text1"), point(46,0))
-- 6
At 45 pixels from the left, we're over the fifth (last) char. And if we go one more pixel, we're over the sixth char... but there is no sixth char. When locToCharPos returns a value that is greater than the number of chars in that line, then we know we've found the end of the word. Now, we can just set the width of the member to 46, or maybe a bit more if you want a little margin.
Here's how I converted that process to a behavior. I discovered that the locToCharPos function only works if the member is wider than the width you are testing. That means that we first have to make sure that the member is wider than the text string. Once that is assured, we can fine tune the width downward.
property spriteNum
on beginSprite me
setWidth me
end beginSprite
on setWidth me
mySprite = sprite(me.spriteNum)
myMem = mySprite.member
myMem.wordwrap = FALSE
textLength = myMem.text.length
testWidth = mySprite.width
-- make the member wider than the text string
repeat while locToCharPos(myMem, point(testWidth,1)) < textLength + 1
myMem.width = myMem.width + 3
testWidth = testWidth + 3
end repeat
-- fine tune the width downward
repeat while locToCharPos(myMem, point(testWidth,1)) > textLength
testWidth = testWidth - 1
end repeat
marginPix = 3 -- your choice here
myMem.width = testWidth + marginPix
updateStage
sendSprite(spriteNum + 1, #align)
end setWidth
That takes care of making the text members set their own width dynamically. For the rest of your question, we simply need to make a behavior that aligns a sprite with the one in the next lowest sprite channel. You'll notice that the last line of the behavior above sends a message to the next higher sprite to #align. So let's make the behavior that will receive that message.
property spriteNum
on beginSprite me
align me
end beginSprite
on align me
mySprite = sprite(me.SpriteNum)
if spriteNum = 1 then exit
targetSprite = sprite(spriteNum - 1)
mySprite.loc = point(targetSprite.right, targetSprite.top)
updateStage
sendSprite(spriteNum + 1, #align)
end align
I separated the align handler because we'll want to be able to call it from elsewhere, whenever text is dynamically updated. Here's a demo movie to show you what I mean. Type "banana" into the text entry field and press the "Text1" button. This will put "banana" into the text of member "text1", replacing "apple" and automatically widening that member. It then sends the message to the next sprite to #align, which aligns itself with the right, top point of the previous sprite and sends the #align message up to the next sprite.
Director 8 download for Mac or Windows.
You'll probably want to make the background transparent on your text members. I left them set to copy ink so you could see how the width is adjusted. You can play with the regPoint of the arrow sprites to make them line up the way you want. Good luck with your program.
Copyright 1997-2026, Director Online. Article content copyright by respective authors.