Navigating a Flash member
August 6, 2000
by Pat McClellan
Dear Multimedia Handyman,
I'm making a project in Director 8 for Win and Mac. I want to use scenes that are made in Flash 4.0. Now, the problem is that the scenes are not readable at that image size. So therefore I want to use a zoom tool to zoom in and out. Scroll buttons are needed to move to the left, to the right, up and down. Besides that, I want a navigator screen that shows me where I am in the scene (like they have in Photoshop). Do you have any ideas that will help?
Tom
Dear Tom,
This is a big, juicy challenge! The key concepts here are a couple of properties of Flash members, or sprites with Flash members: viewPoint and viewScale. Take a moment to look these terms up in your Lingo dictionary. These two terms will enable the zooming and scrolling of the large Flash sprite on the stage. For your thumbnail navigator control, you'll need to use a couple of other functions: flashToStage() and stageToFlash().
Director 8 download for Mac or Windows.
What you see in this demo is a Flash member, the map of North America, placed in two separate sprites on the stage -- one big, and one where the sprite dimensions have been scaled down to create the thumbnail. For clarity, we'll just call these the bigSprite and the smallSprite -- but remember that they're instances of the same Flash member. You'll need to set the scale mode for your Flash member to "Auto-Size" so that it scales down to correspond to the sprite's size.
As you press the zoom button (zoom in or zoom out), a command is sent to change the viewScale of the bigSprite. Another command is sent to the navigator frame sprite (the pink rectangle), the one that shows on the thumbnail which portion of the map is currently displayed on the bigSprite. If you click anywhere on the smallSprite (the thumbnail), the navigator frame will reposition itself, and send a command to the bigSprite to alter its viewPoint to reflect your change. Similarly, the scroll buttons send commands to the bigSprite and to the navigation frame sprite to accurately display the change.
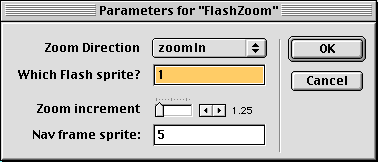
To really understand how this all works, you should download the demo and dig into the scripts. I'll cover the basic concepts and highlight a couple of enhancements I made to the basic functionality. Let's start with the zoom capability. We'll use the same behavior for zoom in and zoom out, so we'll need to allow you to specify which of those you want. You'll need to tell the behavior which sprite is the one to zoom, and you'll want to have some control over how fast the zoom is.

The syntax for setting the viewScale is:
sprite(x).viewScale = Y
I've made it a little more complicated here so that I could specify a zoom limit. In this case, my limit is 2, which means that you can zoom in to a point where 2% of the image fills the frame. That's what the max() function is doing below. The sendSprite() command is sending the message to the navigation frame sprite to update its view.
on zoomIn me
sprite(pBigSprite).viewScale = max(2, sprite(pBigSprite).viewScale / pZoomSpeed)
sendSprite(pFrameSpriteNum,#updateView)
end
Before I go through the zoomOut handler, go back to the demo movie, zoom way in, and position the navigation frame in the top right corner so that you can see Iceland -- or maybe just one of the letters in "Iceland". Now, start zooming out and watch the position of the navigation frame. I wanted to have the zoom out center itself incrementally so that it is perfectly centered when it gets to 100%. But I also wanted to make sure that you don't lose anything from view as you move out. That's the motivation behind the centerFactor in the code below. That means that zooming out not only changes the viewScale, but also the viewPoint.
on zoomOut me
newScale = min(100, sprite(pBigSprite).viewScale * pZoomSpeed)
currentView = sprite(pBigSprite).viewPoint
centerFactor = 1 - ((newScale/100.00) * (newScale/100.00))
newView = centerFactor * currentView
sprite(pBigSprite).viewPoint = newView
sprite(pBigSprite).viewScale = newScale
sendSprite(pFrameSpriteNum,#updateView)
end
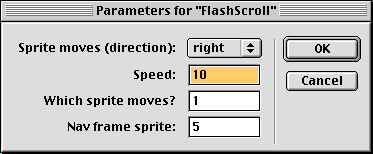
That pretty much covers the zoom. Now let's explore the scroll (sounds very exciting, doesn't it?) The scroller buttons need to know which direction to move the sprite's viewPoint, the speed to move the sprite's viewpoint, which sprite to change the viewPoint on, and finally, which sprite is the navigation frame.

In the demo movie above, start with the image zoomed all the way out. Scroll the image a bit and notice the speed at which it is moving. Now zoom way in again and scroll the image. Notice that the speed seems to be the same as when you were zoomed out. I accomplished this by including the viewScale factor into the speed of the scroll. Here's the code:
on mouseDown me
scaleFactor = sprite(pScrollSprite).viewScale/100
pIncrement = scaleFactor * pSpeed
pFlag = #scroll
end
on enterFrame me
if pFlag = #scroll then scrollSprite me
sendSprite(pFrameSpriteNum,#updateView)
end
on scrollSprite me
case pDirection of
#left: pScrollSprite.viewH = pScrollSprite.viewH + pIncrement
#right: pScrollSprite.viewH = pScrollSprite.viewH - pIncrement
#up: pScrollSprite.viewV = pScrollSprite.viewV + pIncrement
#down: pScrollSprite.viewV = pScrollSprite.viewV - pIncrement
end case
end
One thing that I didn't include was any sort of scroll limit. That's probably something you'll want to add so that the image stays on the screen. All the rest is there. Good luck with your project.
Copyright 1997-2025, Director Online. Article content copyright by respective authors.