Asking a Question with the MUI Xtra
November 14, 2000
by Gary Rosenzweig
One of the features Director lacks is the ability to easily pop up quick dialog boxes to gather simple pieces of information. Even Hypercard had an "ask" and "answer" function that popped up dialog boxes with just one line of code.
There are actually many ways to create dialog boxes in Director. A movie in a window is an old favorite, but that requires a whole other Director movie. Another option is to build a dialog box out of sprites or with Imaging Lingo.
The quickest way, however, is to use the MUI Dialog Xtra. This is an Xtra that comes with Director 7 and 8. It can be used to create many different types of dialog boxes. To start with, let's look at a simple example.

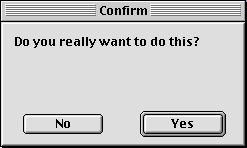
Wouldn't it be great if you could create the dialog box in the figure with one line of code, like this:
customDialog("Confirm","Do you really want to do this?","Yes","No")
Well, you can! All you need to do is write a customDialog handler that uses the MUI Xtra to create a dialog box.
To use the MUI xtra, you first need to create an instance of the Xtra. We'll put it in a global variable.
global gMUI
on customDialog title, text, defaultOption, otherOption
gMUI = new(xtra "mui")
The next step is to define what type of window you want to create. To do this, you need to create a window properties list. Instead of starting from scratch, you can use the getWindowPropList function to get a generic window property list. Then, you can customize the window by changing the properties you want. Here is the code to create a normal window 240 pixels wide and 120 pixels high.
windowProps = getWindowPropList(gMUI)
windowProps.type = #normal
windowProps.name = title
windowProps.callback = "customDialogCallbackHandler"
windowProps.width = 240
windowProps.height = 120
windowProps.mode = #pixel
Notice that the window property callback was set to confirmDialogCallbackHandler. This is the name of the movie script handler that will get messages every time the user interacts with the dialog box. We'll look at that handler later.
The next step is to create the elements of the dialog box. You'll need a piece of text and two buttons. To create each element, start with a generic element list taken from the getItemPropList function. Then, set its properties to fit what you need. Each element is then added to a list. Here is the code to create the text and the two buttons.
list = []
element = getItemPropList(gMui)
element.type = #label
element.value = text
element.locH = 10
element.locV = 10
element.width = 220
element.height = 40
add list, element
element = getItemPropList(gMui)
element.type = #defaultPushButton
element.title = defaultOption
element.locH = 140
element.locV = 90
element.width = 80
element.height = 20
add list, element
element = getItemPropList(gMui)
element.type = #pushButton
element.title = otherOption
element.locH = 20
element.locV = 90
element.width = 80
element.height = 20
add list, element
Notice that the type for the first button is #defaultPushButton and the type for the second button is just #pushbutton. The #defaultPushButton creates the thinker button seen in the image as the "Yes" button. This button is also the default button, meaning that the user can simply press return or enter to activate the button.
Once the window property list and the element list have been created, you can create the dialog box with just two lines of code. This will conclude the customDialog handler.
Initialize(gMUI, [#windowPropList: windowProps, #windowItemList: list])
Run(gMUI)
end
The customDialogCallbackHandler is called whenever the user interacts with the dialog box. This includes the creation and destruction of the dialog box, or even clicking on the text portion of it. By using the parameters passed into the handler, you can determine if the action taken was to click on one of the two buttons. Then, you can take the appropriate action and dispose of the dialog box. In this example, no action is taken, but it is easy to see where this code can be inserted.
global gMUI
on customDialogCallbackHandler action, elementNumber, elementList
case (action) of
#itemClicked:
if elementList.type = #defaultPushButton then
Stop(gMUI,0)
gMUI = VOID
else if elementList.type = #pushButton then
Stop(gMUI,0)
gMUI = VOID
end if
otherwise:
exit
end case
end
This is all that is needed to create your own confirmation dialog box. Of course, it depends completely on the MUI Dialog Xtra. The biggest problem with the MUI Dialog Xtra is that you can't use it with Shockwave, so this is strictly a CD-ROM and full download option.
A sample Director 8 movie is available for download in Mac or Windows format.
Gary Rosenzweig's two most recent books are: "Special Edition Using Director 8" -- The most comprehensive guide to Director ever, including tons of examples and demo movies. It's suitable for novices and experts alike. "Advanced Lingo for Games" -- How to make games with Director 7 and 8. This book comes complete with full source code for more than 20 complete games. More information about these books can be found at http://clevermedia.com/resources/bookstore/. They can be purchased there, or in your local bookstore.
Copyright 1997-2026, Director Online. Article content copyright by respective authors.