Dynamically Creating Radio Buttons
May 15, 2001
by Will Turnage
Dear Multimedia Handyman,
I have a problem which is, I want radio buttons for a survey in my page that has over 100 items. Could you show me how to create them with code?
Thank you
Jaber
Jaber,
One of the biggest problems when designing dynamic movies is that you have to place some limits on what you can do. Often these limits are related to monitor resolution or memory requirements. In the past, you had a limit on the number of sprites you could put in the Score, and while it's not an issue now, it can still be really frustrating trying to work with a movie that has 300 dummy sprites that are just waiting to be used for some dynamic purpose.
Luckily, Director's imaging Lingo allows you to take several on-screen elements and combine them into one sprite. The final product ends up running faster and taking less memory than hundreds of sprites. The only downside is that sometimes the programming can be a little complicated, but if you think through it, it's not too horribly difficult. And just to show you, here's an example of functioning radio buttons using one sprite and imaging Lingo:
So, if you want to use this in your project, the first thing you need to do is get all of your information together. You will need a list containing the text for each radio button in the order they should appear on screen. Also, you will need separate bitmaps for each visual state of the radio button. The sample movie contains four radio button states:
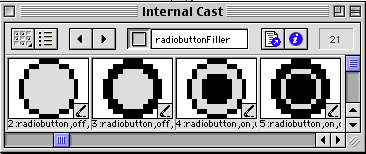
There's a selected state and an unselected state, as well as a hit state for both the selected and unselected states.
The first step to creating your own radio buttons is to create a list containing the text of each button. For instance, in a frame in your movie, you could initialize the list by typing:
buttonList = ["0", "1", "2", "3", "4", "5", "6", "7", "8", "9", "10"]
sendSprite (2, #buildRadioButtonList, buttonList)
and the handler on sprite 2 would contain this code:
on buildRadioButtonList me, newList
imageHeight = 0
imageWidth = 0
pButtonList = []
repeat with i = 1 to newList.count
member ("radioButtonFiller").text = SPACE & SPACE & newList[i]
buttonRect = member ("radiobutton,off,up").rect
textRect = member ("radioButtonFiller").rect
radioWidth = buttonRect.width + textRect.width
radioHeight = max (buttonRect.height, textRect.height)
tempImage = image (radioWidth, radioHeight, 16)
tempImage.copyPixels (member ("radiobutton,off,up").image, member ("radioButton,off,up").rect, member ("radiobutton,off,up").rect)
textDestRect = textRect.offset (buttonRect.width, 0)
tempImage.copyPixels (member ("radioButtonFiller").image, textDestRect, textRect)
finalRect = rect (0,0,radioWidth,radioHeight).offset (0, imageHeight)
pButtonList.append ([#mode: #offUp, #image: tempImage, #rect: finalRect, #text: newList[i] ])
imageWidth = max (imageWidth, radioWidth)
imageHeight = imageHeight + radioHeight
end repeat
You start the handler by setting imageWidth and imageHeight to zero. These numbers will be the eventual height and width of the final image displayed on screen. Next, you initialize your buttonList to be an empty list and then start going through each item in the list passed to the handler.
For each item in the list, you put its contents into a text member. Then you get the rect of your radio button artwork and the rect of the text member containing the text for this item in the list. Next, you combine the information from these two rects to calculate the height and width of a master image containing both the radio button and the text. Then you create an empty image and copy the radio button artwork and the text into that image.
Finally, you store information about this button in a list. Specifically, you store the image of the radio button and text, the text that appears, the rect representing where this item appears in the list of radio buttons, and a property called mode that will tell you which radio button bitmap should be displayed.
Once you've created this list of information, you can create the image of the entire radio button list by stepping through your information list and copying the image of each item onto the master image.
pImage = image (imageWidth, imageHeight, 16)
repeat with i in pButtonList
pImage.copyPixels (i.image, i.rect, i.image.rect)
end repeat
Finally, you select the first item in your list by default, and call the redrawRadioButton handler
pButtonList[1].mode = #onUp
me.redrawRadioButton ()
The redrawRadioButton handler will be repeatedly called throughout the behavior. Its purpose is to update the appearance of the radio buttons to reflect changes in mouse clicks and other events.
on redrawRadioButton me
repeat with i in pButtonList
case i.mode of
#offUp: tempMem = member ("radioButton,off,up")
#offDown: tempMem = member ("radioButton,off,down")
#onUp: tempMem = member ("radioButton,on,up")
#onDown: tempMem = member ("radioButton,on,down")
end case
radioButtonRect = tempMem.rect.offset(i.rect[1], i.rect[2])
pImage.copyPixels (tempMem.image, radioButtonRect, tempMem.rect)
end repeat
pMemRef.image = pImage
pMemref.regpoint = point(0,0)
end
This handler steps through each item in the list and checks the mode for each item in the list. Then it redraws the radio button for each item according to the mode in its list.
You're halfway done creating this behavior. The image of all the radio buttons is created and you've also stored all of the information about your radio buttons in a list. All that's left to do is create the user interaction. The first interaction to create happens when a user clicks on a radio button.
on mouseDown me
if listP (pButtonList) then
pClickedButton = 0
repeat with i = 1 to pButtonList.count
if (the mouseLoc - pSprRef.loc).inside (pButtonList[i].rect) then
pClickedButton = i
if pButtonList[pClickedButton].mode = #offUp then
pButtonList[pClickedButton].mode = #offDown
else
pButtonList[pClickedButton].mode = #onDown
end if
me.redrawRadioButton ()
timeout (pTimeoutName).new(20, #checkRollover, me)
exit repeat
end if
end repeat
end if
end
The first step of this handler is to check whether or not the list of information about your button exists. This is necessary to avoid errors if you haven't ever called the buildRadioButtonList handler. But if the list does exist, then the code goes through the items and checks if the mouse's location is within any radio button's rect. If it is, then you keep track of that radio button in a variable called pClickedButton. Finally, the code creates a timeout object that will check whether or not the user is rolled over the radio button as long as the mouse button is held down.
on checkRollover me
if (the mouseLoc - pSprRef.loc).inside (pButtonList[pClickedButton].rect) then
if pButtonList[pClickedButton].mode = #offUp then
pButtonList[pClickedButton].mode = #offDown
me.redrawRadioButton ()
else if pButtonList[pClickedButton].mode = #onUp then
pButtonList[pClickedButton].mode = #onDown
me.redrawRadioButton ()
end if
else
if pButtonList[pClickedButton].mode = #offDown then
pButtonList[pClickedButton].mode = #offUp
me.redrawRadioButton ()
else if pButtonList[pClickedButton].mode = #onDown then
pButtonList[pClickedButton].mode = #onUp
me.redrawRadioButton ()
end if
end if
end
This code checks to see whether or not the user's mouse is over the same button the user originally clicked on. If the mouse is over the same button, then the code makes sure that the correct hit state of the radio button is displayed. And if the user isn't rolled over the original clicked on button, then it makes sure that that the normal state of the radio button is displayed.
Finally, when the user releases the mouse, you need to check one last time to see if the user is rolled over the same button they clicked, and if so, then reset the rest of the list.
on mouseUp me
if pClickedButton <> 0 then
timeout (pTimeoutName).forget ()
if (the mouseLoc - pSprRef.loc).inside (pButtonList[pClickedButton].rect) then
if pButtonList[pClickedButton].mode = #offDown then
repeat with i = 1 to pButtonList.count
if i = pClickedButton then
pButtonList[i].mode = #onUp
else
pButtonList[i].mode = #offUp
end if
end repeat
else if pButtonList[pClickedButton].mode = #onDown then
pButtonList[pClickedButton].mode = #onUp
end if
me.redrawRadioButton ()
end if
pClickedButton = 0
end if
end
This handler begins by checking your pClickedButton variable to make sure that a valid radio button was clicked in the first place. If so, the first command executed stops calling the handler that checks for rollovers.
Next, it checks to see if the button is the currently selected button. If it is, then it just leaves everything as it is. But if the user clicked on a button other than the currently selected one, then the code resets all the other buttons to the unselected state, while making sure that the button clicked is selected.
And that's basically all there is to creating radio buttons using imaging Lingo. With some slight modifications you could also use this code to create a list of checkboxes or other form elements. I'd be interested to see what people come up with.
A sample Director 8 movie is available for download in Macintosh or Windows format.
Copyright 1997-2026, Director Online. Article content copyright by respective authors.