3D Lingo: Cameras, Overlays and Background Color
October 19, 2004
by James Newton
Source files: xyzCone.zip (Windows) | xyzCone.sit (Macintosh).
The movie above contains four 3D sprites. Each sprite provides a different view of the same Shockwave 3D member. Each view has a different background colour and a title. If you click on any of the sprites and drag, the cone model will move with the mouse. The position of the cone model will automatically update in all the sprites. In this two-part article, we'll look at:
- How to create and modify a 3D primitive
- How to define a point in 3D space
- How to create and place cameras
- How to define a different background color for each camera
- How to create an overlay for a camera
- How to set the camera for a given sprite
- How to use vector mathematics to move a model in a plane (part 2)
It's a hands-on lesson. You'll be seeing line-by-line how to write the code. You'll also find some advanced tips, and details of undocumented or incompletely documented techniques.
Creating a cone from a cylinder primitive
In Director 8.5, create a new movie, then use the menu Insert | Media Element | Shockwave 3D to create a new Shockwave 3D member. You need to give this member a name, otherwise Director will destroy it automatically as soon as you close the Shockwave 3D member window. Drag your member onto the Stage. Control-Click (Mac) or Right-Click (Windows) on the sprite to open the contextual menu , and choose Script... A behavior script window will open. Delete the default handler and type the following instead:
on beginSprite(me)
  tMember = sprite(me.spriteNum).member
  tMember.resetWorld()

  -- Create a cone model
  tConeResource = tMember.newModelResource("Cone", #cylinder)
  tConeResource.topRadius = 0
  tCone         = tMember.newModel("Cone", tConeResource)
end beginSprite
Now run your movie. You should see a cone appear.
Cylinder resource properties (top)
The cone is in fact a deformed cylinder. The shape and size of a cylinder primitive is defined by three properties:
- .topRadius
- .bottomRadius
- .height
If the .topRadius and .bottomRadius are the same, then the cylinder will be cylindrical. If one of these properties is set to zero, you obtain a cone. If you set both to different non-zero values, you get a truncated cone.
The default value for these properties is 25. The default height of a cylinder is 50.
Models and Model Resources (top)
In 2D Director, members are stored in a castLib. You can place several copies of the same member on the Stage, as sprites. You can alter the size, color, position and other properties of each sprite independently.
In 3D, the same distinction applies, though the implementation is different. A modelResource is the equivalent of a member and a model is the equivalent of a sprite. Before you can make an object visible as a model, you must first create a modelResource.
The modelResource defines the shape of the object. Director 8.5 provides 7 primitive model types:
- plane
- box
- sphere
- cylinder
- mesh
- particle
- extruder
Each has a different set of properties. The first four are fairly simple. The last three can be made as complex as you want.
A model is placed by default at the center of the 3D world. Its x-, y- and z-axes are aligned with those of the world, and its size is identical to that of the modelResource used to create it.
Vectors (top)
To define a point in 3D space, you need three coordinates. Director 8.5 introduces a new data type: the vector. This combines three floating point values, one for each of the x-, y- and z-axes. You can use integers instead of floating points, but these will immediately be converted to floating point numbers. Try this in the Message window:
tVector = vector(10, 20, 30)
put tVector
-- vector( 10.0000, 20.0000, 30.0000 )
member(1).model(1).worldPosition = tVector
If your movie is running, you should see the model move in the sprite as its position in the 3D world changes.
Visualizing the axes and boundingSphere of a model (top)
For debugging purposes, it can be very helpful to see how a given model is oriented. To do this, you can set its .debug property to TRUE. Add the following line at the end of your beginSprite() handler, and restart your movie:
tCone.debug = TRUE
This will help you understand which way the model is facing in each view. In a completed project, you would probably want to remove any instructions that set .debug to TRUE anywhere in your movies.
One 3D member, multiple cameras (top)
To create these different views, a total of 4 cameras is used: the default camera and 3 new ones. To create a new camera, you simply need to use the newCamera() function, and provide it with a unique camera name.
tCamera = tMember.newCamera("x view")
The camera will be created at the center of the world: inside the Cone model. You'll need to move it away from the Cone model, and turn it to point in the right direction. You've already seen how to use a vector to define a position in the 3D world. To point the camera at the Cone model after you've moved it, you can use the pointAt() command.
  tCamera.worldPosition = vector(250, 0, 0)
  tCamera.pointAt(0, 0, 0)
The pointAt() command is not fully documented in the Help Files. It will also accept a model as a parameter. The following instruction will also point the camera at the Cone model:
tCamera.pointAt(tCone) -- alternative syntax
Changing views (top)
If you add the above lines (only one of the two suggested pointAt() lines is needed) to your beginSprite() handler, you won't see anything new happen. This is because the sprite will continue to display the world through its original default camera. To change the view, type the following in the Message window:
sprite(1).camera = member(1).camera(2)
Instead of seeing the red x-axis to the left, you should now see the blue z-axis to the right. You are now looking down the red x-axis, so it is invisible. (Before you were looking down the blue z-axis).
projectionAngle (top)
You may also notice that the cone appears slightly larger. This is because the default value for the .projectionAngle property (also known as .fieldOfView) is different for the original default camera than it is for any new cameras. Try this in the Message window:
put member(1)Camera(1).projectionAngle -- default camera
-- 34.5160
put member(1)Camera(2).projectionAngle -- default new camera
-- 30.0000
The .projectionAngle property can vary from 0.0 to 180.0. Angles around 30° produce little distortion at the edges, but reduce the visible area.
Changing the background colour for a camera (top)
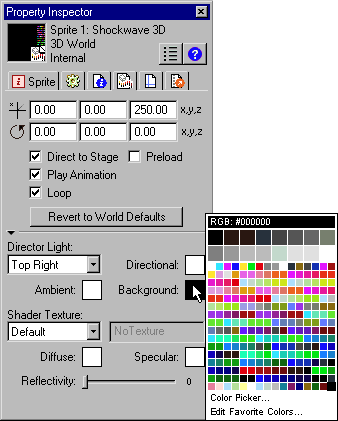
You can use the Property Inspector to change the default background colour for all sprites:.

You can also, however, define a different colour for each camera, by setting the camera's colorBuffer.clearValue:
tCamera.colorBuffer.clearValue = rgb(32, 0, 0)
As you shall see, this property is little fragile: when you set the camera for a sprite, it is overruled by the member's background colour, and may need to be deliberately reset.
Creating a texture for an overlay (top)
An overlay is an image that appears in front of all the models in a 3D world, as if it were stuck on the camera lens. You can have any number of overlays: the highest-numbered overlay is nearest the camera. (You can also create backdrops which appear behind all models: the lowest-numbered backdrop is farthest from the camera).
The image used by an overlay is not an ordinary image: it's a texture. For performance reasons, textures always have dimensions which are a power of 2: 2, 4, 8, 16, 32 ... 512 ... You can use images which have other dimensions to create a texture, but the texture will squeeze or stretch them to the nearest power of 2.
This movie uses the image of a text member as a texture. To ensure that the text member has dimensions which are a power of 2, I placed a text sprite on the Stage, set the member's .boxType to #fixed, and adjusted the size of the sprite so that it was 64 pixels by 16. I then removed it from the Stage.
Here is the code which creates an texture showing a short text:
on mGetTexture(me, a3DMember, aString)
  tMember        = member("Overlay") -- 64x16 pixels text member
  tMember.text   = aString
  tTexture       = a3DMember.newTexture(aString)
  tTexture.image = tMember.image

  return tTexture
end mGetTexture
The .image property of a texture is not fully documented. You can also use...
tTexture.member = tMember
... where tMember is any member that has an .image property (Bitmap, Flash, Text, Vector Shape, or even another Shockwave 3D member, if you are using the #software renderer).
Creating the overlay (top)
An overlay belongs to a particular camera. When you create an overlay, two other assets are created:
- A shader named
shader("OverlayShader-copyX"), where X is an integer starting at 1, and incrementing each time a new overlay is created - A model named
model("Overlay-copyX"), where X is the same integer.
This model uses the plane("DefaultModel") as its resource. This modelResource is automatically created for each Shockwave 3D member. It is only used for displaying backdrops and overlays: you cannot get it to appear in the 3D world as such. Each camera possesses two nameless groups, one for its overlays and one for its backdrops. The model("Overlay-copyX") is added to the appropriate group. Only as a child of such a group will the model appear.
To create an overlay, you must specify a texture, a position relative to the top left corner of the sprite, and a rotation. In most cases, your rotation will be 0, but you must specify it. Here is the code that adds a title at the top left of the sprite:
  tTexture = me.mGetTexture(tMember, "down x-axis")
  tCamera.addOverlay(tTexture, point(0, 0), 0)
The full behavior (top)
Here is the full behavior used in the movie to create the different camera views, overlays and background colours:
on beginSprite(me)
  tMember = sprite(me.spriteNum).member
  tMember.resetWorld()

  -- Create a cone model
  tConeResource = tMember.newModelResource("Cone", #cylinder)
  tConeResource.topRadius = 0
  tCone         = tMember.newModel("Cone", tConeResource)
  tCone.debug   = TRUE

  -- Create three new cameras, looking along different axes
  tCamera = tMember.newCamera("x view")
  tCamera.worldPosition = vector(250, 0, 0)
  tCamera.pointAt(0, 0, 0)
  tCamera.colorBuffer.clearValue = rgb(32, 0, 0)
  -- Add overlay to camera
  tTexture = me.mGetTexture(tMember, "down x-axis")
  tCamera.addOverlay(tTexture, point(0, 0), 0)

  -- y axis
  tCamera = tMember.newCamera("y view")
  tCamera.worldPosition = vector(0, 250, 0.025)
  tCamera.pointAt(0, 0, 0)
  tCamera.colorBuffer.clearValue = rgb(0, 32, 0)
  tTexture = me.mGetTexture(tMember, "down y-axis")
  tCamera.addOverlay(tTexture, point(192, 0), 0)

  -- z axis
  tCamera = tMember.newCamera("z view")
  tCamera.worldPosition = vector(0, 0, 250)
  tCamera.pointAt(0, 0, 0)
  tCamera.colorBuffer.clearValue = rgb(0, 0, 32)
  tTexture = me.mGetTexture(tMember, "down z-axis")
  tCamera.addOverlay(tTexture, point(192, 172), 0)

  -- Use the default camera for a cavalier view
  tCamera = tMember.camera(1)
  tCamera.projectionAngle = 30
  tCamera.worldPosition = vector(144, 144, 144)
  tCamera.pointAt(0, 0, 0)
  tTexture = me.mGetTexture(tMember, "cavalier view")
  tCamera.addOverlay(tTexture, point(0, 172), 0)
end beginSprite

on mGetTexture(me, a3DMember, aString)
  tMember = member("Overlay")
  tMember.text = aString
  tTexture = a3DMember.newTexture(aString)
  tTexture.image = tMember.image.duplicate()
  tTexture.member = tMember

  return tTexture
end mGetTexture
resetWorld() (top)
There is one line that I have not yet explained:
tMember.resetWorld()
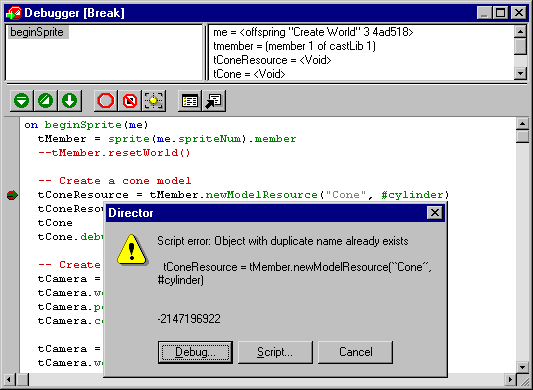
This has no effect until you run the movie a second time. The modelResource and the model that you created the first time around will still be stored in the computer's RAM space. If you try to recreate a modelResource and a model with the same names, you will obtain a script error:

The resetWorld() command destroys all the existing assets, and thus makes the names available for reuse. An alternative technique would be to check if the named modelResource or model exists. If it is does, you adopt the existing asset, if it does not, you create a new one:
  tConeResource = tMember.modelResource("Cone")
  if ilk(tConeResource) <> #modelResource then
    tConeResource = tMember.newModelResource("Cone", #cylinder)
    tConeResource.topRadius = 0
  end if
This second technique is useful if you want to keep models in the positions they were in at the moment you stopped the movie. It requires more lines of code, and is not warranted in this simple example.
Changing camera views (top)
For the moment, you have to switch camera views from the Message window:
sprite(1)Camera = member(1)Camera(2)
sprite(1)Camera = member(1)Camera(3)
sprite(1)Camera = member(1)Camera(4)
sprite(1)Camera = member(1)Camera(1)
In the next part, you will write a second behavior that sets the view for each sprite automatically.
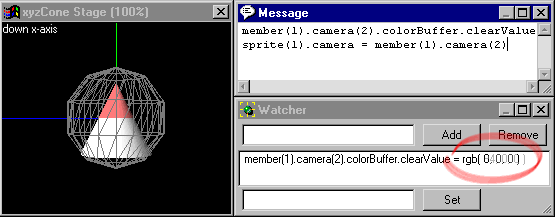
The background colour that you defined for each camera is stripped at the very moment you change the sprite's camera to that camera. You can see this happen if you restart your movie, then watch the following expression in the Watcher window:
member(1)Camera(2).colorBuffer.clearValue
As you press the Return key to execute the line...
sprite(1)Camera = member(1)Camera(2)
... the value switches from rgb(64, 0, 0) to rgb(0, 0, 0). We will deal with this also in the next article.

Copyright 1997-2026, Director Online. Article content copyright by respective authors.