Anti-aliasing
December 4, 1997
by Alex Zavatone
A while ago, while viewing Che Tamahori's wonderful site out of New Zealand, I was impressed by what Che wrote about a method he uses to get antialised graphics in Shockwave. I flopped back in my chair and yelled to myself "DOH! It's so simple! GREAT STUFF!" What I was yelling to myself about was what many of you do with Director every day.
What I was yelling to myself about was what many of do with Director every day. Often there is a feature that is meant to do one thing. Often in our quest to get our projects done, we must repurpose the functionality to make it do what we want it to do. In Che's case, he used rich text to hold graphics by creating a font with the desired graphics as characters.
Often there is a feature that is meant to do one thing, but in our quest to get our projects done, we must repurpose the functionality to make it do what we want it to do. In Che's case, he used rich text to hold graphics by creating a font with the desired graphics as characters. Rich text works at runtime by taking the font character and drawing it as a 4 bit antialiased bitmap with an alpha channel. This means that the edges of the image will blend in with any background it is over and that there will be no jaggies on those edges. But I have not seen support for any colored fonts in Director, how can you get this to work for multicolored graphics? The solution here is to create a font char that will serve as the outline of the graphic. Your graphic will be two sprites in the score. One as the RTF outline, one as the real graphic itself. Click in the sample below for better response.
"Ok, I get it" you say, "now how do you do it?"
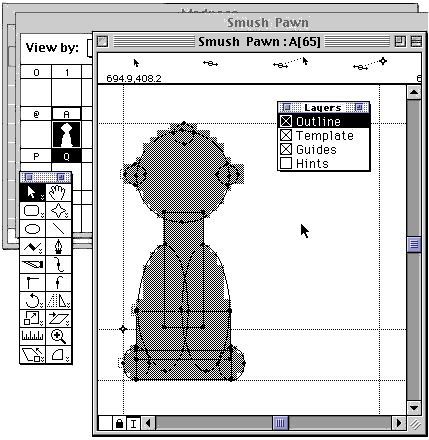
First, you'll need a copy of Fontographer or other font editing tool. In Fontographer, create a new file and start editing the letter of your choice. I like to start at letter "A". From there you can either import a bitmap to trace or start drawing an outline using the spline tools and graphic primitives. The picture below is the character for the pawn graphic from the above shockwave.

Remember to use the preview command to see what the character looks like before saving. When finished, name the font file and save the finished fontographer file. Then select "Generate Font Files..." and from there select Truetype and the type of machine you want to create the font for. Install the newly created font and launch Director.
This font should now be visible from Director's font menu. To use the new character(s), create a richtext member and select your desired graphic by typing the appropriate character in your custom font. Scale it to the desired size by changing the point size. The forecolor can be changed by applying the desired color from the tool window to the character in the richtext window. If you have another colored bitmap graphic, you can place it on top of the antialiased sprite to apply more than one color to the graphic itself. In this case, the antialiased richtext graphic acts as a border for your shape. This can be seen in the shockwave above with the red sphere. Also, more than one graphic can be combined together to produce pleasing effects like the orange with the green leaves.
Try it yourself. SIT and ZIP versions of the Director 6 file used to make the example Shockwave movie are available.
Copyright 1997-2026, Director Online. Article content copyright by respective authors.