Vector Shapes as Animation Tools
March 30, 1999
by Will Turnage
Overview
With Director 7, we finally get vector shapes as a native format. While they're great for creating low bandwidth designs and animations, they also open up a whole new world of animation tools for sprites. Using a few new lingo terms and a little math, you can easily animate sprites along your own vector path.
The Math
The reason vector shapes have such a small file size is that they're all just mathematical equations. So all Director has to do is graph the equation, and you've got a vector shape. When you look closer at vector shapes, you notice they are made up of one or more Bezier curves. Okay, great, so what's a Bezier curve? According to Darrel Plant's Wonderful Web Reference on Bezier Curves
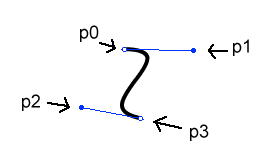
"A cubic Bezier curve is defined by four points. Two are endpoints. (x0,y0) is the origin endpoint. (x3,y3) is the destination endpoint. The points (x1,y1) and (x2,y2) are control points.

Two equations define the points on the curve. Both are evaluated for an arbitrary number of values of t between 0 and 1. One equation yields values for x, the other yields values for y. As increasing values for t are supplied to the equations, the point defined by x(t),y(t) moves from the origin to the destination. This is how the equations are defined in Adobe's PostScript references.
x(t) = axt3 + bxt2 + cxt + x0
x1 = x0 + cx / 3
x2 = x1 + (cx + bx) / 3
x3 = x0 + cx + bx + axy(t) = ayt3 + byt2 + cyt + y0
y1 = y0 + cy / 3
y2 = y1 + (cy + by) / 3
y3 = y0 + cy + by + ay
This method of definition can be reverse-engineered so that it'll give up the coefficient values based on the points described above:
cx = 3 (x1 - x0)
bx = 3 (x2 - x1) - cx
ax = x3 - x0 - cx - bxcy = 3 (y1 - y0)
by = 3 (y2 - y1) - cy
ay = y3 - y0 - cy - by
Now, simply by knowing coordinates for any four points, you can create the equations for a simple Bézier curve.
Simplifying the Math with Lingo
At first all those formulas might seem a little intimidating. But with lingo, we can cut the number of equations in half by using points instead of x and y coordinates. For those who aren't aware, Director allows you to use points when doing simple arithmetic. Take for instance:
put point(1,3) + point(5,8)
-- point(6, 11)
put point(3,2) * 3
-- point(9, 6)
Knowing this, we no longer need to calculate the x and y values of a Bezier curve separately. When you use just points you're left with:
p(t) = apt3 + bpt2 + cpt + p0
cp = 3 (p1 - p0)
bp = 3 (p2 - p1) - cp
ap = p3 - p0 - cp - bp
Using The VertexList
Okay, okay, enough math, my brain can't take it.anymore. Let's look at some lingo. Start with our previous Bezier curve. If we've created this vector in Director and named it 'myCurve',. then

you can type in the message window:
myVertexList = member("myCurve").vertexList
put myVertexList
and the result is
-- [[#vertex: point(-11, -34), #handle1: point(69, 1),¬
#handle2: point(-57, -1)], [#vertex: point(5, 35),¬
#handle1: point(58, 11), #handle2: point(-59, -11)]]
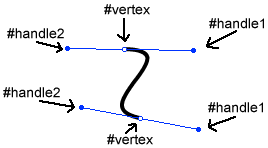
The vertexList is a property of all vector shapes. It's a linear list with each item in the list representing a point along the vector's path. Each one of these points is described as a property list with three distinct values:
#vertex: the relative distance of the point from the originPoint*
#handle1: the relative distance of the first handle from the vertex
#handle2: the relative distance of the second handle from the vertex
*vector shapes and Flash movies use the originPoint as their center of rotation and scaling and the regPoint as their location on the Stage. This is different from bitmaps which use the regPoint as their center of rotation and scaling. By default, the originPoint is point(0,0) and the originMode is #center. To specify an exact originPoint you must set the vector's originMode to #point and then set the originPoint. For more info, read the Help section in Director 7.
Based on our previous diagram, we might quickly conclude that
p0 = myVertexList[1].vertex
p1 = myVertexList[1].handle1
p2 = myVertexList[2].handle2
p3 = myVertexList[2].vertex
But that's not exactly it. You see, the values in the vertexList are relative distances between points, and in order to calculate the points along a Bezier curve, we need absolute values. For instance, if our Bezier curve is located on the Stage at point(100,100), we would use these formulas to get the absolute location of each point.
myStageLoc = point(100,100)
p0 = myVertexList[1].vertex + myStageLoc
p1 = myVertexList[1].handle1 + p0
p3 = myVertexList[2].vertex + myStageLoc
2 = myVertexList[2].handle2 + p3
So to calculate 100 equidistant points along our Bezier curve, we would take these new absolute values for points p0, p1, p2, and p3, and use them in our previously defined formulas:
-- Calculate the Bezier curve values based on the points
-- from the vertexList

cP = 3.00 * (p1 - p0)
bP = (3.00 * (p2 - p1)) - cP
aP = p3 - p0 - cP - bP
-- Create a new list
pointList = []
-- Calculate 100 points along the curve with theTime
-- ranging from 0 to 1
repeat with i = 0 to 99
  theTime = i/99.000
  pLoc = p0 + (cP * theTime) + (bP * power(theTime, 2)) ¬
    + (aP * power(theTime, 3))
  append pointList, pLoc
end repeat
The result is a linear list of 100 points, evenly spaced along the path of your Bezier curve.
The Vector Animation Behavior
Now that you can compute any number of points along a Director Vector Shape, you can use this list of points for any number of things. Two examples we'll examine more closely are sprite animation and curved slider bars
Sprite Animation
Say you wanted a sprite to continuously loop along a vector's path. We could attach this code to the moving sprite.
property currentLoc
property pointList
on beginSprite me
   currentLoc = 1
   pointList = calculatePoints()
end
on prepareFrame me
   sprite(me.spriteNum).loc = pointList[currentLoc]
   if currentLoc = pointList.count then
      currentLoc = 1
   else
      currentLoc = currentLoc + 1
   end if
end
And the resulting animation would run in a loop like this. Aside from maintaining a single code base, if you want to change the animation path, all you have to do is change the vector's shape.
Curved Slider Bars
Say we wanted to take the vector shape from before and turn it into a curved slider bar. We already know how to create a list of all points on the curve, but with a slider bar, there is another factor to consider. When movement is controlled by the mouse, how do you translate the mouse location to a location on the Bezier curve?
One way to do this is to take the distance between two points. If you need a geometry refresher, the distance between two points is defined by:
distance = sqrt ( (y2 - y1)2 + (x2 - x1)2 )
While the mouse is down, you continuously check the distance between the mouse and three locations on your Bezier curve: the current location, the location to its immediate left, and the location to its immediate right in the list. You compare the three distances, and move your sprite to the one point which you are closest. The result is a tracking effect, that is, the sprite will follow the mouse along the curve rather than jumping to the mouse's location, a technique used in most vertical or horizontal slider bars The benefit to using this method is that since the slider handle can only move one point at a time up or down the list, the user is forced to guide the slider handle along whatever curves, loops, or valleys the vector shape has.
In lingo it would look something like this:
property currentLoc
property pointList
on beginSprite me
   currentLoc = 1
   pointList = calculatePoints()
end
on mouseDown me
   repeat while the stillDown
      moveAlongBezierCurve(me, the mouseLoc)
   end repeat
end
on moveAlongBezierCurve me, testPoint
   if currentLoc = 1 then
      moveDownList = 1
   else
      moveDownList = currentLoc - 1
   end if
   if currentLoc = pointList.count then
      moveUpList = currentLoc
   else
      moveUpList = currentLoc + 1
   end if
   stayPutTest = getDistance(me, testPoint, ¬
     pointList[currentLoc])
   moveUpTest = getDistance(me, testPoint, ¬
     pointList[moveUpList])
   moveDownTest = getDistance(me, testPoint, ¬
     pointList[moveDownList])
   if (moveUpTest < moveDownTest) and ¬
     (moveUpTest < stayPutTest) then
     currentLoc = moveUpList
   else
      if (moveDownTest < moveUpTest) and ¬
        (moveDownTest < stayPutTest) then
         currentLoc = moveDownList
      end if
   end if
   sprite(me.spriteNum).loc = pointList[currentLoc]
end
on getDistance me, point1, point2
   hDiff = power((point2.locH - point1.locH), 2)
   vDiff = power((point2.locV - point1.locV), 2)
   return sqrt(hDiff + vDiff)
end
And the final movie would have this effect.
Closed or Open?
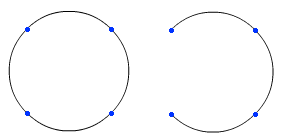
A final thing to consider is whether your vector is closed or open. Take for examples these two circles.

These circles are identical in every way. If you were to check each circle's vertexList, they would be identical to one another. The only difference is one vector is open and the other is closed. Each vector has its own 'closed' property you can set or test.
put member("myCircle").closed
-- 1
It is very important to check whether a vector is open or closed. If the vector is closed, in order to accurately animate along the vectors path, you must compute the Bezier curve going from the last point in the vertexList to the first point in the vertexList. Another example would be a simple line. If you always assumed a Bezier curve was closed, then, your simple curved line will become an ellipse or a figure eight.
When you put all of this together, you have a simple behavior that can be used for all kinds of sprite animation based on a vector's path. Happy coding!
You can download a Director movie demonstrating this technique as ZIP.
Copyright 1997-2026, Director Online. Article content copyright by respective authors.
