Using the fileXtra: Part 1
July 26, 2000
by Zac Belado
Sometimes the answers to your questions are right under your nose. This is what comes to mind when I read questions about manipulating files and directories in Director. Most people are not aware of the fact that Director ships with an Xtra, the fileXtra, that makes it much simpler to perform tasks such as getting a list of files in a directory, getting a list of drives on a machine, or copying files or directories from one location to another. This is primarily because the Director documentation doesn't make much reference to it at all. Which is a shame, because the fileXtra makes almost any task involving files or directories easier; even better, it's free.
The basics
The fileXtra is referred to as a "global" Xtra. This means that all its functions are available to Director as soon as Director loads. You don't need to create an instance of it in order to use the new functions that it adds to Director. This also means that you don't need to clean up after the Xtra by disposing of it.
The fileXtra resides in the Save as Java directory in the Xtras folder. If you are using Director 8 you have to make sure that you install the Save as Java components, as they are not part of the basic Director installation. Users of Director 6.5 and 7 will have access to the Xtra by default. (Note: The fileXtra should really be a part of the basic Director install and should be unbundled from the Save as Java components. A quick message to Macromedia might help bring this about)
The Xtra provides three separate types of functionality: drive access, file access and directory access. Let's start out by looking at the drive functions.
Drive functions
The fileXtra has four drive-related functions: driveExists(), driveFreeSpace(), driveIsCDROM() and drivesToList().
The most useful of these is drivesToList(). This function will return a list of all the available drives on the computer.
put drivesToList()
-- ["Jane", "LinuxPPC 2000"]
(Note the "LinuxPPC 2000" drive is actually a CD-ROM)
On the PC, you get a list of drive letters.
put drivesToList()
-- ["A:", "C:", "D:", "E:"]
This function will also return network drives mounted on the Mac and mapped drives under Windows.
This function has a few quirks. The first is that under Windows, drivesToList() will give you a list of all the available drives, even if they don't currently have any media in them. So, the example above shows the floppy drive ("A:") and the CD-ROM drive ("E:") even though both of those drives contain no media and, consequently, no files. On the Mac the drivesToList() function only returns mounted media; so, if I had a Zip drive attached to my Mac, it wouldn't be listed in drivesToList() unless I put a cartridge in it. Under Windows, the same Zip drive would always be listed.
Secondly, the drive names don't have a file delimiter at the end of them, but some of the fileXtra functions, like directoryToList(), require a path delimiter in the name.
Finally, the drivesToList() function also has a noticeable delay when used under Windows. This is, I believe, caused by the time it takes Windows to access and read the floppy drive. It's best to set the cursor to the watch/hourglass when using drivesToList() so that the end user doesn't think something is amiss.
Once you have a list of the drives on a system, perhaps the most useful thing to do is determine which one of the drives is the CD. Doing this is very simple if you use the fileXtra. The task requires two steps.
- get a list of all the drives using drivesToList()
- iterate through each element in that list and use the driveIsCDROM() to test each drive until you find the CD or run out of drives to test.
on findCD
-- get a list of drives
driveList = drivesToList()
theReturn = VOID
-- go through each drive
repeat with aDrive in driveList
-- test to see if it's the CD
isCD = DriveIsCDROM(aDrive) = 0
if isCD then
theReturn = aDrive
exit repeat
end if
end repeat
return theReturn
end
The code is all very straightforward with the exception of one line.
isCD = driveIsCDROM(aDrive) = 0
A peculiarity of the fileXtra is that it returns 0 if the result of a function test is true. Since 0, as a boolean value, is actually FALSE, this means you need to test all fileXtra functions, like driveIsCDROM(), to see if they are 0 instead of testing to see if they are true.
A PC drive that doesn't have media in it will return a -51 error ("Specified drive does not exist") if you try to test it using driveIsCDROM(). So, even though the fileXtra will list your CD's drive letter, it still won't actually identify it as a CD-ROM drive unless there is a CD in it. The driveFreeSpace() and driveExists() functions both return a -52 error ("Specified drive exists but is not mounted") if there is no media in a removable drive. This doesn't help you find the CD, though. You might want to write your own driveExists() function to take this into account.
on os_driveExists aDrive
if driveExists(aDrive) = 0 OR driveExists(aDrive) = -52 then
return TRUE
else
return FALSE
end if
end
Another option is to return a symbol instead of a boolean value so you can specify which drives are mounted, which are not mounted, and which just don't exist.
on os_driveExists aDrive
driveValue = driveExists(aDrive)
case (driveValue) of
0: theReturn = #mounted
-52: theReturn = #unmounted
otherwise: theReturn = #noDrive
end case
return theReturn
end
put os_driveExists("e:")
-- #unmounted
So, to find the CD name or letter you'd just need to use:
put findCD()
-- "E:"
The function will return either a drive letter or name, or VOID if there is no CD-ROM on the computer.
The final two functions, driveExists() and driveFreeSpace(), are fairly basic. The former tests to see if a drive name exists, and the latter returns the number of bytes of free space remaining on a drive.
put driveExists("foo")
-- -51
put driveExists("LinuxPPC 2000")
-- 0
put DriveFreeSpace("LinuxPPC 2000")
-- 43917312
Getting the number of bytes of free space in a drive is not necessarily very useful, but you can combine these two functions to create a small function that will return the number of kilobytes or megabytes or free space left.
on returnFreeSpace aDrive, returnType
if voidP(returnType) then returnType = #k
-- does the drive exist?
exists = driveExists(aDrive) = 0
theReturn = VOID
if exists then
totalBytes = driveFreeSpace(aDrive)
case (returnType) of
#k: theReturn = totalBytes/1024
#mb: theReturn = float(totalBytes)/ (1024 * 1024)
end case
end if
return theReturn
end
The function first checks to make sure that the drive name it received exists (again checking to make sure that the function result is equal to 0). Next, it uses driveFreeSpace() to get the total bytes remaining on the drive. Then, depending on the symbol passed to the function, it returns either the kilobytes or the megabytes left on the drive.
So, to get the megabytes left on the Linux PPC CD in my CD drive I could use:
put returnFreeSpace ("LinuxPPC 2000", #mb)
-- 41.8828
To get the kilobytes free, you would use:
put returnFreeSpace ("LinuxPPC 2000", #k)
-- 42888
File access
Aside from finding the CD-ROM drive, drive functions aren't really all that interesting or useful. Of far more importance are the file functions in the fileXtra.
The fileXtra has nine file functions but we'll just deal with two of them for now: fileExists() and getFileModDate().
The fileExists() function takes a path name and determines whether that file exists. If it does it returns a 0. If I wanted to determine whether the Word file for this article exists I would use:
put fileExists("jane:desktop folder:fileXtra.doc")
-- 0
Under Windows, you can pass the function a wildcard value in the path to determine if a certain type of file exists (like .bmp files), or to search for a portion of a name.
put fileExists("c:\Windows\System\*.sys")
-- 0
put fileExists("c:\Windows\System\win*.*")
-- 0
The fileXtra's getFileModDate() function continues the Xtra's theme of general quirkiness by returning the modification data of the requested file in an odd string format.
put GetFileModDate("jane:desktop folder:fileXtra")
-- "Sat Jul 22 19:31:51 2000
"
The string is a 25-character string that is terminated by a RETURN (as you can see from the example above). The function supplies the day name, the month, day, and time (in HH:MM:SS format), and the year. Unfortunately, all this data is in a single string, so in order to get at any individual part of it you'll need to parse it out manually. Since the Xtra was written before Director's new date format was created (quite some time before, in fact) this is somewhat excusable, but it's still a bit of a pain.
In the sample movies that accompany this article, you'll find a function called returnModDate() that will get a file's modification date using the getFileModDate() function and return all the individual parts (including a Director date object) for easier use. So it will turn this...
-- "Sat Jul 22 19:52:00 2000
"
into this:
[#date: date( 2000, 7, 22 ), #time: [#hour: 19, #minute: 52,
#second: 0], #day: "Sat"]
Now that you've got all this new Lingo under your command, what do you do with it? How about building file and drive browsers in Director? Before I do that, though, I have to jump ahead to next week's article and look at one Directory function: directoryToList().
The directoryToList() function takes a path to a directory and then returns a list of the files and folders in that directory. Folder names are differentiated from file names by having a path delimiter (either : or \) appended to the name.
put directoryToList("c:\Program Files")
-- ["Common Files\", "CHAT\", "folder.htt", "PLUS!\", "Online Services\",
"Accessories\", "Internet Explorer\", "NetMeeting\", "Outlook Express\",
"Windows Media Player\", "Uninstall Information\", "desktop.ini", "DirectX\",
"HP DeskJet 810C Series\", "Bradbury\", "InstallShield Installation Information\"]
On the Mac you would see a similar list, with the folders ending with a ":" instead of a "\". Also note that on the Mac the path passed to directoryToList() must have at least one path delimiter in it. So...
put directoryToList("jane")
returns VOID, but:
put directoryToList("jane:")
will return a list of files and folders.
With this new function, let's look at building some tools.
Drive Browser
Let's start off with a simple task. We'll build a small Director movie that will:
- List all the drives in a system
- When a drive name is double clicked, list all the files and folders in the drive
- When the option key is held down and the name is double clicked, display an alert showing the free space in MB and tell if the drive is the CD
Something that looks like this.
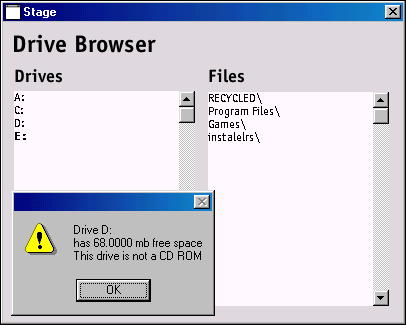
The Director 7 movie of this example is included in the downloads for this article (Mac or PC format) and is called driveBrowser.dir. Please download this example as you continue through the article, as some of the more basic elements of the behavior will not be explained.
Since the feature list is relatively small, we can fit this all into a single behavior that will be attached to the Text member that displays the drive names. The behavior needs to do two primary tasks. First, it needs to build a list of the drives on the system.
on buildDriveList me
-- build the initial list of drives on this machine
driveList = drivesToList()
repeat with aDrive in driveList
pMyField.text = pMyField.text & aDrive & RETURN
end repeat
end
Using drivesToList(), this is quite easy. The behavior simply makes a call to the function, and then adds each drive name to the text of the Text member it is attached to (the pMyField property).
Once the names are displayed, the behavior needs to wait for user input and display either the drive contents in a second Text member (called "files"), or the alert with the drive details in it. The behavior gets the line that the user clicked on by using the pointToLine() function (since it is a Text member and not a Field member we can't use mouseLine), and then gets the drive name.
-- get the drive name
thisLine = pointToLine(pMySprite, the mouseLoc)
thisDrive = pMyField.line[thisLine]
If the user has held down the option key, the behavior builds the required details using the returnFreeSpace() function you saw earlier to determine the free space in MB.
-- do the info alert
freeSpace = returnFreeSpace (thisDrive, #mb)
if voidP(freeSpace) then freeSpace = 0
-- check to see if it is a CD
isCD = driveIsCDROM(thisDrive) = 0
if isCd then
textMessage = "is"
else
textMessage = "is not"
end if
-- build the message
message = "Drive" && thisDrive & RETURN & "has" && freeSpace.string && "mb free space" & RETURN
message = message & "This drive" && textMessage && "a CD ROM"
-- display it
alert message
If the user just double-clicked, then that drive name is sent to another function, which retrieves a list of the drive's contents using directoryToList() and then adds each file or folder to the "files" Text member.
on displayDrive me, aDrive
-- set some defaults for the files Text member
member("files").text = ""
member("files").color = rgb(0,0,0)
-- since we're getting the path name from the drivesToList function
-- we know it doesn't have a path delimiter at the end so we need
-- to add one
aPath = aDrive & pOSDelimiter
-- now get the files and folders
fileContents = directoryToList(aPath)
--display an alert if there are no files
if voidP(fileContents) then
alert "No files in drive"
exit
end if
-- how many are there?
limit = fileContents.count
-- now display the files and folders
repeat with index = 1 to limit
thisEntry = fileContents[index]
-- add each entry in the list to the Text member
member("files").text = member("files").text & thisEntry & RETURN
end repeat
end
And now for something completely different
The concepts in that small browser can be expanded into something a bit more complicated. Instead of just limiting the browser to a single level of a drive, you can build a tool that drills down as far as the directory structure allows. This is similar to the file browser in the NeXT (and soon to be in OS X), or in Greg's Browser for the Mac.
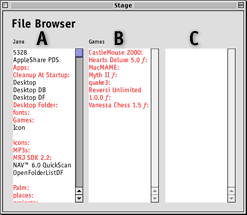
The idea is that you have three Text members, and as you double-click on folder names it displays the contents of that drive or folder in the next Text member. When you double-click on a folder name in the last Text member, it "moves" the display to the left so that each new folder continues to be displayed in the last Text member.
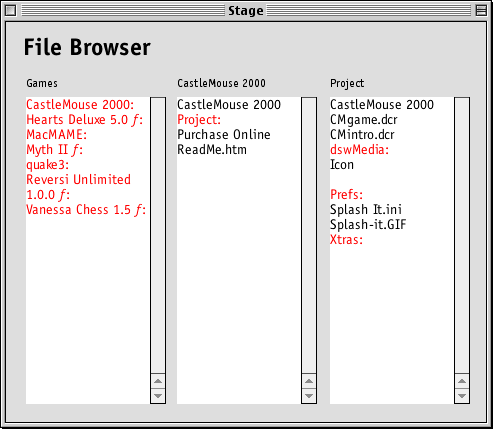
Download the sample movies (Mac or PC format) and run the movie fileBrowser.dir for yourself so you can see the process in action.
There are a few steps in this process that you need to implement. Each Text member needs to:
- Take a path provided to it and display all the files and folders in that path
- If a folder is double clicked, send a new path to its target sprite to get that sprite to display the contents of the new path
- If the behavior is attached to the last Text member, send its old path back to the sprite above it (starting a cascade back up the display hierarchy), so that the display shifts to the left as the user drills down deeper into the drive hierarchy
Most of this is handled by setting two properties in the behavior's getPropertyDescriptionList handler.
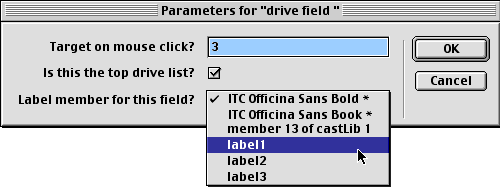
The #pTargetSprite property stores the sprite number of the next Text member in the display hierarchy. I also used a small trick, setting this value to the sprite number that the behavior is attached to if this Text member is the last element in the display hierarchy.
The #pIsTop property simply tells the behavior whether it is the topmost element of the display hierarchy. This is used to stop the cascade calls when the display shifts to the left as the user drills down into subsequent folders.
A third property, #pLabelMember, is set so that the behavior can label the folder or drive name that it is displaying.
Making it work
As you might expect, quite a lot of this code is similar to the code used in the drive browser movie. Again, many parts of the code won't be explained, so please download the sample files to get a fuller picture of the behavior.
As with the drive browser behavior, this behavior only operates if the user double-clicks on the Text member.
if the doubleClick then
thisLine = pointToLine(pMySprite, the mouseLoc)
thisFile = pMyField.line[thisLine]
newPath = pMyPath & thisFile
-- send it off to the target sprite
if pTargetSprite <> me.spriteNum then
sendSprite (pTargetSprite, #browseFolder, newPath, me.spriteNum)
else
-- we're the last sprite so we need to parse this path
sendSprite (pCallingSprite, #cascade, pMyPath)
browseFolder me, newPath
end if
end if
-- broadcast an updateMessage so that fields below the target will clear themselves out
sendAllSprites(#clearLowerFields, pTargetSprite)
end
The behavior determines the name of the element that is being clicked on. Next, it assembles a new path by combining this name with the behavior's existing path. Then, either it sends this path to its target sprite for that sprite to process; or, if this is the last element in the display hierarchy, it sends its old path to the last sprite to send it data (assuming that this is the element higher up in the display hierarchy) and then processes the new path itself.
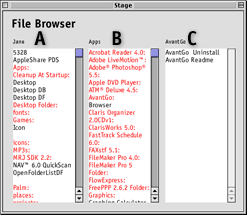
The behavior also sends a clearLowerFields message to all the sprites. This is done to ensure that all the fields only display content when it's appropriate. So, using the images below as a reference, the user has just double-clicked on a folder name in Text member B, which then displays files and folders in Text member C. If the user then double-clicks on a new folder name in Text member A (different that the one already displayed in B), the data displayed in C would no longer be in the same path, so it would need to be removed.
on clearLowerFields me, aSpriteNum
-- only clear out the Text if this sprite is below the sprite num
-- passed as a parameter
if me.spriteNum > aSpriteNum then
-- clear out the text in this member
pMyField.text = ""
pMyField.fontStyle = [#plain]
-- and the label
pLabelMember.text = ""
end if
end
The handler to display the folder contents is almost identical to the one in the drive browser movie. The only exception is that when it is finished, it calls a handler called formatText that reads through the file list again, then colours all the folder names red so they are easier to view.
The only other new handler is the method to control moving the display to the left as the user moves further and further down the directory hierarchy.
on cascade me, aNewPath
-- am I the top drive listing?
if NOT pIsTop then
-- send my path to the last sprite to send me an event
sendSprite (pCallingSprite, #cascade, pMyPath)
end if
-- parse the new path
browseFolder me, aNewPath
end
The handler simply continues to pass each old path back up the display chain until it reaches the top element in the display hierarchy (#pIsTop), at which point it stops.
There are a few other elements that have been left undescribed: labeling the text members, and testing for folders or drives that have no files. These are relatively self-explanatory. The code for the file browser also doesn't yet know how to move back up the drive hierarchy. This is left as an exercise for the reader.
Next week we'll finish up this discussion of the fileXtra by looking at file open and save dialogs, copying, renaming and deleting files, and the remaining Directory functions.
Copyright 1997-2026, Director Online. Article content copyright by respective authors.