Wreaking Havok with Physics, Part 3
August 30, 2001
by Darrel Plant
The Story So Far
In Part 1 and Part 2 of this feature, we created a 3D world in Director using Lingo. The world consists of an open-ended box and three spheres. The sides of the box and the spheres interact with each other through the use of the Havok physics engine built into Director 8.5. Last week, we connected the balls to each other using Havok's linear dashpot tools, then used a behavior to make the balls move in response to the mouse. Click here to see the final piece.
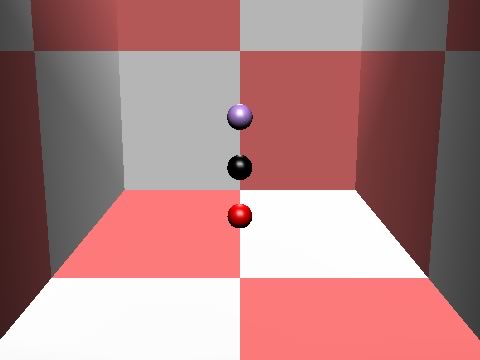
Havok, at least, thinks the balls are connected, but they don't look connected. The physics engine will operate just fine without any visual connection between the spheres. It's a nice touch to have, though.
Spare Rods
The first step to connecting the spheres is to create some rods for the connectors. For our purposes, there doesn't need to be anything exact about them, there are basically two properties they should have: they should be smaller in diameter than the balls, and their length should be about the same as the distance between the centers of a pair of balls.
If you make the rods thin enough and the distance between the balls is equal, the physical interaction between the spheres will prevent the rods from appearing to intersect one another.
Making the rod length the distance between the balls allows them to cover up the fact that Havok's linear dashpots actually have a little give to them,. especially when an object's moving fast. If the rods were the length of the gap between the edges of the spheres rather than the distance between the centers, gaps would be more apparent between the ends of the rod and the spheres it's attached to. A more professional way around that problem would be to dynamically change the length of the rod.
The sphere radius is 10 world units, and they're 40 units apart. In the Create Scene behavior's beginSprite handler, Add this code to create a cylinder model resource 6 units wide and 40 units high, and two model instances (rod1 and rod2), positioning each one between a pair of spheres.
rod = s.newModelResource ("rod", #cylinder)
s.modelResource ("rod").topRadius = 3
s.modelResource ("rod").bottomRadius = 3
s.modelResource ("rod").height = 40
m = s.newModel("rod1", rod)
m.transform.position = vector(0, 150, -70)
m.shader = s.shader ("link")
m = s.newModel("rod2", rod)
m.transform.position = vector(0, 150, -110)
m.shader = s.shader ("link")
This does a fine job of creating the cylinders and positioning their counter points, but if you run the movie at this stage, you'll see that while the rods are in the right place, they're not oriented correctly and they don't move when the balls do. In this image, they just hand in space when the balls fall to the floor.
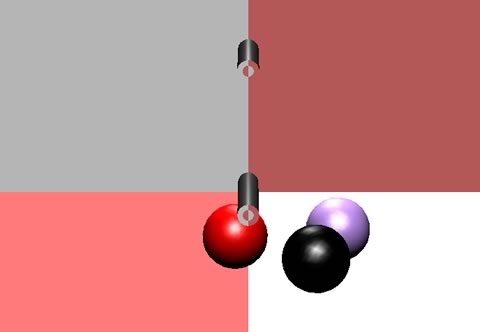
If you look closely at this enlargement, you'll see that setting the shader property of the rod models only affects the tube of the body, not the circular end caps. This doesn't concern us, the caps are going to be buried inside the balls.
Moving the Rods
To get the rods to move along with the balls, we can create a behavior that updates the position of each rod. The Move Rods behavior very simply finds the midpoint between each pair of balls and moves the rods to the new positions.
property s
on beginSprite me
s = sprite (me.spriteNum).member
hk = member ("BlankHavok")
end beginSprite
on exitFrame me
b1 = s.model ("Ball1").transform.position
b2 = s.model ("Ball2").transform.position
b3 = s.model ("Ball3").transform.position
s.model ("rod1").transform.position = b1 + (b2 - b1) / 2
s.model ("rod2").transform.position = b2 + (b3 - b2) / 2
s.model ("rod1").pointAt (b1)
s.model ("rod2").pointAt (b2)
end exitFrame
The position for each of the rods becomes that of one of the balls, plus half of the vector between the two balls of a pair.
The pointAt command orients the front of the rod model to a point in space. But this is what the movie looks like at this point when it's run:
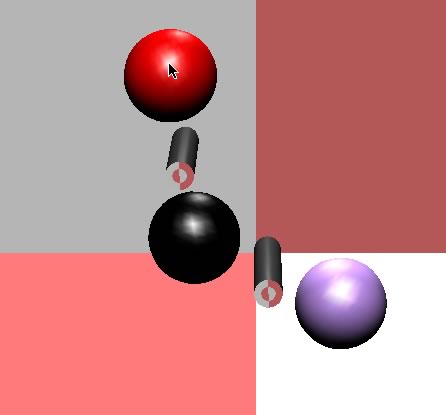
Our problem is that the cylinders are actually 40 units tall, not 40 units long. The front of the cylinder is projected through the side, not though one of the end caps. To correctly orient the rods, you need to rotate them in their own local coordinates.
Orient Express
It's back to the Create World behavior. The pointAtOrientation command rotates the object in its own coordinate system so that the front is different from that of a default cylinder. In the case of the new lines (in bold) below, the first vector defines the positive Y axis of the cylinder as the front and the second vector uses the positive Z axis as the top, effectively rotating the object 90 degrees.
Rod = s.newModelResource ("rod", #cylinder)
s.modelResource ("rod").topRadius = 3
s.modelResource ("rod").bottomRadius = 3
s.modelResource ("rod")Height = 40
m = s.newModel("rod1", rod)
m.transform.position = vector(0, 150, -70)
m.pointAtOrientation = [vector( 0.0000, 1.0000, 0.0000 ), vector( 0.0000, 0.0000, 1.0000 )]
m.shader = s.shader ("link")
m = s.newModel("rod2", rod)
m.transform.position = vector(0, 150, -110)
m.pointAtOrientation = [vector( 0.0000, 1.0000, 0.0000 ), vector( 0.0000, 0.0000, 1.0000 )]
m.shader = s.shader ("link")

Now, the rods move along with the balls, and they appear to connect them, too.
You've probably noticed by now that the rods haven't been added to the Havok world. No meshdeform, no makeMoveableRigidBody, nothing. That's because Havok is not needed for this part of the world, and the less work Havok has to do, the faster it will do it. That's not a big concern in something as simple as this movie, but why stress ourselves. Because the rods never intersect with each other or with anything else, they don't factor into our little limited physical world.
The more you look at this movie, the more little glitches you'll see. Clicking on the rods rather than the balls doesn't do anything. The Havok library behavior we're using to respond to the mouse only affects objects in the Havok world. You may also see that the balls don't actually touch each other. Try lifting the middle ball, letting the others dangle down. In the real world, they'd touch, but at least with the current settings we've used, they don't quite. But who cares? It's a heck of a lot easier than writing this stuff yourself.
That's the end of this little adventure into Havok. Hopefully, you've got some idea of how simple it can be to take advantage of this Xtra that you've already got if you're using Director 8.5. Take a look at the links in Part 1, and keep an eye out for demos other folks have posted. There's some amazing stuff out there.
You can download a Mac or Windows version of the Director 8.5 source file for the final version.
Copyright 1997-2025, Director Online. Article content copyright by respective authors.