Blur with Imaging Lingo, Part 2
September 11, 2001
by Sébastien Portebois
Last week we defined what a blur is and described how to perform it quickly with Imaging Lingo. So far, we have only used a 3x3 matrix where all coefficients were equal to 1. This time, we will go a little deeper and see what minor updates we must to do to get a Gaussian blur. Then, I will show you some fun stuff to modify your images with Imaging Lingo, extending the image manipulation techniques seen last time.
What is a Gaussian Blur?
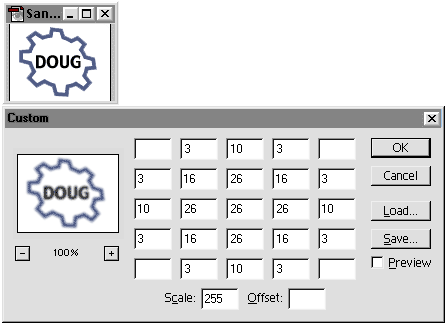
Everything is in the name. You have a blur, it is defined by the neighbors of a pixel, and you have a Gaussian rule. In our early efforts, the averaging method we used was a uniform one which ignored the distance between the center pixel and its neighbors. The Gaussian rule tells us that the highest concentration of elements will be near the middle, and will tend to 0 as the distance from the center grows. Therefore the coefficients of the central pixels will be high, and the boundary coefficients will be very low.

Setting up the matrix yourself in Photoshop to get an approximative Gaussian blur.
I've called this an approximative Gaussian blur because the coefficients have been rounded to integers, to have a total of 255. This is almost a true Gaussian blur, and its purpose is to be Imaging Lingo ready. The sum of all the coefficients is equal to 255, which is the maximum blendLevel value in the copyPixels syntax.
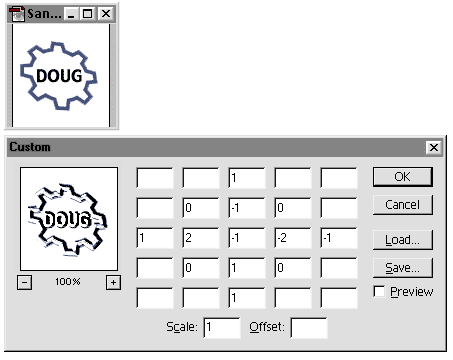
As an example of what can be done with these types of image transformations, we'll look at another matrix. This matrix is asymmetric and includes negative values. This doesn't do anything like a Gaussian blur, but shows the power of using these types of matrices.

Setting up the matrix yourself in Photoshop, here a crossover between edge detection and bevel. The important point is to have the sum of the coefficients equal to the divider.
The Imaging Lingo Version
Our starting point is the Blur handler from Part 1. The first (and easiest) thing to do is update the offset list (offsetL) to handle a 5x5 matrix. So this time we won't use N, W, SE, etc. notations, but a simple Cartesian grid with x and y coordinates.

The 5x5 matrix used for an imaging Lingo Gaussian blur.
The second point is the implementation of blendLevel applied for each copyPixels. I've just used blendLL list to store the blendLevel values. The only important point for this to work is to keep the same indexing base for both lists : if the offset of cell (3, 2) is stored in offsetL[14], then its blendLevel will be read from blendLL[14].
So this is the updated offsetL declaration, with the new blendLL initialization :
offsetL = [] -- list of offsets
blendLL = [] -- list of corresponding blendLevels
-- blend value = 0
-- the 0 are still there, but bypassed in the repeat loop.
-- this enable this handler to be easily converted to use
-- any other 5x5 matrix
-- x = 5, y = 5
offsetL.add([4,4])
blendLL.add(0)
-- x = 5, y = 1
offsetL.add([4,0])
blendLL.add(0)
-- x = 1, y = 5
offsetL.add([0,4])
blendLL.add(0)
-- x = 1, y = 1
offsetL.add([0,0])
blendLL.add(0)
-- blend value = 3
-- x = 4, y = 5
offsetL.add([3,4])
blendLL.add(3)
-- x = 4, y = 1
<SNIP>
-- x = 3, y = 3 <- center
offsetL.add([2,2])
blendLL.add(26)
repeat with j = 1 to 25 -- = offsetL.count
myBlend = blendLL[j] * 1.8
-- 1.8 = luminosity correction, from 1.5 to 5
if not myBlend then next repeat
destRect = myRect.offset(offsetL[j][1], offsetL[j][2])
buffer.copyPixels(startImg, destRect, myRect, [#blendLevel : myBlend])
end repeat
And voilá! the Gaussian blur is working (look at the end of this page for a demo, and a link to the downloadable sources)
Now we will look at the second matrix, the asymmetric one with negative values. The only problems we will face if we try to put these matrix values in our current script will be in the determination of the blendLevel; the copyPixels command's blendLevel parameter value can range from 0 to 255, and cannot be negative. So what we do is test the blendLevel stored in the blendLL, and if it's negative we use its absolute value and choose an ink for applying the copyPixels.
After this little update, the end of the chunk above becomes :
if not myBlend then next repeat
destRect = myRect.offset(offsetL[j][1], offsetL[j][2])
if (myBlend > 0) then
buffer.copyPixels(startImg, destRect, myRect, [#blendLevel : myBlend])
else
buffer.copyPixels(startImg, destRect, myRect, [#blendLevel : -myBlend, #ink : reverseInk])
end if
Here I've used reverseInk, which is an integer. This way, without changing the matrix, you can switch between several rendering styles. For the example below I use the same matrix previewed in Photoshop and shown at the top of this article.
Two implementations of the 5x5 handler : a Gaussian blur and an image manipulation behavior. ;¬)
Copyright 1997-2026, Director Online. Article content copyright by respective authors.