Rolling (and Pitching and Yawing) the Bones, Part 2
January 3, 2002
by Darrel Plant
Last week, we used the ShapeShifter3D 1.5 Xtra to create the 3D geometry for a robot arm that will be animated with Lingo commands. In this week's article, we create a bone skeleton for the arm and import it into Director.
It's possible to animate individual models by changing their positions and rotations with Lingo, but it's a lot more difficult when the models need to move in relation to each other. Bone animation can change the relationships between individual meshes making up a single model resource in Director and it can even change the shape of a mesh by modifying the coordinates of vertices within the mesh.

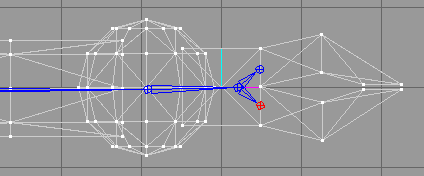
What's been created so far is the visible portion of the robot arm. It consists of three groups of vertices and faces: arm and forearm are each made up of a cylinder and a sphere; claw started out as a box, but one side has been modified by extrusion and rotation to create a couple of pincers. (The groups of objects in SS3D are not equivalent to groups in the exported Shockwave 3D file.)
What remains to be built is the unseen control structure of the arm, around which the vertices will be transformed.
Each bone in a system like Shockwave 3D has a joint. The joint is the bone's reference point and serves as an origin for transformations of the bone. If you rotate, scale, or move the bone, it's all done relative to the joint.
Moving a bone by itself is nothing, though. The bone is invisible. What makes things happen is when the bone has vertices or other bones attached to it. As the bone moves, everything attached to it moves in relation to it: rotating along with the bone, moving with the bone, etc. Since subordinate bones are also transformed, all of the points attached to them move along. This way, a single operation to a bone can move an entire substructure of a model.
That's exactly what we need to do to the robot arm model. If we give it a good skeleton, we can move a bone at the elbow and the entire forearm and claw will maintain their relationship to each other.
Put Your Head Inside the Puppet Hand
Planning a skeleton structure is an important step before you go throwing bones into a model willy-nilly. It's possible to make missteps even in a simple project like this one! First, we need to know where we want the arm to be jointed. Here's my list:
- At the beginning of the cylinder on the far end of the arm from the claw, its shoulder;
- The elbow, the sphere closest to the shoulder;
- The wrist, the sphere attached to the claw;
- Each of the pincers should move separately.
That's a minimum of 5 joints. In actuality, there will be 7, but I'll explain why later in the article.
The rest of this tutorial assumes you've built the arm from scratch using last week's instructions, you can also just look at the completed robotarm.SS3D file in the download.
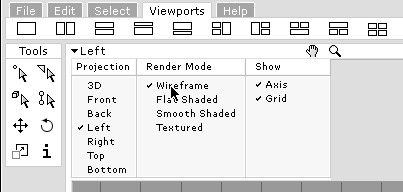
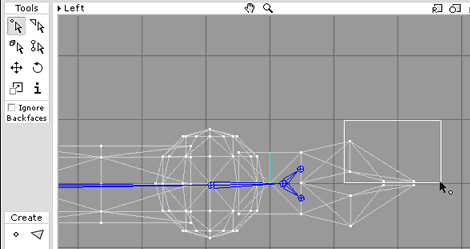
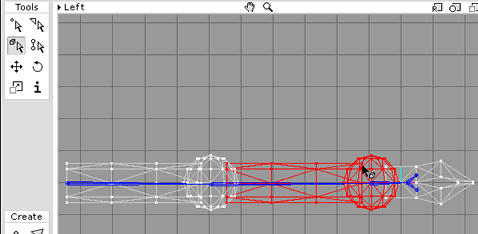
For our purposes, it will be much simpler to work in an enlarged modeling window, so switch into the Viewports menu in SS3D and choose the single-viewport configuration. Click on the arrow next to the viewport identifier to open the context menu (below) then set the Projection to Left and the Render Mode to Wireframe. Collapse the menu by clicking on the arrow next to the viewport identifier.
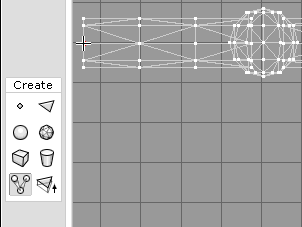
Use the viewport's Frame all objects button ![]() to center the arm within the viewport.
to center the arm within the viewport.
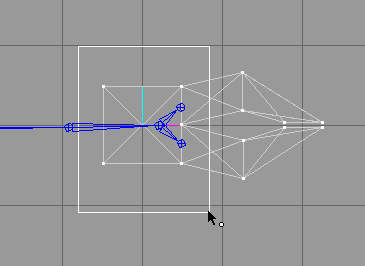
Select the Create joint mode tool from the Create palette, then click at the end of the arm group (see where the crosshair cursor is in the image below). This will be the shoulder joint for the arm.
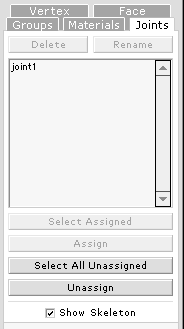
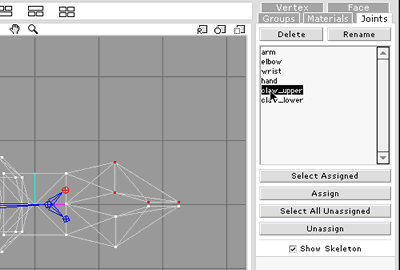
Select the Joints tab at the right of the SS3D window, and you'll see the list of bone joints. Newly-created joints are given names beginning with the word joint, and an index number. Make sure the Show Skeleton check box is selected. This option is usually automatically activated when you select the Create joint mode tool.
You won't see much in the viewport yet. A single joint is relatively small. Click a second time with the Create joint mode tool, this time in the center of the sphere closest to the shoulder joint.

Now, a bone has been created between two joints. You can see a small knot at the shoulder joint, then a thin, tapering shape representing the bone. The thicker end of the bone indicates the dominant joint of the bone: if the shoulder joint is transformed, it will affect the elbow joint we just created.
Without selecting anything else, add joints for the wrist at the center of the second sphere and partway up the claw. You can see in the Joints tab list that four bones have been created.

Since we're only looking at two dimensions, we can only affect the y and z positions of the joints. The first joint was placed with an x coordinate of 0 by default; subordinate joints will be given the same value as long as they're created in the Left viewport. If the joints were moved to a different x coordinate, new bones would pick up their values.
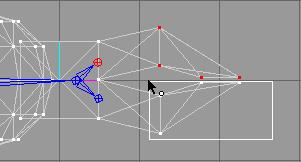
To create the joints for the pincers, use the viewport's Zoom and Pan tools to get a closer look at the claw. This shouldn't deselect the last joint you made, but just in case, select joint4 before moving on by clicking on its entry in the Joint tab list.
With the Create joint mode button selected in the Create palette, click slightly to the right of and above joint4 to make a new joint.
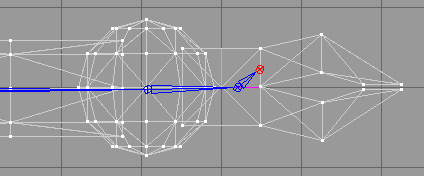
The new joint (joint5) is subordinate to joint4. Clicking again to create the lower pincer joint would make it subordinate to the currently-selected joint. Since that's the top pincer, that's not what we want. Choose joint4 again from the Joints tab list to select the joint, then make a new joint down and to the right of joint4.
Both of the joints for the pincers are linked to joint4. This is how you can have more than one bone directly subordinate to a single joint. Any transformation of joint4 will move both of the pincer joints.
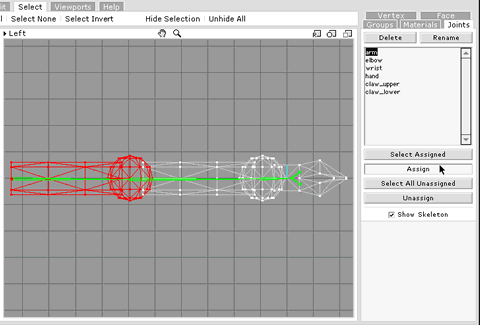
You can rename the joints just like you rename groups. Select a joint in the Joints tab list, press the Rename button, and use the dialog to change the joint name. Here are the names for the six joints we've created:

To affect the shape of the model, vertices have to be assigned to the joint that will control them. The process is simple, but can become laborious and time-consuming for complex models. First, you select some vertices, then you choose a joint to assign them to, then you use the Joint tab's Assign button. Repeat that for every bone and all your vertices.
First, let's do the upper claw. From the Tools palette, choose the Select vertex mode, then make sure the Ignore Backfaces option is deselected. This is an important step! If you leave it on, only the visible vertices will be selected, and since the structure of the arm is symmetrical, those vertices directly behind the ones you see will be ignored.
Click and drag in the viewport arount the upperportion of the claw, just enough to catch the last two ribs of the extrusion. The selected vertices will appear in red after you release the mouse button. If you get unwanted portions of the model in the selection, just redo it.
Select the claw_upper joint from the list in the Joints tab. Both the vertices you selected and the joint itself should appear in red in the viewport.
Press the Assign button in the Joints tab to give the joint control over the vertices.
Repeat the process with the lower claw vertices. The Select vertex mode tool should still be selected. Just click and drag over the bottom portion of the claw, and a new vertex selection will be made (the old selection will be discarded).
Choose the claw_lower joint, then use the Assign button for the newly-selected vertices.
Because the claw group overlaps with the forearm group, you can't just click and drag to select the portion of the claw that's not used for the pincers. To select the rest of the claw, we need to hide the forearm temporarily.
Select the Groups tab at the right of the window and click on the forearm group in the list. Press the Hide button in the Groups tab to clear the group from the viewport.
Now, you can use the Select vertex mode tool to click and drag around the remaining claw vertices.
Switch back to the Joints tab and select the wrist joint from the list. Assign the selected part of the claw to the wrist. All of the vertices of the claw group are now linked to the wrist joint or a subordinate joint.
You may notice that we didn't assign any vertices to the hand joint. A joint doesn't actually need any vertices to be assigned to it. We could have linked the claw joints directly to the wrist, but I used the hand as an intermediary just to make things look a little cleaner.
Select the SS3D window's Select menu and choose the Unhide All option to show the forearm group once again.
Switch to the Select groups mode tool in the Tools palette. In a real arm, the forearm pivots around the elbow; our robot arm should do the same. Select the forearm group (consisting of the middle cylinder and sphere).
In the Joints tab list, choose the elbow joint and assign the selected vertices with the Assign button.
The last vertices to assign belong to the arm group. Select it, then choose the arm joint and assign it.
You can check to see if any vertices are not assigned to bones (there shouldn't be any) by pressing the Joint tab's Select All Unassigned button. If you spot any, select them with the appropriate tool and assign them to the right joint. Assignment is cumulative, you add selected vertices to the currently assigned vertices of the joint.
The arm modeling and joint linkage is complete. Now it's time to switch into Director (of course, since ShapeShifter3D is an Xtra, really we're already there). In the SS3D File menu, choose Save, and save the native SS3D file. The extension ss3d is added automatically. This is the file you can open and edit with SS3D.
To export a file you can use in Director as a Shockwave 3D cast member, choose the Save as Macromedia Shockwave 3D option from the File menu. This exports a file with the w3d extension that's in the Shockwave 3D format.
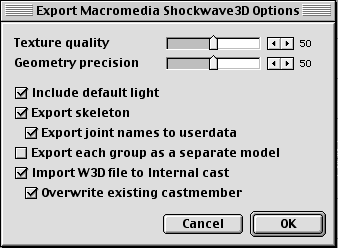
Part of the process of exporting the file includes setting the options for export. You can change how accurately the model geometry meets the original model, how compressed the exported textures are, whether to include skeleton names, and whether to import the cast member into the currently open movie (even if it's empty). Set up just like the picture above, and your robot arm will be in a movie after you export. Then you can close the SS3D window.
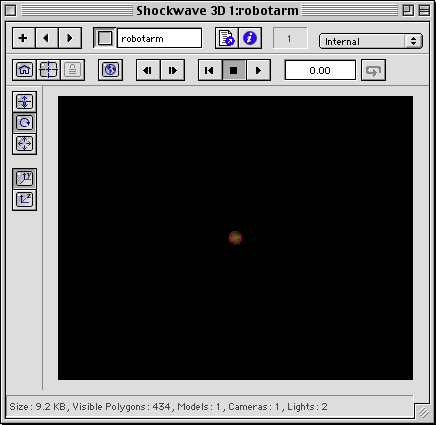
Opening up the robot arm in the Shockwave 3D window in Director, it doesn't look like much. The camera is out beyond the claw of the model, there's not much in the way of light, and it doesn't move yet.
In our final installment, we'll move the camera, add some light, and make the arm move. If you want to see the finished file, you can check it out here. You can download the completed ShapeShifter3D model and Director source file in Mac or Windows archive formats.
Copyright 1997-2026, Director Online. Article content copyright by respective authors.