Maxon Cinema 4D XL7 and Shockwave 3D, Part 2
April 2, 2002
by Darrel Plant
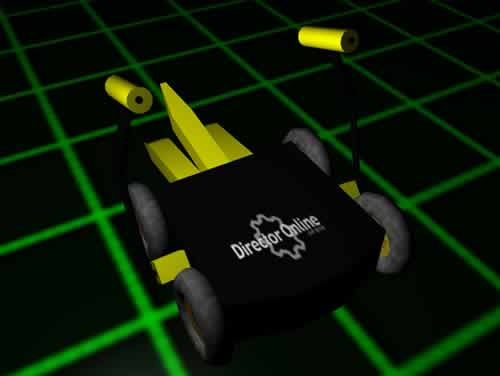
This article (finally!) wraps up our review of Cinema 4D XL from Maxon Computer GmbH. The previous installment examined C4D's pricing and system requirements, tutorials, modeling tools, and shaders. My test model was based on Donald Hutson's Diesector, from Comedy Central's Battlebots show. You can check out the animated Shockwave version of the robot by clicking on the image below.
Animation
Dem Bones -- NOT!
Cinema 4D, like most current 3D applications supports bone animation within the modeling application, but its Shockwave 3D exporter can't export those animations. (So far as I'm aware, only Newtek Lightwave, Discreet 3D Studio Max, Alias|Wavefront Maya, and Softimage XSI can export bone animations. Tabuleiro ShapeShifter 3D can export bones in static models).
Animation is the Key
C4D does support keyframe animation. Creating an animation is relatively simple, just set the current frame marker to the right frame;Use the transformation tools to modify a model and Record (F9) to make a keyframe, or create the keyframe first and double-click on the keyframe marker in the Timeline for the transformation(s) you want to enter numerically.
One important thing to be aware of is that scaling animations need to be done with C4D's Model tool selected, not the Object tool. Transformations created with the Object tool modify the model's local coordinate system, which will affect the other transformations applied to the model when it's exported. The animation will appear correct in C4D (and render correctly), but not when it gets into Shockwave 3D. Maxon recommends using the numeric entry dialogs you get by clicking on keyframe markers in the Timeline rather than the Coordinates dialog at the lower right of the C4D interface.
All in all, animation in C4D is similar to many other 3D applications (at least so far as the types of animation that can be exported to Shockwave 3D), and fairly easy for someone familiar with Director to understand.
As in other Shockwave 3D export-capable applications, only animations of models are exported, animations of cameras and lights by themselves aren't exported (including a light or camera in a group or making it a child of an animated model works just fine).
Exporting to Shockwave 3D
The export process to Shockwave 3D is painless. The Import/Export Settings menu lets you set up your options for SW3D export, among others.
The Output Quality settings control how much compression is applied to bitmap textures, and how many much accuracy is applied to the exported for the vertex and animation point data (rounding off point values means that the data can be compressed more easily, making the file smaller).
You can select which of the Shockwave 3D-compatible texture options are exported, and how lights are saved. The Debug Options let you export a file showing how much of the file is used for geometry, texture, and shaders, etc., as well as a lengthy report showing nodes, model info, light data, and other useful goodies. This is a sample of one of the entries for the Body model:
*** Entry 13: Index: 13 Name:Body
Model Resource
This IFXMeshGroup contains 2 IFXMesh(es) and 16 Update records.
Mesh statistics:
0: Faces: 2 Verts: 6 Res Changes: 2 Face Updates: 0
1: Faces: 18 Verts: 57 Res Changes: 10 Face Updates: 15
Bounding Sphere at 0.000000, 0.000000, -12.500000, radius 180.710403
Modifier Chain: MRM_Modifier
*****************
Style Palette
*****************
*** Entry 0: Index: 0 Name:default
0: ShaderID: 0
1: ShaderID: 0
*** Entry 1: Index: 1 Name:Body
0: ShaderID: 13
1: ShaderID: 14
-------------------------------------------------------
The Sample Frequency setting of the Animation Export Options determines how many times per second the transform data of a model is tested and stored in the Shockwave 3D motion for the model. If your Cinema 4D scene is set up at 30 frames per second, and has a lot of key frames, a Sample Frequency of 1 probably won't be adequate. Animation data is usually just a small percentage of the exported data; in my test movie, it was less than 1 percent of the final file size.
My tests of the Cinema 4D Shockwave 3D exporter found a glitch in the texture export. The DOUG logo on top of the body of the Cinema 4D model robot is rotated using the Texture tool. If you compare the screen shot below to the Shockwave 3D version, you can see that the texture isn't rotated.

Maxon confirmed that their exporter uses the texture transform values of the first shader applied to a model. Because the texture applied to the main portion of the body wasn't rotated, no rotation was applied to the logo texture on the top of the model. Rotating the texture on the main portion of the body would rotate the top texture as well.
Before you export, be sure to create at least one light. The default ambient light exported by C4D is black, and without adding one, you won't see anything, even if your models are visible in the modeling application. The exported default camera is defined by whatever the current view is set to in C4D. One thing to watch out for is is you export from one of the standard orthogonal views (front, top, left, etc.) the camera position is actually set to the world origin in the Shockwave 3D model, which isn't its apparent position in C4D.
Making the Bot
Modeling
To create and animate the bot, I started off with a simple cube, which I made editable to modify the mesh and extruded slightly at the back. You can see it in the object hierarchy below, named Body. The hierarchy shows which objects are children of others by name indentation and inheritance lines.
The wheel assembly consists of a cylinder for the hub and a torus for the wheel. The hub is a child of the tire, and the tire is itself a child of a null object (which becomes a Shockwave 3D group) named rear right. The other wheels are instances of the rear right wheel assembly, just positioned in the property places. All of the wheels are grouped into a null object named wheels.
The top portion of the jaws on the front is another modified cube, with an extrusion to create the pointed end. The two lower fangs are instances of the top fang, rotated and moved, then grouped together into a node named fangs lower.
The hammer axle is another simple cube, scaled and rotated. The hammer assemblies consist of a central spike and a hammer (both cylinders), and a modified cylinder for the arm that's extruded, enlarged at the ends, and bent. Cinema 4D has a great Symmetry modeling tool that worked originally to create a second arm from, but the Symmetry objects don't export correctly to Shockwave 3D, so I ended up just duplicating the geometry for one arm and rotating it into place.
All of the objects were then grouped into the robot null object, and a plane was added for the ground (C4D has a Floor Object, but it doesn't export to SW3D, so I just used a standard Plane primitive).
Texturing
Most of the coloration comes from bitmap images. I used PNG files created with Fireworks. As I mentioned in the first segment, I didn't have much luck compositing multiple textures, so each model has only one shader applied.
The one exception was the body, where I selected just the top of the mesh, then used the Set Selection option to create a separate mesh named top, to which I applied a version of the black texture for the rest of the body with the DOUG logo. The line of icons for Body shows a triangle which represents the selection of the body's top.
Texture selection is largely a drag and drop affair. There are a number of tools in C4D for fine-tuning texture placement, scaling, and tiling, as well as several modes for wrapping textures that correspond to those supported in Shockwave 3D.
Animating
I planned four separate animations for the robot. Each of the arms would swing down and back. The jaws on the front needed to open and close. And the wheels needed to turn. Since all of the animations were going to be triggered by Lingo commands, only one half of the jaw and hammer animations were needed; I could run them in reverse.
Even though I wanted the hammer animations to cycle much faster than the jaws or the tire rotation, I made each of the animations the same length in the timeline. Shockwave 3D exporters save animation data for all of the scene's frames, even if the animation ends well before the last frame, so each motion in the SW3D file is the same length. Lingo can speed up the motion; putting the last keyframe of each animation in the last frame of the scene means you can play the entire motion.
The default pivot point for a model is at the center of the object. Of course, you don't always want to pivot around the center of the model, so C4D has an Object Axis tool you can use to move the object origin, just like you'd change the registration point of a bitmap in Director. In the image below, the right arm is shown in a composite of three of the thirty frames of its animation. The white cube at the base of the arm is the object axis, moved from its original position at the center of the arm group. You can also see the traces of the local axes (red for positive x, green for y, blue for z).
Each of the tires simply spins 360 degrees, with each keyframe providing 120 degrees of rotation to ensure that they don't accidentally reverse themselves.
The two jaw objects open a full 40 degrees (moving in opposite directions). Although this places the lower jaw through the floor, the robot I was modeling can actually lift its front end with the lower jaw; even though this version doesn't allow for that, I put in the full rotation anyway.
Export
I left the export options largely untouched for this project, and used an animation sample rate of 30. All of the Output Quality sliders were left at 100%, all of the Texture Export Options were checked. This is the result of the statistics for the file (I assume that the spelling of "Ananlysis" is a result of the fact that Maxon is based in Germany):
Shockwave 3D File Ananlysis
Total File Size: 378.07 KB
Total Block: 212
File Version: 17
Categories Size(KB) Blocks Percentage
---------- -------- ------ ----------
Geometry 130.89 101 34.62
Shader 4.42 22 1.17
Texture 235.42 12 62.27
Material 1.23 23 0.32
Light 0.05 1 0.01
Animation 1.03 8 0.27
Nodes 4.69 40 1.24
Unknown 0.36 5 0.09
The export of the robot took less than 5 seconds on a Pentium III/700 laptop.
In Director
Examining the Shockwave 3D file (with the ever-useful 3DPI, which has a new site), it's interesting to see the correspondence of Cinema 4D objects and Shockwave 3D nodes.
Five groups (other than the ever-present World group are created): robot, fang bottom r, fang bottom l, and wheels. The first and last of these are non-animated groups in Cinema 4D, the lower fangs are instances of the upper fang.
There are a total of 26 model resources, including the DefaultModel plane. Nearly half of them are parts of the wheel assemblies. Although only two models are used for each assembly, it's the group (or group instance) that's actually animated in Cinema 4D. Since Shockwave 3D groups can't have modifiers applied to them for animation, the null objects in Cinema 4D are exported as models, so both a model and an empty model resource are created. Instances in Cinema 4D are exported as individual model resources; multiple instances don't all reference the same resource. Duplicated model resources get names like: hubCBAAAAAA.
As you might expect from the number of model resources, there are 25 models. Duplicated models from instances get names that match the model resources.
The duplication extends to the shaders, although since some of the models are null objects, the exporter assigns them a single c4d invisible dummy material shader. Even 23 shaders don't affect the file size much. The real heavy portion of the SW3D file -- the textures -- are exported only once.
There are 8 keyframe motions in addition to DefaultMotion. The name of the motion corresponds to the model it's applied to: The arm l model uses the arm lmotion (a space would be nice). Each of the motions in my sample is 1000 milliseconds long, corresponding to the fact that my 30fps Cinema 4D scene had 30 frames in its timeline.
The code for the bot movie is only about 250 lines of unoptimized Lingo. After some minor adjustments to the camera and light, and some parameter initialization, I started off by stopping all of the animations in the beginSprite handler of a behavior attached to the SW3D sprite:
pScene.model ("arm l").keyframePlayer.removeLast ()
pScene.model ("arm l").keyframePlayer.playRate = 3
pScene.model ("front left").keyframePlayer.playRate = 0
The first line in this sample removes the animation from the arm l model's keyframePlayer.playlist (the keyframePlayer modifier and the model's corresponding motion are automatically applied by the SW3D exporter). Because I want the arms to animate faster in playback than I created the motion, I set the playRate to 3. The animations on the fangs are also removed, but their playRate is left unmodified (at 1).
The animation is left on each of the wheels, but the playRate is set to 0.
I'm not going to explain here the mechanics of moving the robot on a flat plane, it's a simple matter of translating or rotating the top-level robot model and checking to make sure it doesn't go out of bounds, and it's no different than if you were moving something in 2D except for some syntax.
pScene.model ("front right").keyframePlayer.playRate = pVelocity / 20.0
This is sort of fun, though. In the exitFrame handler of the behavior on the SW3D sprite, I test the pVelocity property I use to determine the bot's speed, and set each of the four wheel models' keyframePlayer.playRate property to a value based on the robot's velocity. It's not perfect (the wheels don't counter-rotate when the bot is turning), but the general impression is that the wheels turn faster as the bot goes faster.
The arms are animated in a different manner (also in the exitFrame handler). The "a" key is the trigger for the left arm, and when it's pressed I check to see whether the arm is currently animating by seeing if there are any animations in the keyframePlayer.playList. If the playList for the arm is empty, I add two versions of arm lmotion. The first plays the motion the way it appears in Cinema 4D, not looping (FALSE), from time 0 to time 1000, at a scale of 1.0 (remember we already set the playRate to 3 in the beginSprite handler), and beginning at time 0. The second motion is virtually identical, except that it plays backward (the scale is -1.0) and starts at time 1000 (it still plays the range of time from 0 to 1000). Because we never stopped the arms -- merely removed their default actions from the playList -- the actions will commence immediately on the next update.
if keyPressed ("a") then
if pScene.model ("arm l").keyframePlayer.playList.count < 1 then
pScene.model ("arm l").keyframePlayer.queue ("arm lmotion", FALSE, 0, 1000, 1.0, 0)
pScene.model ("arm l").keyframePlayer.queue ("arm lmotion", FALSE, 0, 1000, -1.0, 1000)
end if
end if
The fangs are a slightly different proposition. They need to open or close, depending on their current state. I chose to store this information in the property pJaws, which is initialized to #closed in the beginSprite handler. Again, I test the playList to see if anything's happening currently, then check pJaws to see whether they're open or closed. This is the code for the opening of the jaws:
if pJaws = #closed then
pScene.model ("fangs lower").keyframePlayer.queue ("fangs lowermotion", FALSE, 0, 256, 0.768, 0)
pScene.model ("fang topLAAAAAAA").keyframePlayer.queue ("fang topLAAAAAAAmotion", FALSE, 0, 1000, 3, 0)
pJaws = #open
The animation for the upper fang is straightforward. It plays the whole animation, doesn't loop, starts at frame 0, and plays it back at a scale of 3 times its original speed (this is an option to setting the playRate). Because I don't want the lower fang assembly to poke into the floor, though, I only use a portion of the animation between times 0 and 256. To synchronize the animation time with the upper fang, I set the scale for the speed to 0.768 (the upper fang is moving through its full range of motion at a speed of 3; the lower fangs have the same range of motion but are only moving 0.256 of the same arc; 3 x 0.256 = 0.768).
The final element of the bot movie is the camera animation. The camera's made a child of the robot model in the beginSprite handler, along with the light (this could also be done in Cinema 4D before export). It's easy to make it orbit the robot on a key command (because it's a child of the robot, it already follows the robot as it moves):
if keyPressed ("z") then
pCamera.rotate (0, 3, 0, #parent)
end if
Because the camera's already pointing at the robot model's local origin, rotating it on the y axis around the camera's #parent coordinate system keeps it pointed at the robot.
Conclusion
Like most of the other contenders in the Shockwave 3D tool world, Maxon's Cinema 4D has modeling and animation features that go beyond what you're likely to need in Shockwave 3D. It's cross-platform, it's not too difficult to learn, the tutorials are excellent, and its speed is more than adequate. The interface is well-thought-out, and in almost every case (actually, every case I saw), you have the option of either visual or numeric entry for tool manipulation. It's quite capable of producing complex 3D scenes that look a lot better than the demo I've done here.
So far as Shockwave 3D goes, lack of bone animation export is its primary missing feature. It is less expensive than many of the other tools out there; and if what you want is solely modeling capabilities, the just-released Cinema 4D ART can also export Shockwave 3D, according to Maxon. At US$795 (less than half the full price of Cinema 4D XL7) it is described as essentially the same product, but without the animation Timeline (I have not tested C4D ART).
I'd like to see Maxon make a few improvements in the SW3D exporter. I'd like an option to reference a single model resource when instances are used in the original scene, in order to keep file size down -- most of the geometry data in the robot is points for the tires of the wheel assemblies. Multitexturing support would make complex shaders easier to do. And bone export is high on the list as well, although I think you can see in my example an idea of what can be done with just keyframe animation and some Lingo. And Cinema 4D.
Director 8.5 and Cinema 4D source files are available in ZIP and SIT archives.
All colorized Lingo code samples have been processed by Dave Mennenoh's brilliant HTMLingo Xtra, available from his site at http://www.crackconspiracy.com/~davem/
Copyright 1997-2026, Director Online. Article content copyright by respective authors.