Using Imaging Lingo with the Mui Dialog Xtra
August 16, 2002
by Robert Wingate
Unless you're new to Director, you've heard about Imaging Lingo. It arrived with Director 8, and is a set of Lingo commands that gives you pixel-level control over the graphics in your movie. It lets you create, draw, paint, fill, and composite images at runtime. You may have experienced this flexibility if you ever used the CastEffects, DrawXtra or Composite Xtras, but to have the functionality within our native lexicon is exciting.
Another tool to have in your bag of tricks is the Mui Dialog Xtra -- it's the dialog-making engine used by Director itself. This article assumes some prior experience programming "General Purpose" dialog boxes with Mui Xtra. If you need a refresher course on building General Purpose dialogs, here's an article that will jog your memory.
The aim of this article is to pick up where the previous one left off: at the callback handler. Specifically, it demonstrates a technique that uses Imaging Lingo within your Mui dialog's callback handler. You'll learn how to composite several graphic elements into a single one on the fly, based on the dialog's latest settings. Then, in conjunction with Mui Xtra's ItemUpdate method, you'll update the graphics in your dialog box while it's running.
An application of this technique.
Note: since Mui Xtra is not currently Shockwave-safe, and you're looking at a webpage right now, you may have surmised that this Shockwave example is a mock-up of a Mui dialog. You'd be correct. However, if you ask Macromedia to make the next version of Mui Xtra safe for Shockwave, it may actually happen. You could make the difference!
Play with the Shockwave example above. Notice that the graphic changes whenever you click a checkbox or radio button. Surely there are lots of graphics in the cast to accommodate such a variety of combinations! In fact, I figure there are 128 possible image combinations this dialog could produce. But we'll do it all with a single empty-slate graphic, plus the six individual graphic elements you see below:
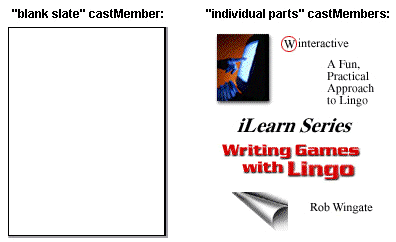
These are the seven cast members used in the application.
That's one of Imaging Lingo's strengths -- compositing images on the fly. So let's look at how this is done.
Getting the Dialog On Screen
This article won't spend much time explaining the fundamentals of building or displaying Mui dialogs -- that's the earlier article's job. But briefly, these are the steps you'll follow:
- Create an instance of the Xtra
- Configure your dialog's overall window properties
- Configure each dialog element's properties
- Display the dialog box
Your Mui Callback Handler
What is a callback handler, anyway? You can think of a callback handler as a handler that you write, but that you don't call directly from your code. You only need to tell Mui your callback handler's name (which can be anything), and Mui calls it when the time is right.
When you tell Mui Xtra to display your dialog, it begins firing events to your callback handler, which you design specifically to process user interactions that occur within the dialog. That is, whenever your user enters text, drags a slider, clicks a checkbox, or interacts in any other way with your dialog box, the Xtra tells this handler exactly what happened, and the handler determines what to do in response. Your callback handler breathes life into your dialog, and it's where we'll composite and update our graphic image.
For each user interaction the Xtra notices while your dialog is visible, it sends three pieces of data to your callback handler:
- The type of user event (a symbol)
- The widget's position within #windowItemList (an integer)
- The widget's current properties (a property list)
Your callback handler should primarily consist of case statements that distinguish between user events, examine item properties to identify the current widget, and finally, determine how to handle changes to the current widget. For an idea of how to filter user events through your callback handler, look at this example:
on MyDialogCallback (event, eventData, itemPropList)
case (event) of
#itemChanged:
-- User has changed something within the dialog;
-- use itemPropList.type to see what it was.
put itemPropList
#itemclicked:
-- User clicked a button within the dialog box;
-- use itemPropList.type to find which button.
put itemPropList
end case
end
This example does nothing more than write the current widget's properties to the Message Window, so it's not good for much. But for demonstration purposes, it does show what the itemPropList structure looks like. For the dialog in the sample movie this would be the itemPropList sent to MyDialogCallback: when you clicked the Show Title checkbox
-- [#value:1, #type:#checkBox, #attributes:[], #title:"Show Title", #tip:"tip", #locH:5, #locV:56, #width:132, #height:12, #enabled:1]
Armed with an understanding of this structure, it's easy to determine the following:
- The user just clicked a checkbox (#type property)
- It was the "Show Title" checkbox (#title property)
- The new state of the checkbox is CHECKED (#value property)
Refining the Callback Handler
Now that we know exactly what interaction just took place (the user turned the "Show Title" checkbox on), how can we enhance MyDialogCallback to respond?
global lsWidgetStates
on MyDialogCallback (event, eventData, itemPropList)
case (event) of
#itemChanged:
case (itemPropList.type) of
#checkBox:
-- User just clicked a checkbox; we use
-- itemPropList.title to see which one.
case (itemPropList.title) of
"Show Title" : lsWidgetStates.title = itemPropList.value
"Show Author": lsWidgetStates.author = itemPropList.value
-- etc.
end case
end case
end case
end
Notice we're now storing each widget's current value in a global list called lsWidgetStates. It looks like this:
lsWidgetStates = [#publisher: 0, #title: 0, #description: 0, #author: 0, #pageCurl: 0, #graphic: 0, #color: "White Background"]
Now that we're storing a list of widget states, it's a simple matter to use those values to decide how to composite our graphic.
Here's essentially what happens when you click a checkbox:
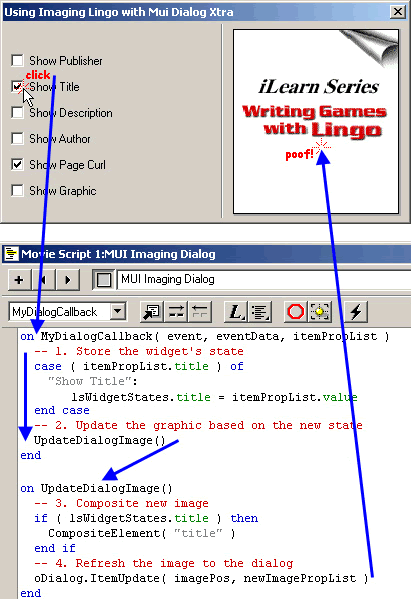
Notice the flow of execution through the callback handler.
Each time you click a checkbox or radio button, MyDialogCallback calls the UpdateDialogImage handler, which in turn uses lsWidgetStates to decide which graphic elements to composite onto the final graphic displayed in the dialog box. UpdateDialogImage does the following:
- Creates a new "blank slate" image
- Paints its background color, based on the values of lsWidgetStates
- Composites checkbox graphics, based on lsWidgetStates values
- Uses Mui's ItemUpdate to send the new image to the dialog
Enter Imaging Lingo
We need only a small fraction of Imaging Lingo's power for this application; we'll do almost everything using copyPixels. This function copies the pixels in a specified area of one image into another specified area of another image. The "area" can be a rect or a quad, and you can apply colors, inks, blends, dithering, and masks to the copied pixels. Its syntax is:
destinationImage.copyPixels (sourceImage, destinationRect, sourceRect {paramList})
Watch how UpdateDialogImage uses copyPixels to create the "blank slate" image:
on UpdateDialogImage ()
-- Take some preliminary measurements
w = member ("BlankSlate").width
h = member ("BlankSlate").height
r = member ("BlankSlate").rect
-- 1. Create an image in memory, then copy the blank
-- slate castMember's image into it:
newImage = image (w, h, 16)
newImage.copyPixels (member("BlankSlate").image, r, r)
Now UpdateDialogImage colorizes the image based on the active radio button:
-- 2. Fill newImage with a color based on radio button state:
rFillArea = r
if (lsWidgetStates.color = "White Background") then
newImage.fill (rFillArea, rgb( 255,255,255)) -- white
else
newImage.fill (rFillArea, rgb( 180,220,240 )) -- light blue
end if
Next, we add the individual checkbox graphics, if their boxes are checked:
-- 3. Add each of the six elements (or not), based on
-- that checkbox's current state:
if lsWidgetStates.publisher then -- Publisher
CompositeElement( newImage, member ("publisher"), 9, 6 )
end if
if lsWidgetStates.title then -- Title
CompositeElement( newImage, member ("bookTitle"), 9, 50 )
end if
-- etc.
By the way, the CompositeElement handler calculates the destRect into which to paint the individual element's pixels, and then dumps those pixels in:
on CompositeElement (imgPtr, mElement, nLft, nTop)
sourceImage = mElement.image
destRect = rect (nLft, nTop, nLeft+mElement.width, nTop+mElement.height)
imgPtr.copyPixels (sourceImage, destRect,sourceImage.rect, [#ink:1])
end
Also note that as it does with most other objects, Lingo refers to image object variables as pointers. This means that passing an image object to a function as a parameter allows the called function to operate on the object itself, instead of on a copy of the object. UpdateDialogImage passes the image object pointer it created to CompositeElement, which then does its work on the original object.
Finally, once we've finished compositing the new image, we need to save it back into the bitmap cast member our dialog uses:
-- 4. Now update the bitmap castMember:
member ("dialogGraphic").image = newImage
So far, we've seen how MyDialogCallback recognizes a mouse click on a checkbox and saves its new state. We've seen how UpdateDialogImage creates a new graphic and calls CompositeElement for each widget whose state is TRUE. The only remaining step is to send the new graphic to the dialog box.
Updating The Dialog Box Graphic
Mui Dialog Xtra's ItemUpdate command updates widgets in response to user interaction. It's analogous to Lingo's updateStage command, only it works within a Mui dialog box, committing the changes you've made to one of its widgets. And luckily for us, the Xtra considers the graphic a widget, which means we can update it while the dialog is running.
Before UpdateDialogImage returns, it calls the ItemUpdate command. Its syntax looks like this:
dialogObject.ItemUpdate (intItemNumber, itemInputPropList)
ItemUpdate wants to know which element number needs updating, as well as the property list that describes the new element. In this dialog box, the graphic happens to be the 18th element in the linear list that defines the dialog. For itemInputPropList, we duplicate that element, assign its name, and pass it to ItemUpdate:
-- 5. Finally, refresh the image to the dialog
lsNewGraphicWidget = lsDialog[18].duplicate()
lsNewGraphicWidget.value = member ("dialogGraphic")
-- Update the new image to the dialog
oDialog.ItemUpdate (18, lsNewGraphicWidget)
So What?
What's a practical application of this technique, you ask? Most application Wizards and many Print Options dialog boxes contain graphics that update based on the dialog's current settings. You can use MUI Xtra to make button-enabled splash or help screens for your application, and with this technique, you can animate them, too. Personally, I've used the technique in all these situations for commercial products.
I wrote this article concurrently with my previous one, and finally got around to submitting it to DOUG exactly two years later.
A Director 8.5 source file is available in SIT or ZIP archive format.
All colorized Lingo code samples have been processed by Dave Mennenoh's brilliant HTMLingo Xtra, available from his site at http://www.crackconspiracy.com/~davem/
Copyright 1997-2026, Director Online. Article content copyright by respective authors.