Rolling (and Pitching and Yawing) the Bones, Part 3
January 10, 2002
by Darrel Plant
In Part 1 of this series, we used the ShapeShifter3D 1.5 Xtra to create the 3D geometry for a robot arm. Last week, we added bones to the model, exported a Shockwave 3D (W3D) file, and imported it into a Director movie. Finally, we're ready to animate it.
Animation in Shockwave 3D can come from motions, resources stored in the W3D file itself, or from Lingo animation of nodes (including models, lights, cameras, and groups) or bones. Motion resources are created in a 3D modeling program and exported with the Shockwave 3D file. New motions can be created at run-time by combining existing motions or importing motions from another Shockwave 3D file, but they can't be created from scratch entirely from Lingo.
Motions, though, are not interactive. You can start and stop them, slow them down and speed them up, even blend them so that multiple pre-defined motions are playing simultaneously, but they can only provide the type of transformations that you define in the modeling program. We want our robot arm to be under the control of the user, and while it could potentially use motions for the movements we'll want it to do (playing a portion of a motion to move incrementally, for instance), it's easier in this case to just modify the transform property of the model's bones directly.
The structure of the bones in the robot arm model is simple. Each of the small knots in the image below represents a joint -- the origin of transformation for a bone and its associated vertices. The connections between the joints in the picture indicate which joints are subordinate to others (the subordinate joints are transformed along with the vertices). The parent joint for the arm is at the left, as you move to the right (toward the claw), the joints becomes increasing nested. All of the bones in this model share the same z coordinate, and are aligned along the center of the cylinders.making up the arm.

There are a few important items to set up in order to get the robot arm working in Director. First, make the imported Shockwave 3D cast member a sprite by dragging onto the Stage, then create a simple loop script. The behavior attached to the 3D sprite uses an initialization routine to get things going.
property pWorld, pArm, pClawAngle, pClawSpeed
on beginSprite me
pWorld = sprite (me.spriteNum).member
me.mInitialize ()
end
on mInitialize me
pWorld.resetWorld ()
pWorld.camera[1].transform.position = vector (-225, 0, -75)
pWorld.camera[1].transform.rotation = vector (0, -90, 0)
pWorld.light[1].transform.rotation = vector (-20, -75, 0)
pArm = pWorld.model[1]
pArm.addModifier (#bonesplayer)
pArm.bonesplayer.play ("defaultmotion",1)
pClawAngle = 0
pClawSpeed = 0
end
The mInitialize handler uses resetWorld to force the 3D sprite back to its saved state, then modifies the position and rotation of the default camera so that you're looking at the side of the arm instead of the end.
Even though we're not using any motions for our animation (ShapeShifter3D can't create animations), the bonesPlayer modifier must be added to the model in order to access the bones through Lingo, and the defaultmotion (an empty motion created for every Shockwave 3D world) is played by the bonesPlayer to initialize it. Without these two steps, you can't access the bones or get them to do anything.
If you look at the Model Resource tab of 3DPI or type
put member ("robotarm").model("claw").bone.count
into the Message window, you'll see that although we defined only six joints (arm, elbow, wrist, hand, claw_upper, and claw_lower), that there are seven bones. in the claw.
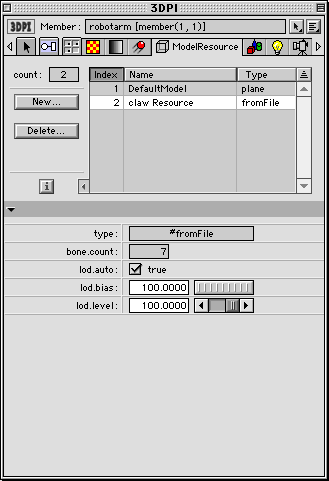
You can probably figure out how the bones are numbered, but SS3D makes it easy for you if you remember to use the Export joint names to userdata option when making the W3D file.
If you did, then the names of the bone are accessible to you through Lingo:
put member ("robotarm").model("claw").userdata
-- [#ss3D_bone_count: "7", #ss3D_bone_1: "ss3D_rootbone", #ss3D_bone_2: "arm", #ss3D_bone_3: "elbow", #ss3D_bone_4: "wrist", #ss3D_bone_5: "hand", #ss3D_bone_6: "claw_upper", #ss3D_bone_7: "claw_lower"]
This may not seem very cool, unless you already know that you can't get the name of a bone through Lingo. If you already know the name of the bone, you can use the getBoneID function on the model resource to find the index number of the bone:
put member ("robotarm").model("claw").resource.getBoneID ("wrist")
-- 4
There's no way to go the other direction, getting the bone name through the index number, though.
From the model's userdata property, you can see that the first bone is named ss3d_rootbone. This is a default bone that's exported from all of the exporters (although each exporter uses a different name). We only need to concern ourselves with bones 2 (arm) through 7 (claw_lower).
If I was to get fancy, I'd write a lookup routine that associated names with numbers for each bone by reading through the userdata property, but for simplicity's sake, we're just going to use the bone numbers here.
The first animation we'll do is to open and close the claw. Two buttons are used in the sample movie; pressing on each starts the open/close operation, which continues automatically until either a limit is reached or a different command is issued. pClawSpeed is a flag parameter that will be checked every frame to determine whether the claw is not doing anything (0), opening (1), or closing (-1). The Open Claw behavior sends a message to the Shockwave 3D sprite telling the claw to open:
on mouseUp me
sendallsprites (#mClawOpen, 1)
end
The mClawOpen handler just sets the pClawSpeed property.
on mClawOpen me, vSpeed
pClawSpeed = vSpeed
end
In the 3D sprite's behavior, the exitFrame handler checks the value of pClawSpeed to see whether the claw should be doing anything.
on exitFrame me
if pClawSpeed <> 0 then
pClawAngle = pClawAngle + pClawSpeed
if (abs (pClawAngle > 45)) or (pClawAngle < 0.5) then pClawSpeed = 0
t1 = pArm.bonesplayer.bone[7].transform
t = t1.duplicate ()
t.prerotate (vector (0, 0, pClawSpeed))
pArm.bonesplayer.bone[7].transform = t
t1 = pArm.bonesplayer.bone[6].transform
t = t1.duplicate ()
t.prerotate (vector (0, 0, -pClawSpeed))
pArm.bonesplayer.bone[6].transform = t
end if
end
The pClawAngle property is used to track the relative rotation of the claw joints. The initial values of the bone rotation may not be 0 (in the sample file, the z axis rotation of the claw_upper bone is -77.7945). Rather than work from the initial rotation value and accounting for the fact that rotation wraps from -180.0 to 180.0, we can use an exernal value to track how far off the original we've moved. If pClawSpeed is anything other than 0, pClawAngle is modified and tested to see whether it's within the range I've established. The claw will open around 45 degrees from it's closed state. The 0.5 value is used for closing, because otherwise you sometimes get some ugly overlapping of geometry.
You need to go through a couple of steps to modify a bone's rotation. While you can set its transform property, there's no access the transform's rotation, scale, or position properties. In fact, you can't even duplicate the bone's transform (although you can for models and other nodes). The variable t1 becomes a pointer to the bone's transform property, and allows it to be duplicated into the variable t. Whay duplicate it? Because you can't use the transformation functions (preRotate, in this case) on the bone's transform property or on a pointer to the transform. The preRotate function rotates the duplicated transform on the z axis by the value of pClawSpeed. Then the modified value of t is put back into the bone's transform.
This process is executed for both bone 6 and bone 7, with the only diffference being that bone 7 is rotated in the opposite direction from 6, just as you'd expect.
Now that we've written specific bone transformations, let's look at a more generic bone rotation handler.
on mBoneTransform me, vBone, vVector
t1 = pArm.bonesplayer.bone[vBone].transform
t = t1.duplicate ()
t.prerotate (vVector)
pArm.bonesplayer.bone[vBone].transform = t
end
This hander has the same form as the transfomation portion of the exitFrame handler, except that it could modify any bone on any axis.
The other buttons in the sample movie work as long as they're pressed. They share a single behavior that controls which bone they affect and which axes are rotated.
property pActive, pBone, pXangle, pYangle, pZangle
on beginSprite me
pActive = FALSE
end
on mouseDown me
pActive = TRUE
end
on exitFrame me
if pActive then
if not the mouseDown then
pActive = FALSE
else
sendAllSprites (#mBoneTransform, pBone, vector (pXangle, pYAngle, pZangle))
end if
end if
end
on getPropertyDescriptionList
vList = [:]
vList.setaProp (#pBone, [#comment: "Bone", #format: #integer, \
#default: 2, #range: [2, 3, 4, 5, 6, 7]])
vList.setaProp (#pXangle, [#comment: "X Rotation", #format: #float, \
#default: 0.0, #range: [#min: -1.0, #max: 1.0]])
vList.setaProp (#pYangle, [#comment: "Y Rotation", #format: #float, \
#default: 0.0, #range: [#min: -1.0, #max: 1.0]])
vList.setaProp (#pZangle, [#comment: "Z Rotation", #format: #float, \
#default: 0.0, #range: [#min: -1.0, #max: 1.0]])
return vList
end
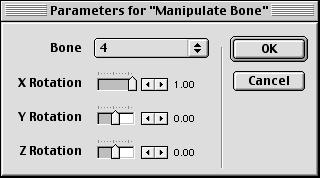
The parameter dialog for the rotate wrist button shows bone 4 (wrist) is rotated by 1 degree. Each exitFrame while the button is pressed, the behavior will send an mBoneTransform message with the bone and a vector as the parameters. The rest of the buttons are simply variations of values for the bones and rotations.
How do you know which axis is which? Well rotation of the x axis will always "spin" the bone along its long axis, but with terminal bone/joints like the claws, you don't always know which way that's pointing. The y and z axes, in the case of this example, are aligned with the visual axes relative to the camera, but in other projects you may need to do some experimentation to know which rotation (or combination of rotations) will get the bone into the right angle.
One truly neat thing about bone animation is that there's only one model in the sample file. It contains three meshes (corresponding to the groups created in ShapeShifter). Animating the claw actually modifies one of the meshes, without resorting to the meshDeform functions of Shockwave 3D.
Most of the buttons will eventually spin the arm into a position where it intersects with another portion of the arm, there's no attempt here to determine collisions in the sample, but using the same technique for the other joints that we used for the claw, it would be a cinch to limit the rotations.
Only the position and rotation of a bone transform can be modified, don't bother with the scale!
Get really adventurous, and you could even pick things up! Torstein Soerlid wrote to us after last week's article and sent along a picture with his suggestion (shades of "Joe RobotArm"!)

I hope you've enjoyed our little introduction to 3D modeling and bone animation in Director 8.5. Thanks to Mauricio Piacentini of Tabulerio who answered questions about SS3D from the side of his pool. Happy New Year, Director developers!
You can download the completed ShapeShifter3D model and Director source file in Mac or Windows archive formats.
Copyright 1997-2026, Director Online. Article content copyright by respective authors.